Blog: The Million Dollar Case Study: Europe â Session #12: Advanced Amazon Product Photography
The Million Dollar Case Study: Europe â Session #12: Advanced Amazon Product Photography
As a photographer I was super excited about this weeks session. The goal? Talk about Amazon product photography, the requirements, and all of the possible routes to creating the best set of images for your product.
Whether you want to do some of your own photography, hire a pro, or both, Greg and I shared our top advice in this session.
Before I get into it, I bet you are wondering if there are any new updates with the progress of my product being produced and shipped to the UK? Lots has happened in the past two weeks, which is why I am planning to give an update in full in the next session (#13). So make sure you tune in for that session too!
Here's the video replay:
Here's the slides:
What We Will Cover
Here's what was covered in this session:
- Product photography considerations
- Amazon photography requirements
- How to take your own DIY product images
- Affordable equipment
- How to hire a professional
- Testing your images
I have a few hints and tips of my own as a photographer of 7 years. In the past, I've done a mixture of portrait, wedding, travel and product photography. The best part is, I am completely self-taught. So if you have some experience, or an interest in photography, then keep reading.
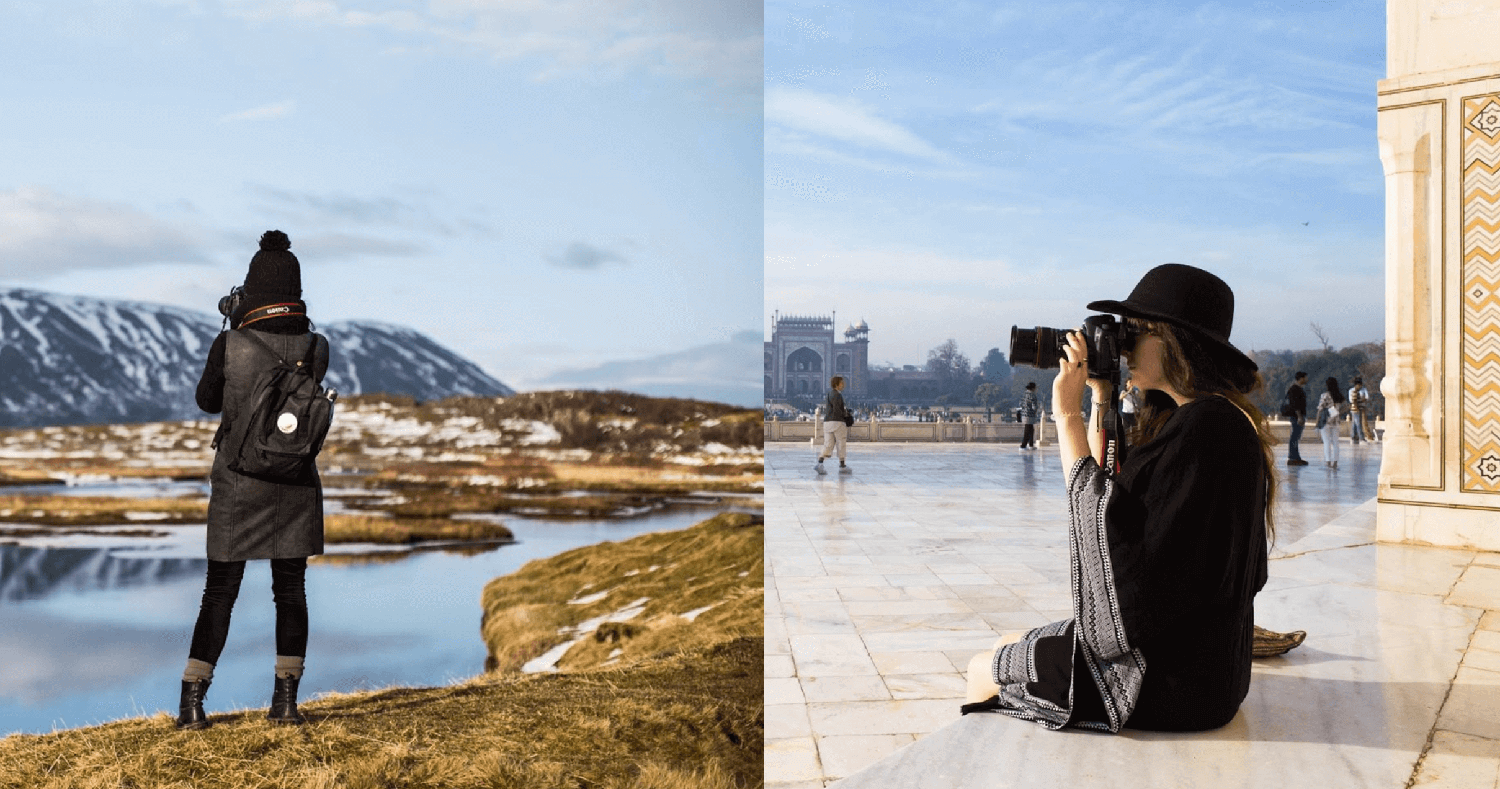
Me doing what I enjoy doing the most – other than Jungle Scouting and selling on Amazon of course 😉
If you are sat there thinking, “doing my own photography is my idea of hell” – that's fine too. Self-awareness points to you. We will also cover how to find and successfully hire a professional to do the job for you.
Types Of Product Photography
Those new to ecommerce often consider a product photograph a simple photo of the product on a white background. Whilst this is true, there are lots of other types of photography that you can utilize to get your product seen, and convert more purchases.
Here's some examples of different types of product photography, just from looking at our Jungle Stix and Jungle Snugs listings:
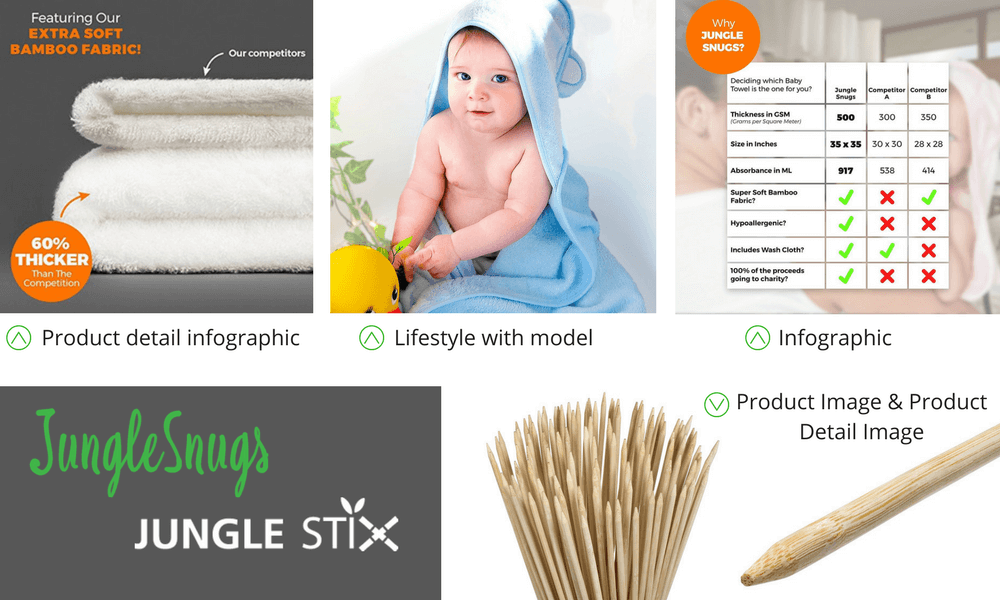
Product image on a white background – this is a requirement for any product on Amazon, as we will cover later. It's actually possible to take this type of photograph with a decent smartphone, again, more on this to come.
Lifestyle images – These sorts of images show the product in use, usually with a model or a hand model to add a human touch. Depending on your product, the type of lifestyle images you might require can vastly differ.
Infographics – These images require some design work, and often show extra information about the product using text and design elements. For example, you could convey a feature, guarantee, add a logo, or show the size of a product with measurements and arrows. The possibilities are endless!
Amazon Product Photography Requirements
OK let's get the boring stuff out of the way first. Here's what you will need, and of course I would advise that you pay the most attention to the ‘recommended' section:
Bare Minimum
- A main image on a white background
- Show the full product with no distractions
- Image at least 1000 px wide
- Square crop
Recommended
- At least 9 good images to use up your full allowance
- One main image on a white background showing the full product with no distractions
- Images are 2000px wide or more
- A range of ‘other’ images including lifestyle, models and infographics
The Technical Stuff
- Size matters, ensure images are 2000px wide, preferably more
- Stick to RGB Color mode
- JPG or TIF (no photoshop or illustrator files)
According to Amazon, your naming conventions should be: Product identifier (ASIN, ISBN, EAN, JAN or UPC), followed by an optional 4 char variant code and file extension. Example: B000123456.PT01.jpg.
Here's the photography help page for Amazon UK, which is where I will be launching my first product for this case study.
Greg's advice is that it's not necessary to follow this. There is also no concrete evidence that packing keywords into your product image title helps towards SEO. Best advice, name your products with something that means something to you, include the ASIN too if you like, but adding a small description will really help you when you are managing your images and uploads.
Getting Started
We covered this briefly in Session #8, but there are a few considerations when it comes to deciding how to approach your product photography. As you will have gathered by now, you can do it yourself or pay a professional. Here are some of the pros and cons of each:
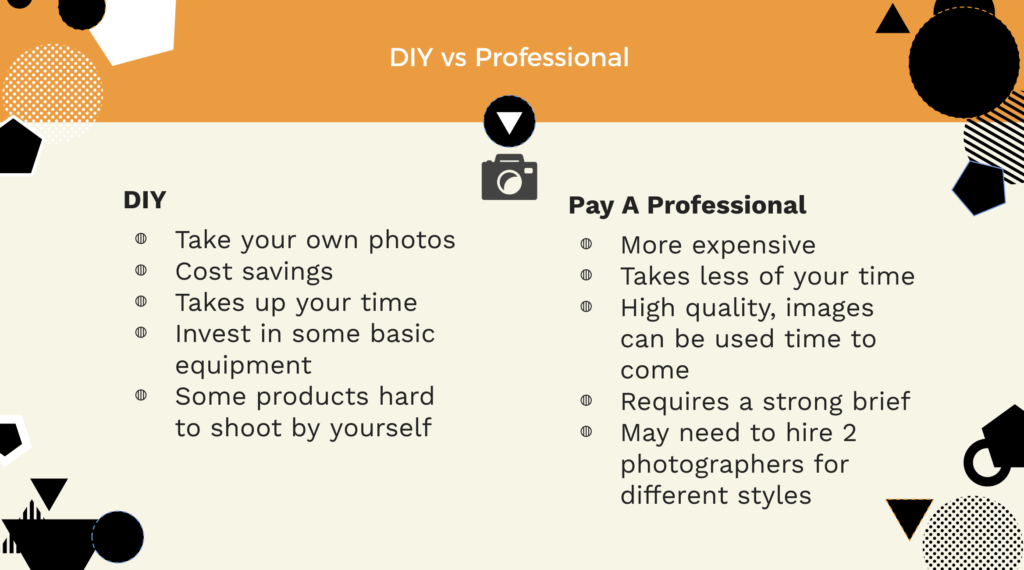
There are a few caveats of course. DIY photography becomes harder when you have difficult products to work with, such as large products, products with shiny surfaces, or white products (hard to shoot on a white background without proper lighting).
Another consideration is that product photography and lifestyle photography are completely different beasts. You may feel more comfortable with one or the other, and that's okay!
Obviously a big benefit of the DIY route is cost savings, especially for a new seller. DIY images may be fine for starting out, but it is always advisable to pay a professional to take a round of high-quality product images that you can rely on.
DIY Product Photography
Taking images of reasonably size products on a white background can actually be achieved using a few household items, and a smartphone. I covered this topic with a specific how-to guide here. Make sure to check that out if you are thinking about doing your own product images.
Read the in-depth guide on how to take product photos with your smartphone
The great thing about this method is that you don't need to rely on someone else to get the work done. So even after a product is launched, if you tweak the product and need to update the images, or you want to test your main image using a service like Splitly, you can get quick results by doing the photos in your own home.
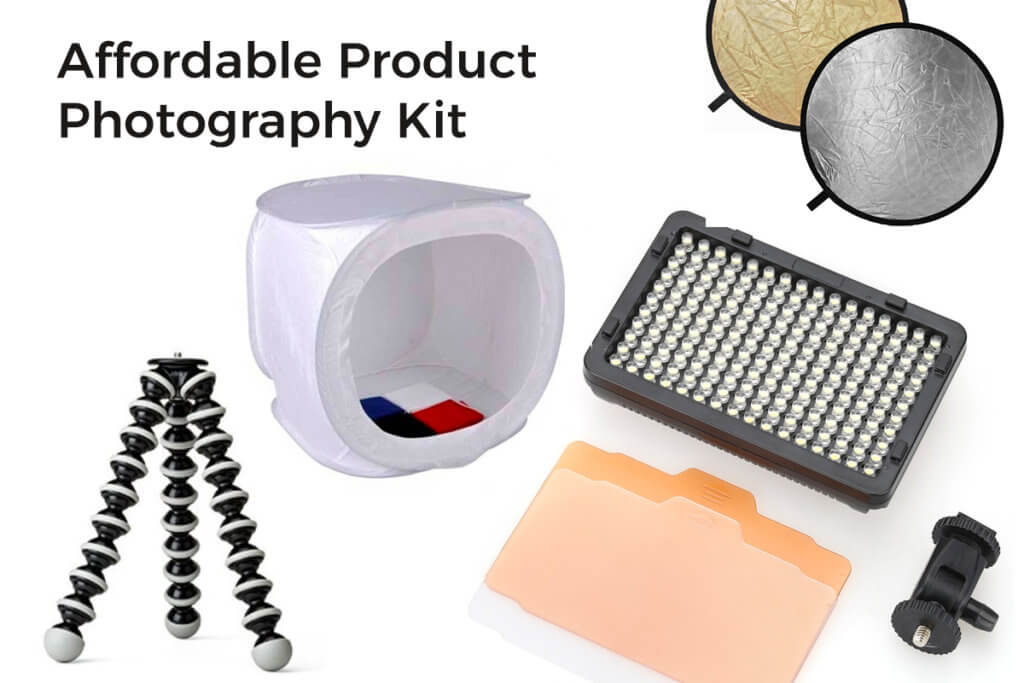
Get Some Basic Photography Gear
What will really help you out if you plan on going down this road is to invest in some affordable items that you can find on Amazon. Here are some key items to look for:
- White lightbox – Really easy way to create a seamless white background and easy to illuminate with lighting on the outside.
- LED light panel – Affordable extra light source that usually allows you to alter the brightness and temperature of the light, much better than using a desk lamp for minimal cost.
- Tripods – You can get tripods to fit your phone if you don't trust that you have a steady hand, as well as for external lighting.
- Reflectors – These are great for adding to the light and bouncing light around a room, also very useful when working outdoors with natural light.
- Backdrops – You can also buy white backdrops which are a little more expensive, but useful for larger products.
Composition, Angles, Frames, Lines
Light is the most important factor in any photograph. Without light, you have no exposure. After that, there's a bunch of other things you can keep in the back of your mind as you are shooting your products:
- Play around with a few angles to show the product in the most dynamic way possible.
- Be wary of unwanted shadows and dark lines.
- The more white space you have around the product, the more room you have to edit.
- Lines are super important in photography. You want to position and frame your photo so that any vertical or horizontal lines created by the product are not at strange angles, causing disruption.
- Centre the product in the frame for a tight square crop – Remember, Amazon images are square, and your main image should fill 85% of that square. It might help to shoot the image as a square to begin with, rather than cropping it later.
Doing Your Own Lifestyle Photography
As I mentioned previously, lifestyle photography is much broader as it depends on your product, whether you need models or not, whether you want a studio lit setting or an outdoor setting, and what props you require. This becomes very apparent when you start to scope out the cost for lifestyle photography.
If you need models, lots of props or a photographer to travel to a specific location, the price can soon start to add up.
It requires more artistic direction too, setting up your scene is an art that professionals have perfected over the years. But that is not to say you can't source your own models and locations, and try this out with your smartphone or a camera.
Here are a few tips:
- Lighting is everything, try and shoot on a nice day with some quality natural light.
- Spend time setting up the scene and making it look desirable.
- Think about your target audience, who are they? How would they use this product?
- Don’t be afraid to try different compositions and angles, you can pick your favorites later.
- Try using shallow depth of field, using portrait mode on your phone or a decent portrait lens.
- If you are using a DSLR or mirrorless camera, a good staple lens to use is a 50mm.
The guidelines are quite rough, as this is a much more difficult subject to convey in a webinar. If you are interested in learning more about doing your own lifestyle images, let me know in the comments below!
Image Editing
Editing is often the scariest part to most people. Of course, if you know how to use Adobe Photoshop or Lightroom, then that's great. But you can get similar results by using mobile apps like VSCO, or photo editing built into your phone. You can also use a basic online editor such as Fotor. Again, you can check out my post on DIY product photography which covers basic editing using an iPhone.
Final Tips
If you do decide to do some of your own photography, expect it to take up some of your time, and potentially some investment for some simple equipment. Try to be open-minded about the outcomes and don't be afraid to experiment with lots of different things when you are shooting – this gives you more to work with when editing.
It is also advisable to budget for some investment in professional images at some point during your product's lifecycle. Whether that is right away, or once the sales have started coming in.
Check Your Competition
A really useful exercise at most steps of the Amazon seller journey is to see what the competition are up to. In this case, we want to see what our competitor's photography is like, and more importantly, how ours can be better!
When I checked my UK competitors for the sleeping bags, I noticed that they all had pretty solid product photography on white backgrounds, and some had infographic style images. But that was it.

Whilst this was a good sign, I had no examples in sight of what better photography for a sleeping bag might look like. When this happens, make sure you hunt it out in other places, such as other Amazon marketplaces, or other e-commerce stores and by looking to the big brands in your niche.
This should dig out some other ideas of how you can position your product to stand out from the crowd on Amazon in your marketplace.
After a quick search I found these images from a seller on Amazon.com:
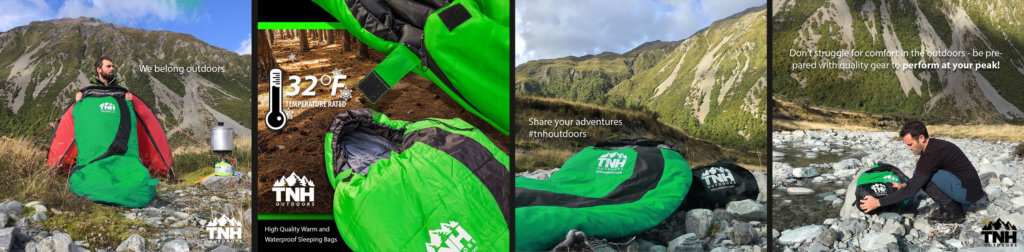
These are obviously high quality, in an inspiring location, and even have some motivational captions.
I need to find ways to really make my product stand out as the must-have sleeping bag through aspirational photography that really draws on the features which I have negotiated with my supplier.
Hiring A Professional
The burning question: what can I expect to pay? Here is a very crude guide:
Product Images (on a plain background):
- From £15 / $20 per image upwards
- You usually pay more per photo if only placing a small order
- Some specialist companies will offer package deals with a set number of images for a set price
Lifestyle Images:
How long is a piece of string?
Depending on your product, request, and whether or not you need models and a location, you can pay anything from a few hundred pounds/dollars to a thousand or more.
Greg's advice here is that, because the costs can really start to rack up, lifestyle photography might actually be the one thing that you can try out yourself to start with. Especially if you're budget conscious or just getting started, this might be one option to keep those up-front costs at bay.
Where To Find Photographers
You can hire freelancers on websites such as Upwork, Fiverr and People Per Hour. This can often be a cost-effective way to outsource your photography work, as you may find students, or people who can cut their costs by using friends and family as models. Make sure you see a sample of their work before you choose them, and always brief in detail.
You can also find dedicated product photographers who specialize in just that. Some will do studio lit photography and others will do lifestyle. Be wary that if you choose a photographer that only does one style, then you may have to find a second photographer to do the other.
Here are some UK based photographers that were recommended by our Facebook Community. We haven't personally used any of these yet so please do your own due diligence.
I'll let you know who I end up using for my photos and of course, we'll share our experience and how they turn out.
Sending A Photography Brief
When outsourcing to a photographer, doing your research and sending a strong brief is the most important thing you can do, in order to get the most out of your investment.
You should:
- Give as much information as possible
- Give a full and detailed explanation for EACH individual image you require
Especially since many will charge you per photo, you really want to make sure they shoot it correctly. If you miss out any details, and then the results are unsatisfactory, the photographer would likely expect you to pay extra to do the whole shoot again.
What To Include
As a rule of thumb, you should submit the following as a broad brief:
- Product Name and Description – Give them a good idea of what the product is all about
- Contact Details
- Brief Overview – Just a few sentences will do at this point, go into detail later
- Number of Photographs Required – This is especially important if you are looking for a quote
- Type of Photographs Required – Do you require studio photos on white backgrounds? Lifestyle images? Both?
- Models Required?
- Size of Product – Particularly if it is large, let them know
- Technical Requirements – Full high-resolution images, RGB color mode, JPG and/or TIF files
- Cropping (i.e. square cropped ready for Amazon, or would you like them un-cropped and do this yourself?)
- File Names – If you are ordering a lot of photos, it's useful to specify how you would like them to be named, saves you a job and the photographer can quickly export them with the correct naming conventions
- Product Delivery – Let them know how and when you can deliver samples
- Deadline – Very important for you, especially when finding out which photographer will be the best fit if you are on a tight schedule
Then you should go into detail for each image with the following types of information:
- Type of image – Really explain what each photo needs to look like. Well lit on a white background? Studio lit on a different color background? Outdoors on location? Indoors on location?
- Positioning / Angle – Explain how you would like the product to appear in the image. What angle? Close ups? On it's side? If it helps, provide a rough sketch
- Product Details – Do you need any product details to be included or on show? Think about logos, packaging, specific features
The less information you give, the more the photographer will fill in the gaps, and use their own creative decision making.
Of course if you select a good photographer, they may have some ideas of their own, or even make suggestions based on your brief. This is a good sign and shows they are invested in taking your ideas on board and working with you towards the best outcome possible. So if you are unsure about how to provide a detailed brief like this, perhaps finding a photographer who can help guide some of your decisions would be a good call 🙂
Additionally, see below for a free template you can use to help you put your brief together.
Your Homework
If you are joining me and following along as I launch my first product on Amazon, you will know by now that there is always some homework.
This week it involves:
- Decide whether to do DIY or professional photography (or both)
- Hire your photographer, buy your kit, get shooting
I just asked my supplier if they can let me know when the first units are finished, packaged and ready to go. At this point, they have agreed to send one or two sleeping bags to my photographer.
> Here's this weeks updated homework sheet, which has the full template to help you with a brief <
If you have any thoughts, tips or questions about this session, slide into the comments below. Also make sure you check out the next session here, which contains lots of updates on the progress of my new product, as well as an insight into my thoughts about the process so far, as Greg quizzes me about what I have enjoyed, what I found difficult and much more!
Finally, do me a huge favor, if you are enjoying the Million Dollar Case study, make sure to give us a like and subscribe over on the YouTube channel: