Blog: The Million Dollar Case Study: Europe â Session #8: Amazon Listing Optimization
The Million Dollar Case Study: Europe â Session #8: Amazon Listing Optimization
Welcome back to the Million Dollar Case Study: Europe. If you are just joining now, make sure you go back and check out all of the good stuff that's happened so far. If you are looking to launch a product in Europe (or anywhere for that matter), the good news is that this a totally free educational resource that will guide you through the whole process.
Today's session recap is going to focus on creating a unique Amazon product listing, and Amazon listing optimization!
I have also been including homework, templates and downloadables every week to make this even easier for you to get involved and launch your own physical products business. This does require a several hours of dedicated work, but it's entirely manageable, especially if you keep your ambitions and end-goal in mind. Want to free up your time? Replace your salary? Travel more? You can do that and more by building a successful Amazon business – I believe in you!
Sample #1 Preview
I already have one sample which is pretty nice (pictured left with Greg as a model). It's warm, the size is good and the drawstring hood is great. But there are a few things I want to tweak, for example the fabric on the inside could be softer, and the zipper could definitely be of higher quality.
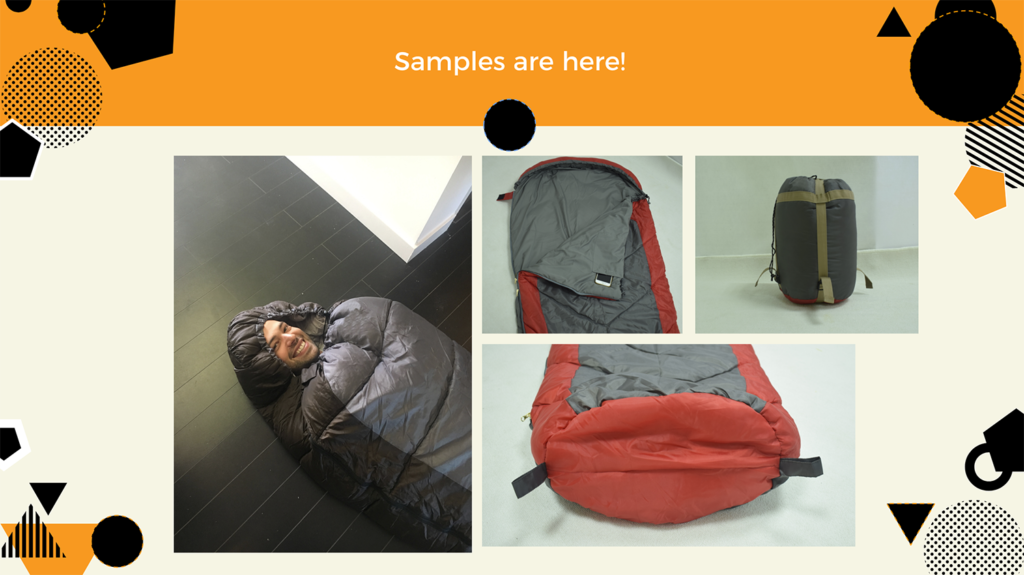
The sample on the right are photographs the supplier sent on Skype, and this one should be arriving any day now. I am looking forward to getting a comparison with the three samples I ordered.
Progress Updates
Right now I am still waiting for the rest of my samples to come in, before placing a deposit with my favorite supplier on my first shipment of inventory.
At this point, a few things are going to need to take place before I can make that happen:
- I need to get my packaging finalized – go back to Session #7 to read more about this
- A product listing needs to be created on Amazon.co.uk
- I will need to select a freight forwarder and start communicating with them ahead of planning my first shipment
So with this in mind, this session is focussed on creating a unique Amazon product listing. Here's what we covered:
- The anatomy of a product listing
- Keyword research and how to do it
- Product listing copywriting tips
- Photography requirements & DIY product photography
- How to hire a photographer
Then in the next session (#9), I have invited some expert guests from Flexport to join Greg and I, to talk about importing, shipping and customs.
One step at a time as always, let's get our listings created…
Full Replay:
Review the slides:
The Importance Of A Good Amazon Product Listing
This is your window to the world for your product and your brand. It's the place where shoppers will land and decide whether or not they need to purchase your product. It's your job to make them believe that they should!

There's multiple reasons why you should spend some of your time and concentration on this step in the process. Not only is it the only place for potential customers to make buying decisions, your listing also plays a huge role in Amazon SEO (search engine optimization).
Amazon SEO isn't some sort of dark art that only specific people know how to master. It's actually pretty easy to do the appropriate research and product listing copywriting that will allow your listing to rank well in the Amazon search results. If you play your cards right, you can also get some nice rankings in other search engines like Google. We will find out how in this session!
Overall, it's important to remember that optimized listings = more sales & profits.
The Anatomy of A Product Listing
For those of you who are new, here's a break down of which parts of your product listing you can either directly build, edit or influence as a private label seller:
- Product Title
- Product Photography
- Product Features
- Product Description
- Reviews
In this session we are going to focus on the first four elements, including how to make them stand out from your competitors and help you to rank for relevant keywords associated to your product.
Number 5, Reviews, is also very important, and we will cover tactics on building reviews in a later session, once I get my product launch strategy underway.
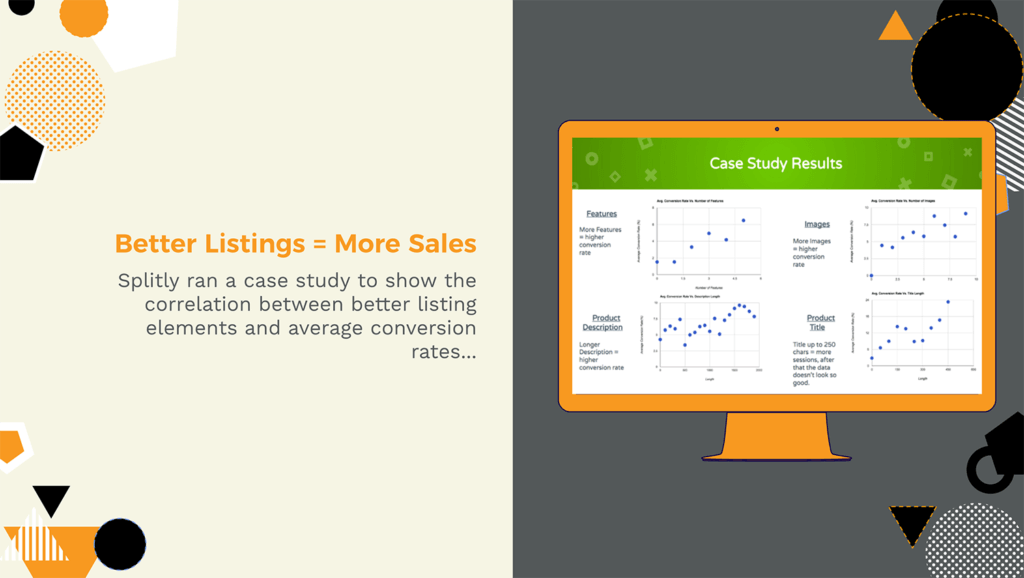
Every Element Counts!
In fact, we proved this to be the case using a data-driven study from Splitly users, that shows a direct correlation between the quality of each element of the product listing, and conversion rates.
It's so common to see an FBA seller product listing that sucks. Sorry but it's true. There are many listings out there with poorly thought out titles, only 1 or 2 bullets in the features section, and a description that is basically a repeat of the above with only 1 or 2 sentences.
If your product has competition with this calibre of product listing, that's good news for you, because you are going to create the best product listing ever, right?
The truth is, not every customer will read the description – but some will. The same goes for every other element of the listing. Consumers don't all behave the same, so as a seller it is your responsibility to ensure your listing shines in every corner.
This Is Just The Beginning
Creating your product listing as a private label seller requires research, time and dedication. But it doesn't have to stop there. You should seek to create the best listing possible from the outset, but be aware that things change.
There is always room to improve and optimize your listing. If nothing else, what works today, may not be the same story 6 months from now. Consumer trends change, Amazon's algorithms change, your competitors will change. View this as a solid launch pad for what will become a constant work in progress.
The Basics: How To Set Up A Product Listing
Even if you are still assessing samples, you will want to get started on this process. It can take a few weeks of work to finalize your product listing, and in any case, even if you don't fill out the fields yet, you need to create your listing to get an FNSKU for your packaging.
Read more about product packaging requirements in Session #7
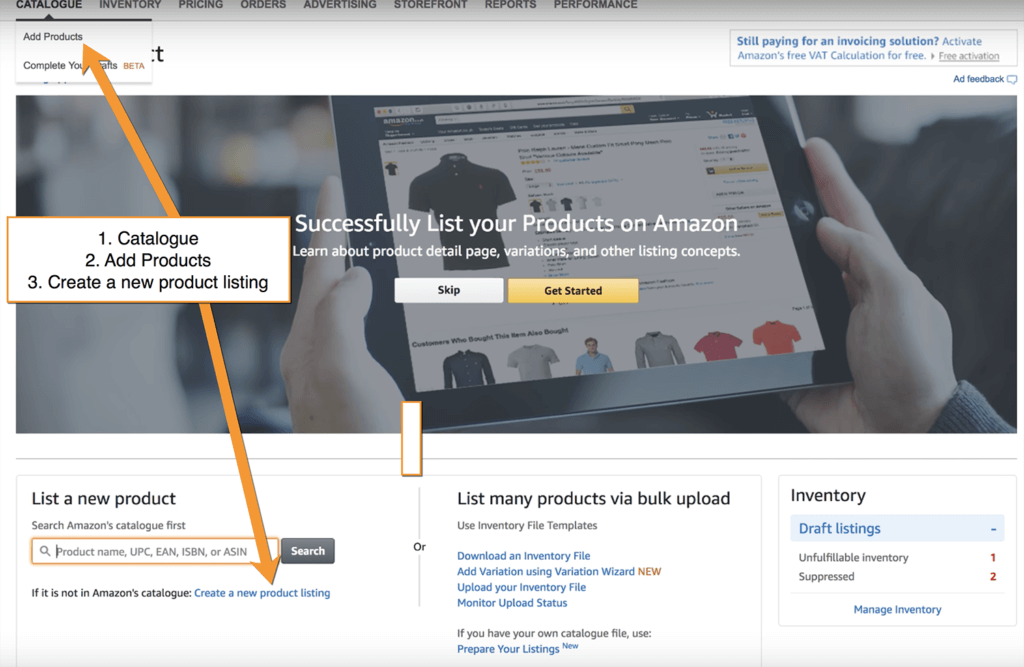
Step 1: Create a listing in Seller Central
Greg walked us through how to set up a listing in the webinar. First of all you need to head to “Catalogue” and “Add products“, then rather than searching for an existing product listing, click “Create a new product listing“:
Step 2: Select the right Category
After starting the process you will be asked to select a category. On the Europe Seller Central, it just lists all of the core categories, within which you can drill down into the correct subcategory:
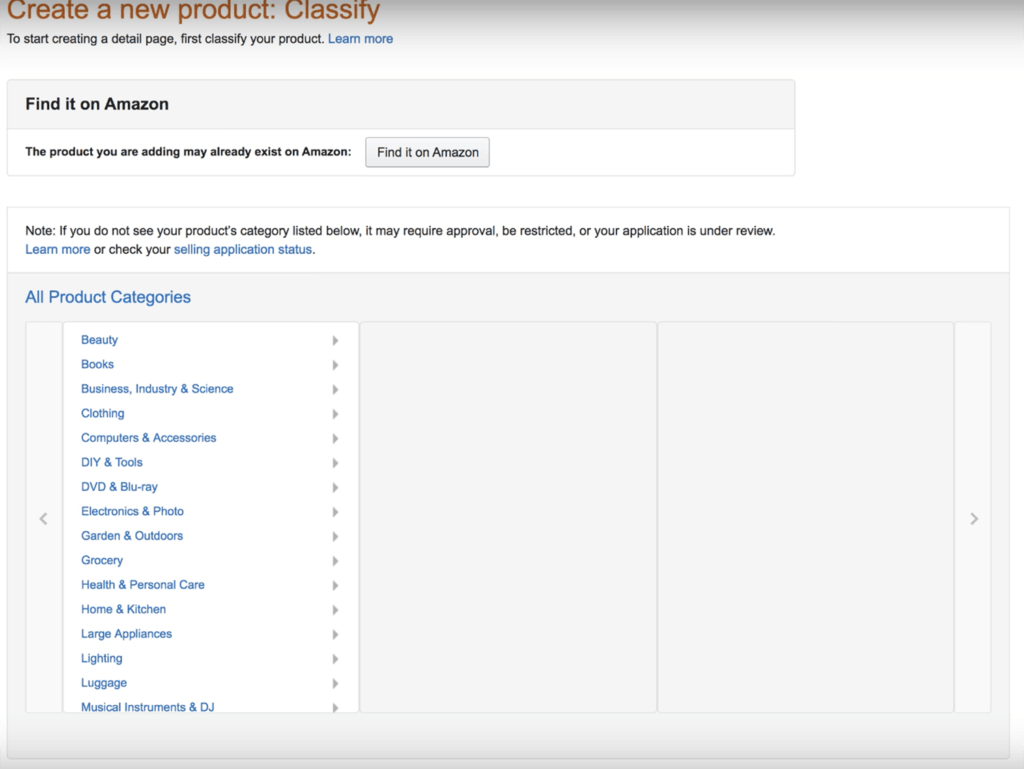
Greg's advice here is to check out some of your competitor listings and see what sub-category they are listed in. You used to be able to get listed in more than one sub-category but this is no longer the case. The best route is to find the most relevant category for your product, as you can only choose one, and although Amazon may let you change to a new category, it's best to start out in the right one.
For my sleeping bags, I found the “Mummy sleeping bags” sub-category to be best:
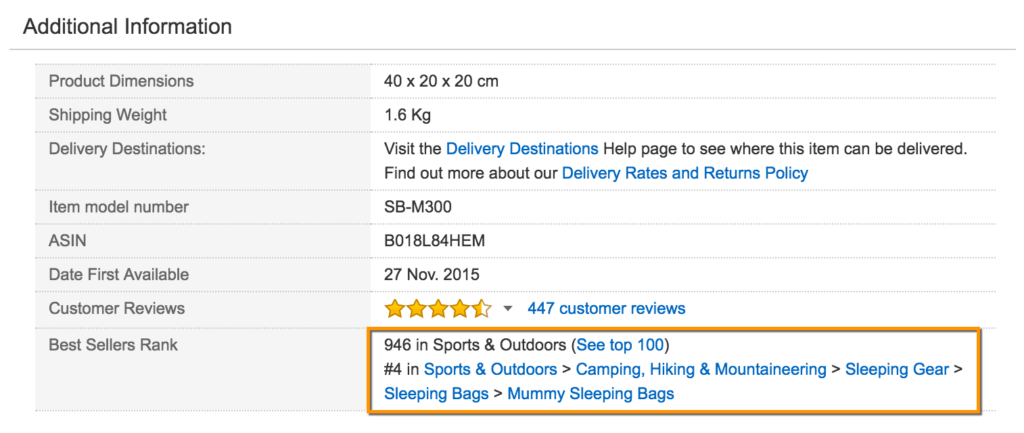
It's a super relevant category for me and also one of my top keywords.
Step 3: Enter your Vital Info
Once you have done this you will be able to enter some basic information about your product to get it started:
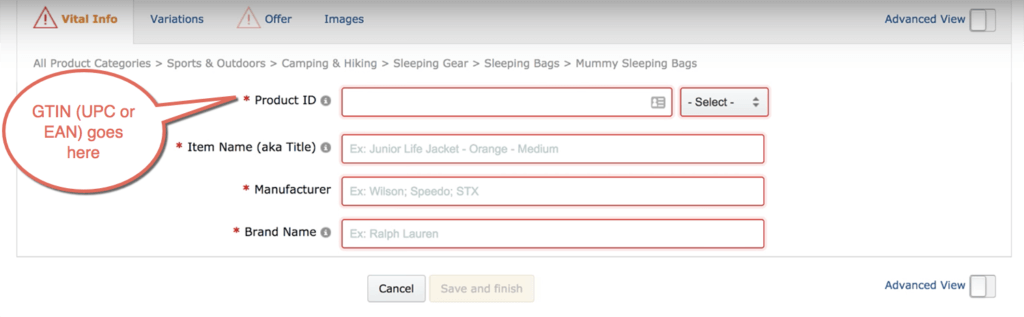
As you can see here, you can enter your GTIN, which if you are selling in Europe will be an EAN code in the top field. Then you can fill out the rest of the fields as follows:
- Item Name (aka Title) – This is your product title. Don't worry too much about this now, you can just enter your top keyword to get started, so for me I might enter “Mummy sleeping bag”.
- Manufacturer – You can enter the same name as your “Brand Name”, see below
- Brand Name – This is where you should enter your brand name. This is important if you want to enter the Brand Registry at a later date, because you need to enter the brand name that you will register a trademark under. For us, we could either go with something specific like “Jungle Slumber” which might be the name of the product, or we could go for something more open-ended like “Jungle Creations”, which we could then use to brand other products that we launch in the future.
Under the “Offer” tab is where you enter your price, you can just tick the following box and fill this out at a later date:
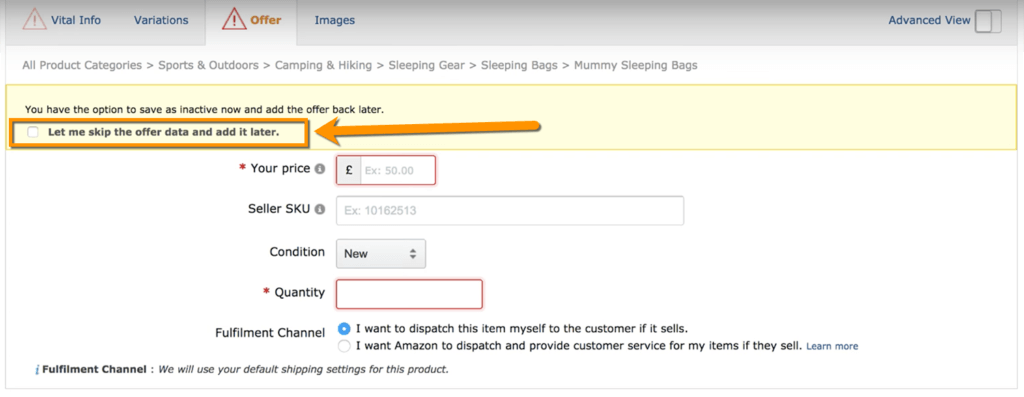
Note: you will need a GTIN to create a product listing, which you can either buy from GS1 or a third party source. If you missed it, we covered this in the last session too.
Step 4: How to Get Your FNSKU
Once you have created your listing on the most basic level, here's where you can find your FNSKU to give to your supplier:
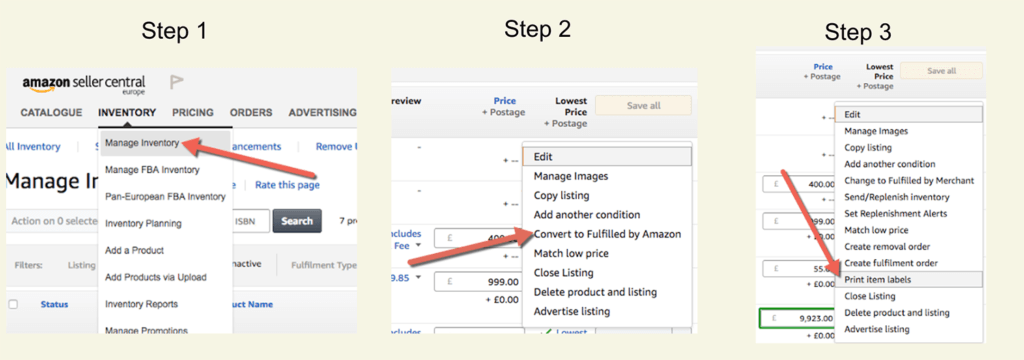
This will print your FNSKU to a PDF which you can store somewhere safe. Here's what it will look like:
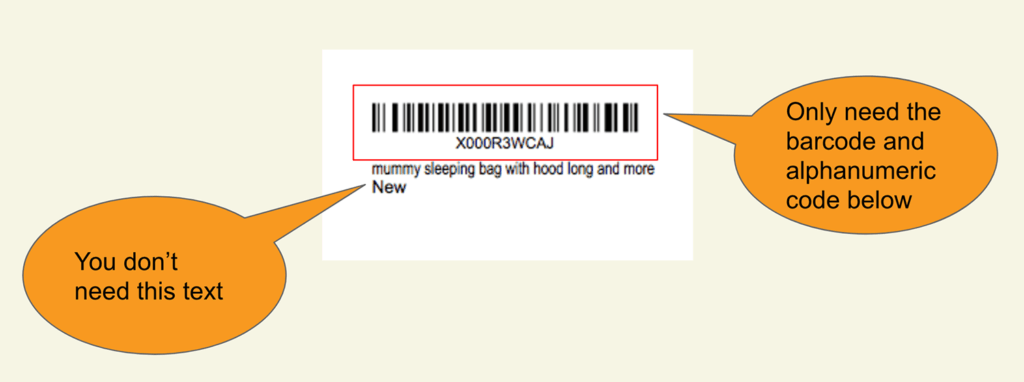
You can remove the text underneath because it is not required, but make sure you pass the full barcode and alphanumeric code to your supplier to use on your product.
Variants
If you have variants of your product (different sizes, colors etc.) then you will need to repeat this process for each child variant, which all require their own unique GTIN and FNSKU. When setting up products that have variants, you would normally create a ‘parent' product that will be a generic product listing (it would not have a price or inventory stored next to it), and then create all of the ‘child' variants below it, that would all have a price and inventory available.
Example of a parent/child product setup:

Keyword Research
Now you know how to create your listing in Amazon Seller Central. So far we have only entered the bare minimum information in order to get our hands on the FNSKU.
The real work starts here – it's time to start with some keyword research to find out what the most relevant keywords are for your product. From there, we will go on to figure out how to write some bad-ass-customer-converting copy using our keywords.
Tools of the Trade
Here's some tools you can use for your keyword research…
Finding Monthly Search Volumes:
- Google KW Planner – free with limited data
- Ahrefs KW Explorer – paid tool
- Moz KW Explorer – paid tool with a small amount of free queries
- Keywordtool.io – paid tool
Unfortunately there are no free options for finding estimated monthly search volumes these days. Google's Keyword Planner is still the best option for this in my opinion. If you are not running any Google PPC ads with a significant spend, then Google will give much broader figures for the average monthly search volumes. But this is still useful, especially when you are comparing all of your keyword ideas against each other.
For further ideas and semantic keywords:
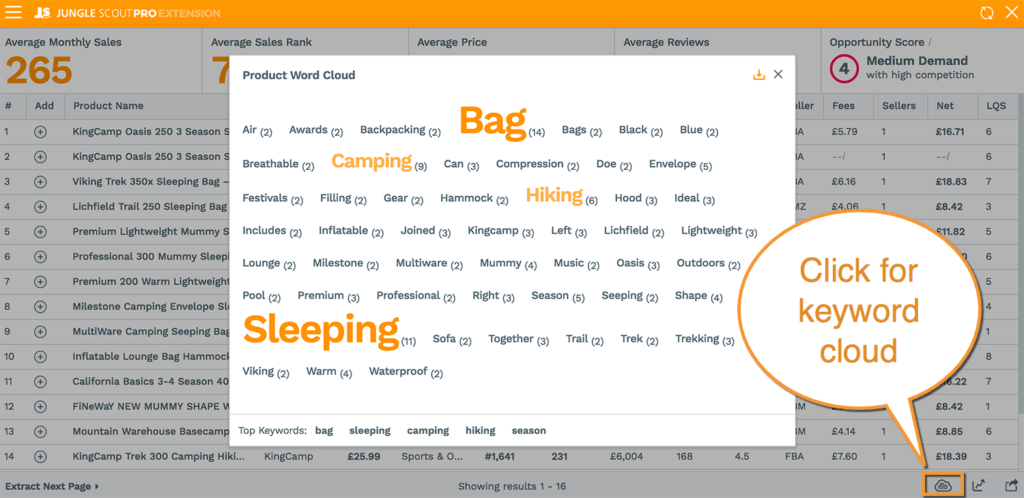
- Jungle Scout Extension – Use the new keyword cloud to find out what keywords are most prevalent on any listing or results page within Amazon
- LSI graph – enter a keyword and it will spit out a bunch of other relevant keywords that you may not have thought of
- Ubersuggest – similar to LSI graph
Competitor Keyword Research
You know where a good place to find keywords is? Your competitor listings!
Not only is it a good source for keyword ideas, it's also super important to find out what keywords your soon-to-be competitors are using in their listings, what they are ranking for and what is bringing in their sales. You will effectively be competing for these same keywords in just a few weeks time, so make sure you don't skip this step.
You can start by searching for some keywords you found already in Amazon and see who is ranking in the top spots on the first page of results, then take a look at their listings and scour their titles, features and descriptions for keywords. Keep a note of this in a spreadsheet if it helps.
I like to use the Niche Hunter in the Web App to search for keywords too, which gives me a list of Amazon results alongside their estimated sales and other metrics. You can just search for a keyword in the search box and filter by marketplace to get some interesting results. I can then click into any listings I am interested in for a deeper investigation.

Example
Here's what some of my keyword research looks like for my product. This is just a small sample. I will also create lots of topic groups of keywords including some more open-ended ones such as “camping equipment”.
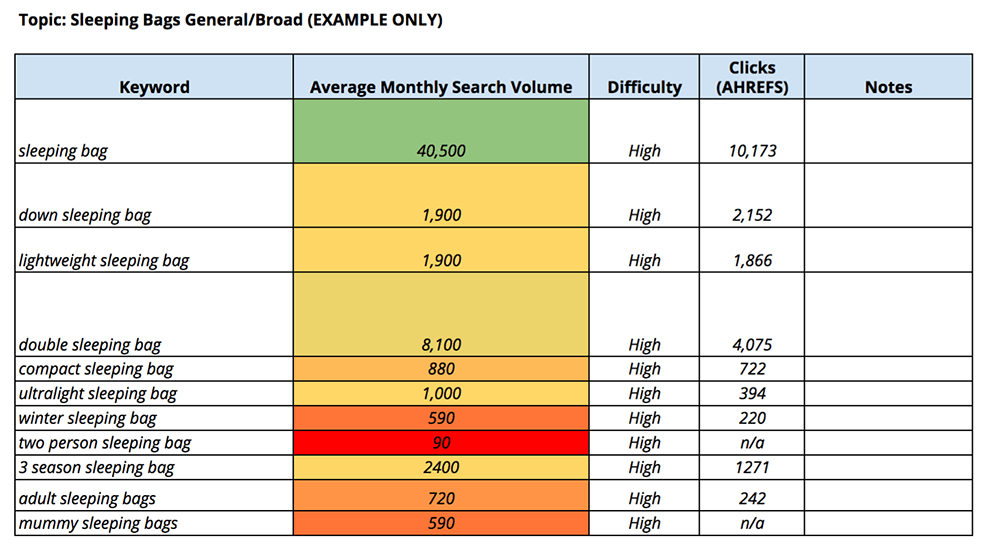
For each keyword topic you can usually find a handful of relevant keywords (or more) that people are actually searching for on the internet. Then once you have compiled a big list of research, you can start to see which ones have mores search volumes and which will be most relevant to your product and brand.
Tips for Amazon Keyword Research
Here's the top takeaways for keyword research for Amazon sellers:
-
Always keep a record of your research in a spreadsheet, you WILL need it again later
-
Use a mixture of tools to get a better idea of average search volumes
-
Pick out what you think are going to be your most influential keywords (highlight them or make notes)
-
Relevancy test: When in doubt, search in Amazon
- Use your competitor’s listings as a starting point
Product Listing Copywriting Tips ✍️
Now that we have keyword research under wraps, how do we go about writing a really good product listing up, and including all of those keywords that we have identified at the same time?
Product Title
A good product title should include relevant keywords and still be something that a human can read and make sense of. Here's a good example from our Jungle Stix listing:
It reads a little like a story, despite the fact it has got our main keywords as well as some of the benefits and features of the product.
Takeaways:
- Put your top keyword(s) in your title
- Include some features in your title
- But keep it human friendly
- In the future: test your title for better optimization
Product Features
Amazon calls this section your product features but you need to think about it more like product benefits. In general, ecommerce content should always be driven by the benefits. This is because your customers want to know how the product will benefit them much more than they want to know the full specifications (for most products).
Here's an example of some features from the Jungle Snugs listing:
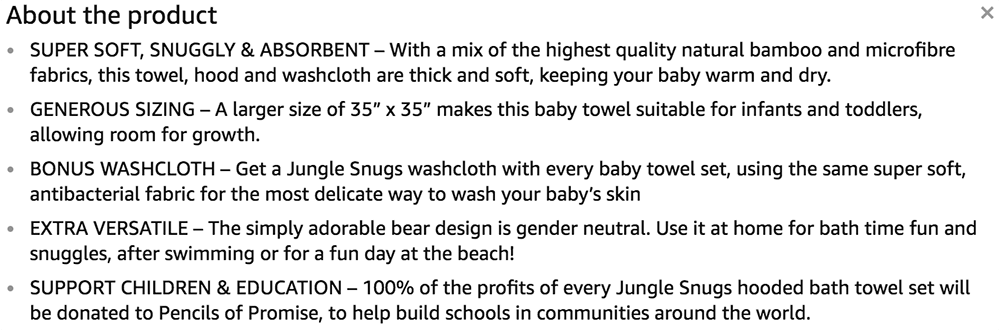
Some of the benefits here include keeping your baby warm and dry, allowing room for growth, can be used for different activities and so on. We could actually even revise this copy and make each feature lead on the benefit at the start of each bullet point.
Takeaways:
- Use all 5 bullet points (seriously, just do it)
- Lead with benefits, follow up with features
- Include guarantees, convey quality
- How will the product features solve a problem, or change the customer’s lives?
- Include more than one keyword
In the future: test long form vs. short form features
Product Description
A product description is the most neglected part of the humble Amazon listing. But it's actually an opportunity to add in extra detail, more keywords and give your product a narrative. Try to add some personality too, this helps you stand out and can help to increase those reviews too.
Another tip is to use some simple HTML to add bold subheadings and bullet points. Technically this is against Amazon's rulebook, but so many sellers do this (including Greg and the Jungle Scout products too) and we haven't ran into any trouble.
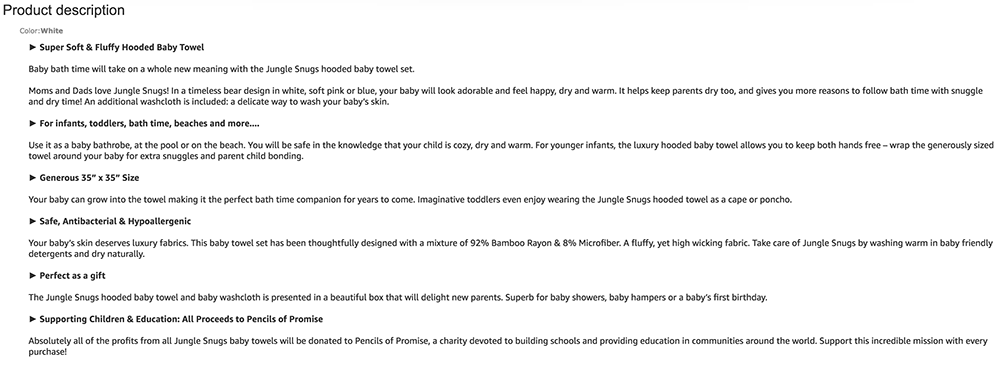
Here's an example of a nice long description that makes use of headings, tertiary keywords and product narrative:
Takeaways:
- Don’t neglect it, give your product a narrative
- Use HTML to create headings, bold, italic and bullet points
- Include your main keywords and some tertiary keywords
- Use descriptive language: robust, smooth, soft, cosy, durable, warm, strong…
- simplehtmlguide.com/cheatsheet
Keywords In The Back-End of Seller Central
Another place to put those keywords you have researched is in the back end of seller central. These days, there is some confusion about the character limits for this. It used to be a very generous 5000 characters, which was, if anything, too much. Now there has been announcements that it is 250 characters. I am not entirely sure if this is per field, or across all 5 fields (see below example). Some communications from Amazon suggest it is the latter, but I am deeply suspicious about this.
First of all, Seller Central still allows you to enter more than 250 characters per field. Plus, 250 characters in total would equate to 40-45 words which seems very narrow. It is entirely possible that Amazon is only indexing the first 250 characters, so it is a good idea to enter your most important keywords first. But I have also seen reports from sellers and consultants claiming they are ranking for keywords that fall outside of this limit.
For the JS products, we are still using up to 250 characters per field and entering as many relevant keywords as possible.
We get some sellers writing in saying “how will I condense down my keywords now that I only have 250 characters”. Here's the thing, I don't think many products would ever seriously require more than 250 x 5 characters in keywords in the back-end of seller central. The whole point of these fields is so that Amazon's A9 Algorithm can factor in your keywords and truly understand what your product is, what it is used for and who wants to buy it.

As soon as you start “keyword stuffing” with a ton of irrelevant keywords, Amazon may have a harder time doing this, and won't place as much importance on those keywords that really do matter.
This is all speculative, no one really knows exactly how Amazon uses this keyword section, but I assume they shortened the limits to actually encourage sellers to only enter relevant keywords. Don't forget that you can also include additional keywords in your product listing itself.
Takeaways:
- No punctuation required, separate words with spaces
- Try to front-load with your most important keywords – you can still add 250 characters per field at the moment, just keep it relevant
- No need to add singular and pluralized words, Amazon will pick up on this so don't waste characters
- No need to repeat keywords
- Related keywords: think about the use cases for the product, or who it is used by?
Avoid these Common Mistakes
Here are some things you should never do:
- Never include your competitors brand name in your listing
- Don’t stuff with irrelevant keywords (or in Amazon’s words, “provide redundant information”)
- Do not use commas or punctuation in the keywords section in Seller Central
- Be genuine, do not try to mislead Amazon or customer's about what your product is, and your brand name
Amazon Product Photography 📷
The final topic covered in this jam packed session was product photography. This is something that you need to consider now because as soon as your final samples are ready, you will need to ensure you have some decent photographs with which to launch your product.

There's two ways you can go about this, DIY or hire a professional.
DIY vs Professional Photography
Which ever route you decide on, remember that your product images are the closest thing a customer gets to the real deal before ordering. It is definitely worth spending some time and/or money on your photography. Even if you don't want to invest right away, you can take your own photos with a plan to get some professional ones taken as soon as you can. Here's some considerations for each route:
DIY
- Requires your time to take your own photographs
- Cost savings
- Lower quality (unless you are a confident photographer, that is)
Pay A Professional
- More expensive
- Less of a time strain
- Higher quality outcome that can be used for years to come
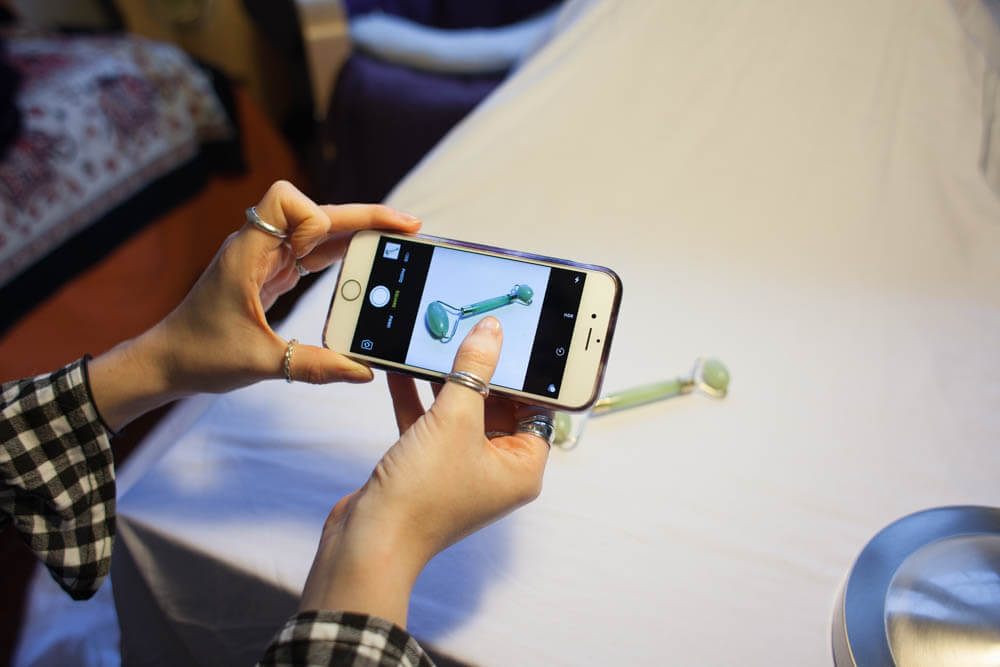
If you do want to try to do some of your own photography then check out a guide I put together on how to take main images (on white backgrounds) using a smartphone and some household items here.
Lifestyle Images
Lifestyle images are considered a “nice to have” but in reality, this could really help make your product much more appealing to a customer. They are more costly if you hire a professional but help to give the product a narrative, show it in use and make it more desirable by using models and locations. Here's a handy example of three types of photographs we have had taken for the Jungle Snugs product:
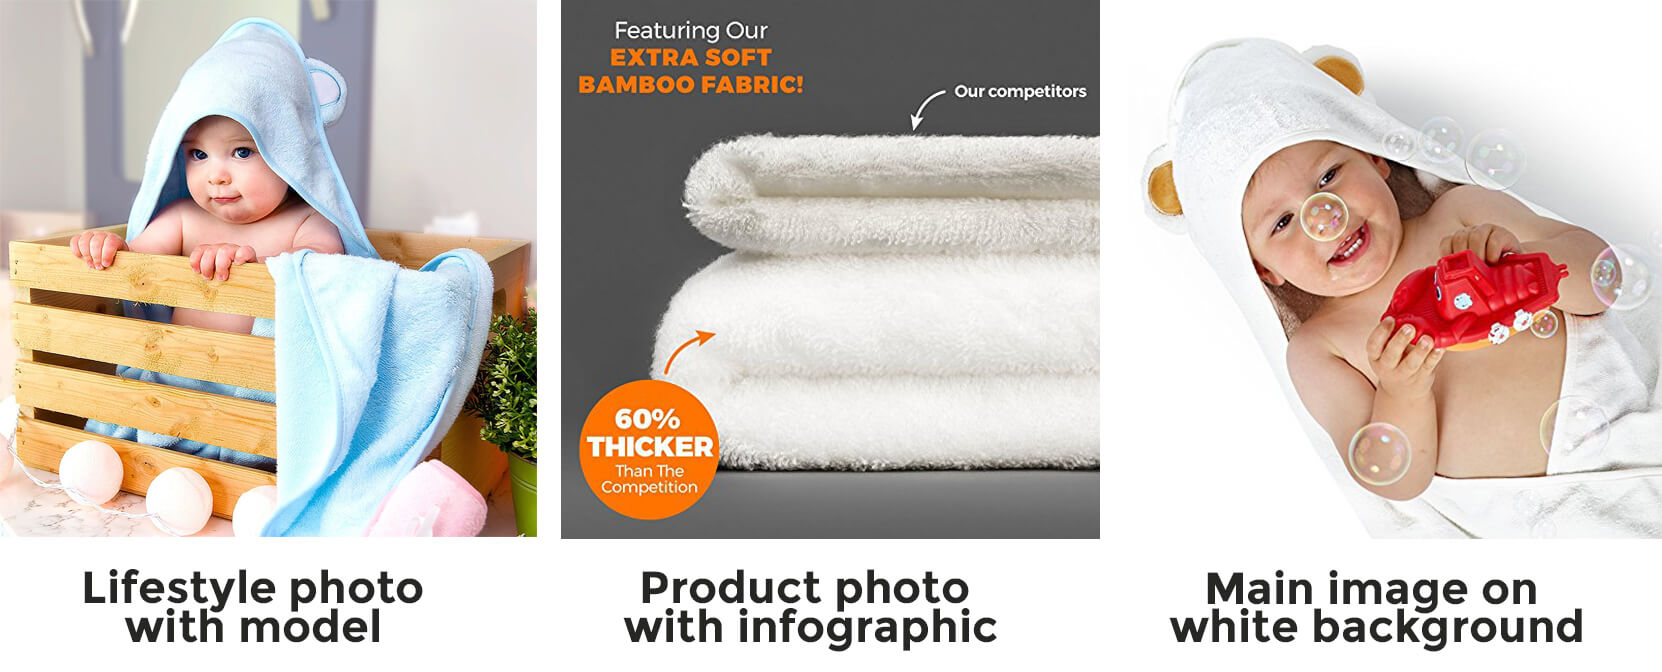
Note that we also included a model in our main images, as this performs much better than just showing an image of a folded towel in the search results for this type of product.
Amazon Product Photography Requirements
Amazon also have their own requirements which you need to meet, including size, quality and the color of your main image background.
You will need to have at least:
- 1 product image on a completely white background
- Up to 8 other images
- All images at least 1000px width or height
In order to stand out from competition, it’s nice to have:
- Lifestyle images showing the product in use (with models)
- Infographics to show size or quality
- A range of different product images showing different angles, packaging and more
Greg advised that product photography can cost anything from $200/$300 dollars upwards for a set of product images on white or plain backgrounds. Lifestyle product photography can vary wildly, depending on the photographer's rates, and whether models, locations and props are required.
Many people these days own a decent camera and many sellers try out some lifestyle photography of their own to save on costs here.
Product Photography Brief
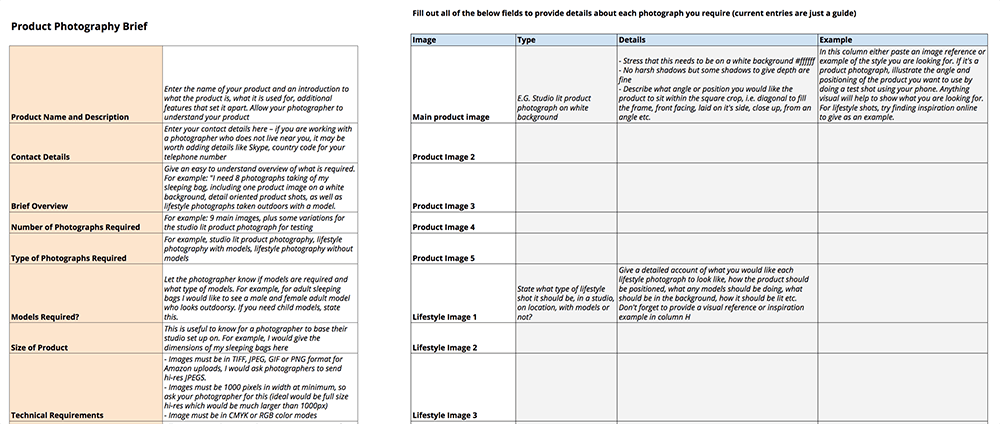
If you do decide to hire a photographer, make sure you draw out a super detailed outline or brief for them to follow. This ensures you get the images you want to the right specifications, and get the most out of your investment.
It also really helps to send a detailed brief when requesting quotes, as you will get a much more accurate idea of the costs.
I put together a template in this weeks homework (link coming up below) to help guide you on what information to send to a photographer:
Your Homework 👩🎓 👨🎓
This week's tasks are:
- Create a listing on Amazon
- Do some Keyword Research (& competitor KW research) for your product
- Using your research, start writing your product titles, features and descriptions
For bonus points, spec out a product photography brief for your photographer ready for final samples becoming available
Get the latest templates and resources for your homework in this workbook!
Conclusion
That's all from this session. There was quite a lot in here that you may want to revisit as you work on your listing to ensure you have a converting “shop window” for your product.
In the next session, we have Sam and Travis from Flexport joining us to tell us all about importing, shipping, customs and what a freight forwarder can do to guide you through this whole process.
See you there!
Subscribe to our YouTube channel for weekly insightful content: