Blog: The Million Dollar Case Study Session #13: Amazon Pay Per Click Strategies
The Million Dollar Case Study Session #13: Amazon Pay Per Click Strategies
The session today is a deep dive into setting up Amazon sponsored products for our product launch. If you caught last week’s session on Product Launch Strategies, you saw Greg dive into the first two parts of a product launch: email campaigns and promotions. The third part of the launch strategy involves pay per click advertising, which means running paid advertisements to get your product listing in front of relevant traffic.
We have covered some basic and advanced pay per click topics in the past. You can check those for additional insights on setting up, analyzing, and optimizing your Amazon pay per click campaigns.
- How to Leverage Amazon Pay Per Click to Get Better Rankings and More Data
- Amazon PPC Optimization: A Step by Step Guide to Find Converting Keywords
- Amazon Pay Per Click Campaigns: How To Advertise Your Private Label Product on Amazon
And also make sure to check out Session 11 of the Million Dollar Case Study, where Kym and Greg do keyword research for our hooded baby towels to find the most relevant keywords for the product.
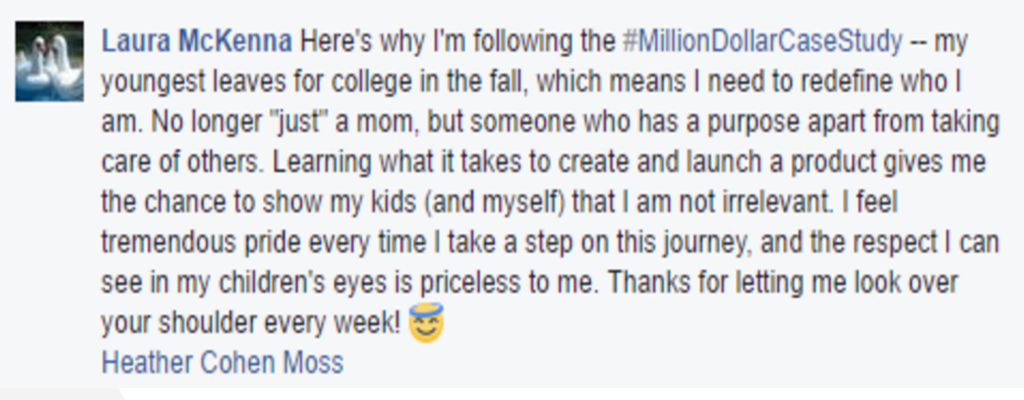
Last week, we also ran a little contest to hear from you about how you are impacted by the Million Dollar Case Study.
The winning entry was submitted by Laura McKenna, who shared this inspiring post:
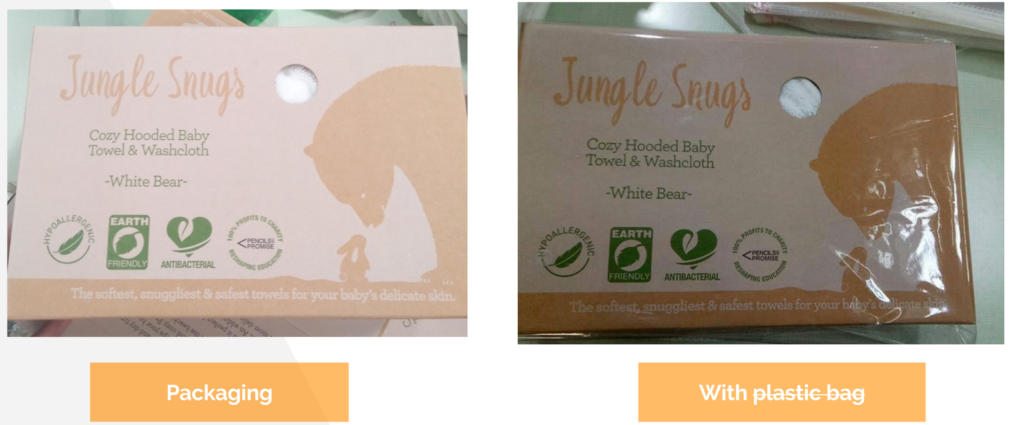
Jungle Snugs Update
And lastly, a quick update on the Jungle Snugs production. The manufacturer put plastic bags on the packaging, which isn’t exactly ideal. As Amazon states in its terms,
“Poly bags with a 5″ opening or larger (measured when flat) are required to have a suffocation warning, either printed on the bag itself, or attached as a label.”
As we didn’t add a suffocation warning label and don’t have one ready, the poly bag will be removed. When creating the design, Greg made sure to include an exposure to the towel that was less than 1” wide exactly so that a poly bag would not be needed.
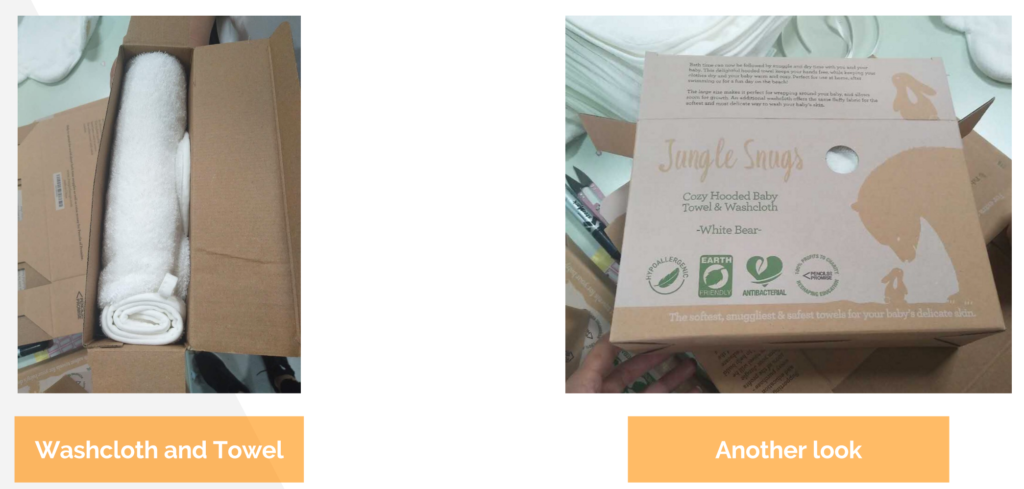
Here are pictures of the product:
So, now to the good stuff… setting up a pay per click campaign! In this session, we were joined by Brent Zahradnik of AMZPathfinder, an Amazon PPC consultancy.
Here is the full video recap:
And Brent’s slides, which are loaded with great content:
The tools you need
We covered some of these tools in Session 11 of the Million Dollar Case Study, but it’s always interesting to see what’s in someone else's toolkit.
These are the tools that Brent recommends, both free and paid options:
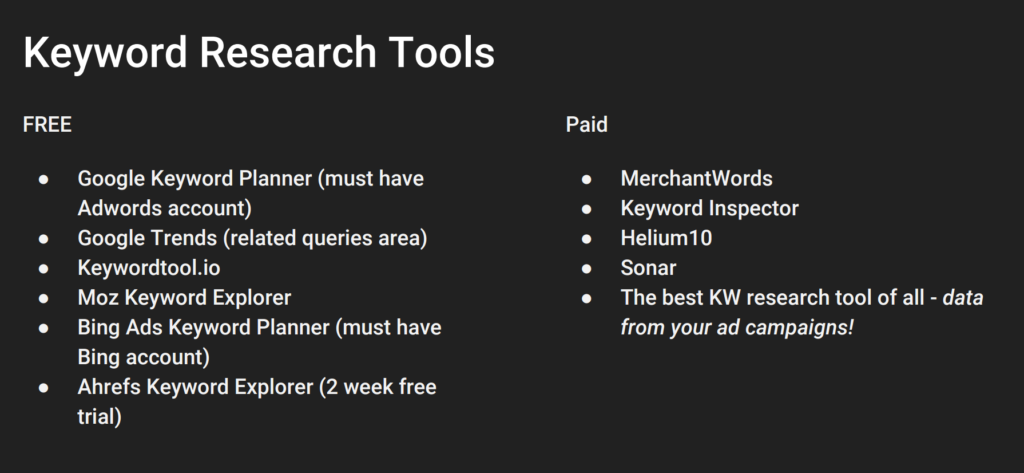
And interestingly, the most important tool is what will be unique to your product listing: the actual customer search data that drove visitors to your product page.
A few notes about this: in order to run sponsored ads, you will have to control the buy box. For private label sellers, it is assumed that you will control the buy box, as there should be no one else selling your product. The other caveat is that you can only get customer search queries if and when you are running paid campaigns.
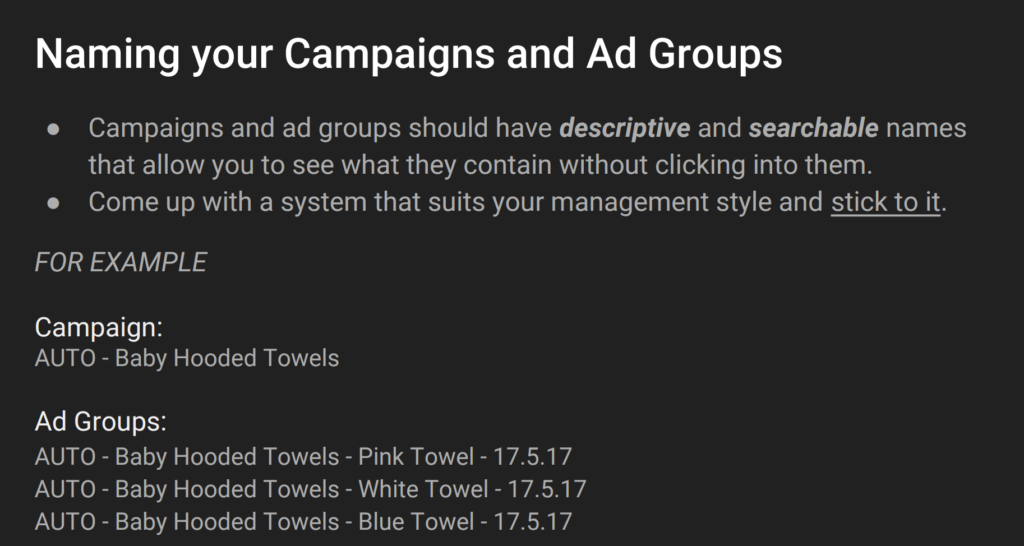
Campaign Structure: What is the best method?
Similar to the tools a given marketer uses, it is always interesting to see how someone running paid campaigns structures their campaigns and ad groups. Everyone has their own preferences, but the most important priority is that it is a structure that is well-organized, easy to understand, and scalable as you add more campaigns and ad groups.
Brent suggests a few methodologies for organizing your paid account, which could look like the following:
The process of launching pay per click campaigns
Brent has an elegant two-pronged approach to starting with pay per click campaigns for new products. He likes to start with Automatic campaigns to ensure that he created a good listing with relevant keywords (basically that Amazon is understanding the product correctly), and concurrently run Manual campaigns for keywords that are assumed to be relevant.
Let’s back up for one second just to review the basic definitions here:
Automatic Targeting: Amazon determines which search queries will trigger your ad. You set a maximum bid price, and Amazon does the rest.
Manual Targeting: You select the keywords, match type, and maximum bids.
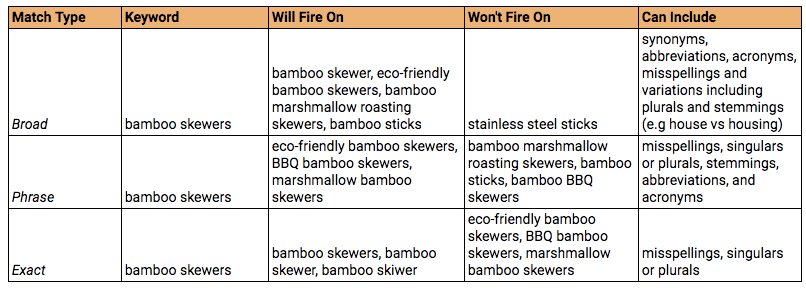
While we’re on the topic of definitions, let's do a quick review of how match types work. Here are Amazon’s explanation of match types, you can read more about it here (along with a whole lot of other helpful information about sponsored ads on Amazon):
Exact Match: The customer’s search term must match exactly the keyword in order for the ad to show, or close variations of the exact term. Exact match is the most restrictive match type, but can be more relevant to a customer’s search.
Phrase Match: In Phrase Match, the customer search term must contain the exact phrase or sequence of words or their variations. It is more restrictive than broad match, targets more specific audiences, and will generally result in more relevant placements for an ad.
Broad Match: This match type offers your ad broad traffic exposure. A customer search term will match if it contains all the keyword terms or close variants (plural forms, acronyms, stemmings, abbreviations, and accents). The customer search term can contain keywords in any order.
Here are some examples of how these match types would work for our Jungle Stix:
So let’s review each step of the process that Brent recommends, and review how he put the campaigns together for Jungle Snugs…
Step #1: Run automatic campaigns
Brent recommends starting an Automatic campaign from the very beginning.
There are two main benefits to this :
- You can see how Amazon analyzes and interprets your listings. Basically, as Amazon scans through the keywords you added to your Product Title, Product Features, Description, and back end keywords, does it ultimately show your product ad on the relevant keyword searches? Running an automatic campaign will answer that question.
- Amazon’s main priority is generating relevant search results for a given customer search query. Of course, Amazon wants to maximize the likelihood of a click turning into a sale. And because Amazon has troves of data on what searches result in customer purchases, the algorithm may show your ad on new keywords that you didn’t anticipate. You can’t identify such new keywords if you only run Manual campaigns.
Brent also recommends the following for the Automatic Campaign bidding:
- Start the budget at $10-$15 per day.
- Start the bid at $0.35, and increase the bid $0.10 ever two days, while monitoring spend. Stop when you start maxing out your campaign budgets on a daily basis.
- After a few weeks, you will have a better gauge of actual cost per clicks for keywords, and then you can shift more of the spend towards Manual campaigns, where you have greater control of which search queries your product shows for.
Which leads to Step 2, initiating Manual Campaigns…
Step #2: Run manual campaigns
Remember the keyword research that we mentioned above, and covered in Session 11? It’s time to make use of those efforts again. This is why it's an important task to do thoroughly as it will help you for many months to come.
Brent recommends starting with a Manual campaign using keywords that you anticipate to convert to sales, based on your research, and then let the campaigns run to see which keywords actually do generate sales.
You want to create separate ad groups for each child SKU. Additionally, you can organize by match type to facilitate your bidding and campaign management.
Some general guidelines for your manual campaigns:
- Start with a budget of $20-$25 per day. This is your maximum budget, not necessarily what you will end up spending per day.
- Brent recommends starting the ad group bids at $0.85, which is higher than the Automatic bids you created above. You can use Amazon’s bid suggestions to help guide you as well.
Step #3: Refine your campaigns
Now that you’ve done the hard work, let the campaigns run for a week or two. You will want to monitor them on a daily basis, and pull the search term report a few times a week to evaluate impressions, clicks, and sales.
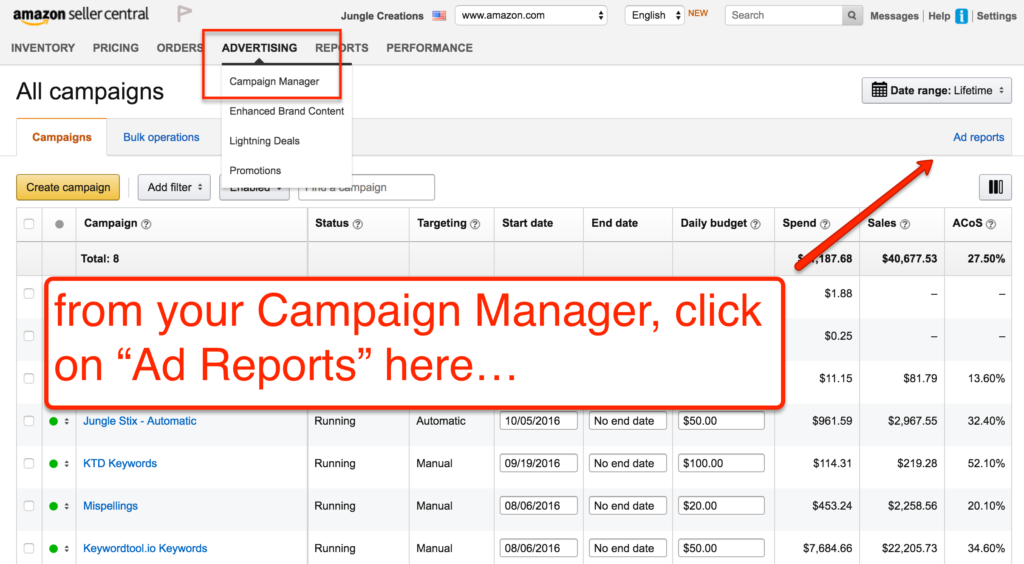
Your Search Term Report is a running tab of the data from your pay per click campaigns. You can access it here in your Seller Central account, in two steps…
1. Navigate to Advertising Reports:
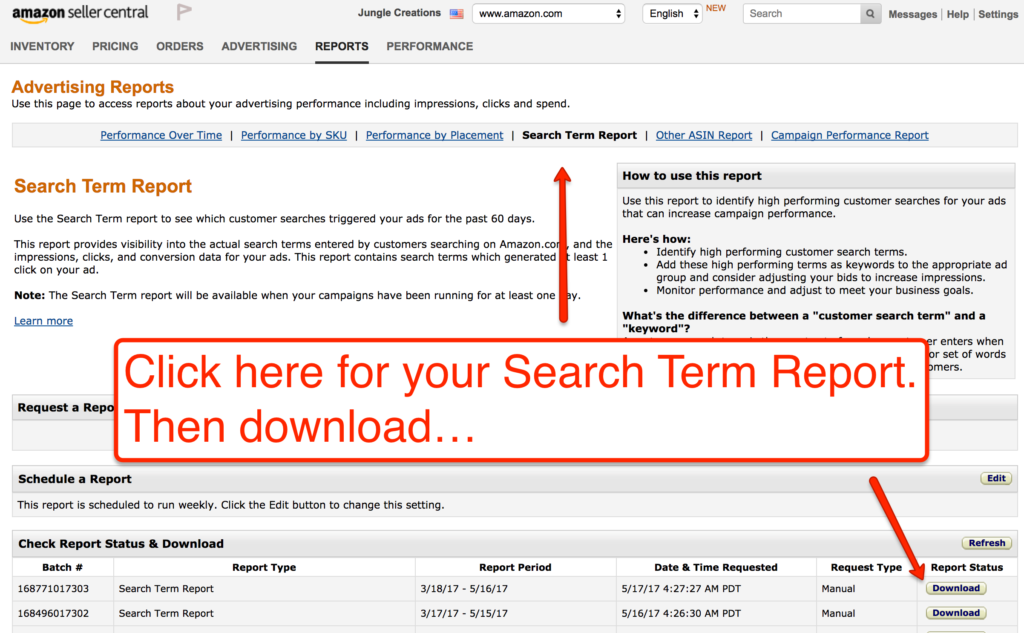
2. Download your search terms report:
This is going to be your most important report and source of information to feed back into your campaigns and keep them running like a well-oiled machine. It's also pretty insightful generally, and you can feed some of the findings back into your Amazon listing optimization.
A few other important notes:
As you monitor the keywords that you are bidding on, be sure that they are relevant search terms. This is especially true if you are running Automatic campaigns and/or broad match campaigns. Ensure that you don’t pay for unwanted clicks by adding negative keywords on an ongoing basis.
Amazon has a 48 hour latency period—this means that your reports may not show any conversions immediately. So make sure that you are giving the data adequate time to accumulate before you make too many changes.
Don't forget these further resources
If you are looking for more information on Amazon sponsored products and pay per click, make sure to check out our other posts on the topic, which have a lot of valuable content to help you through the process:
- How to Leverage Amazon Pay Per Click to Get Better Rankings and More Data
- Amazon PPC Optimization: A Step by Step Guide to Find Converting Keywords
- Amazon Pay Per Click Campaigns: How To Advertise Your Private Label Product on Amazon
Many thanks to Brent from AMZPathfinder for a great session on setting up the campaigns. We look forward to initiating the campaigns and having him back to analyze the data.
Next steps
Next week, we have Scott Voelker from the Amazing Seller podcast. Scott is a tremendous wealth of knowledge about growing an Amazon business, and he will share his strategies for leveraging search engine optimization to generate more organic traffic to our listing.
Register for the webinar and catch up on past sessions here:
REGISTER HERE