Blog: Million Dollar Case Study: Amazon PPC
Million Dollar Case Study: Amazon PPC
In this episode, we cover Amazon PPC.
- What is Amazon PPC?
- How Amazon PPC works?
- How much to spend on advertising?
- Setting up your first campaign
- Ongoing campaign management
- Missed an episode? See them all here.
We’re covering all of this today in our 13th episode of the Million Dollar Case Study. Watch the video, keep reading and don’t forget to claim your EXCLUSIVE MDCS Jungle Scout discount!
Subscribe to the Million Dollar Case Study list here, so you never miss an episode!

Before you get started, if you’re not already using Jungle Scout, you’ll need to get a Jungle Scout subscription to follow along with us and complete your product research.
To help you out, we’ve put together a Jungle Scout discount code that gives you more than 30% off Jungle Scout – both the Web App and Chrome Extension! Plus, you get a pretty fantastic FREE t-shirt to go with it.
Welcome Back to the Million Dollar Case Study!
In this episode, we’re going to be talking about what is Amazon PPC, how to set up those initial campaigns, how to do your keyword research to know what keywords to bid on, and we’ll dig a little bit into optimizing your Amazon PPC.
What is Amazon Pay Per Click (PPC)?
Amazon Pay Per Click is an advertising platform offered through your Seller Central account. If properly created and managed, a PPC campaign on Amazon can help you sell more inventory faster, while increasing your organic rankings as well.
- Get your message in front of 310MM active customer accounts worldwide
- Ads appear in highly visible placements, like page one of search results or on product detail pages
- Pay only for the clicks your ads receive
- Getting started is easy and Amazon PPC isn’t difficult to manage
When should I start running PPC campaigns?
I like to set up my Amazon PPC campaigns immediately, as soon as I launch my product. Other people will say they wait until they get a few reviews because that’s when the listing converts better but I actually prefer to turn mine on right away and use it as part of my launch strategy.
How Amazon PPC Works
Campaign Structure Explained
Think of PPC as a hierarchy of things that build a full account. Here’s a visual aid to describe it best:
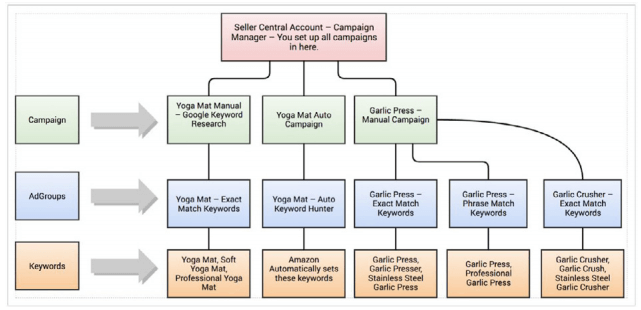
- Campaigns
- Where you group things by the product and by the type of campaign: manual or automatic
- Ad Groups
- Where you can start to break down your campaign into manageable chunks
- Keywords
- Terms that you are effectively bidding on, in order to get your ads to show up in the search results
- How competitive a keyword is will typically determine how much you have to pay to get your product displayed in Amazon for that keyword
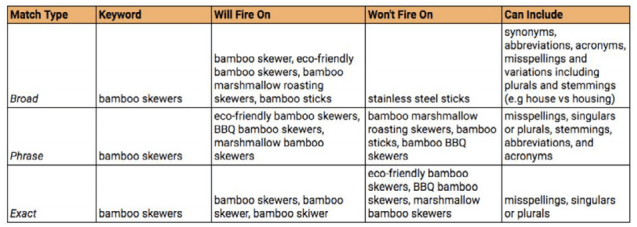
Keyword Match Types
You have the choice to set your keywords as broad, exact, or phrase match.
- Using a broad match type opens up your ads to a wider audience which is great when mining for new keywords. This is a good place to start when launching new products.
- Using a phrase match type allows you to start to narrow down the amount of variants that can trigger your ad, thus saving cost and becoming more targeted. But there are still some variants which can continue to provide some useful insights.
- Finally, using exact match is most targeted and allows for the least variance in the search term that the consumer enters. This makes your ads more targeted, and usually cheaper with an improved ROI. It also means your ad will show to fewer people (fewer impressions). It will take some experimentation before you can transition keywords from broad match to exact match.
When you start a new campaign, it’s always best to start broad, so that you can reach a wider audience and spot keywords you had not already thought of or researched. Then, once you can see which keywords perform well for your product, you can hone in on those customers with phrase and exact match.
How much should I spend on Advertising?
- If you have recently launched, you may want to bolster your sales with a higher budget for a few weeks, and take the hit on your profits, until your BSR and sales start to improve.
- If your product has been around for some time, but sales are slowly declining, you may want to start with a more modest budget, and then adjust this based on performance over the first few weeks. The same would apply if you have been out of stock for a while and your listing has dropped in the organic search results and your rank has suffered.
- The key thing to remember when deciding on your budget is that it’s totally flexible. You can amend, pause and cancel your campaigns at any time.
Setting Up Your First Campaign
Start with an Automatic Campaign
- Amazon will use your product listing to generate ads, and select keywords to target based on your listing and commonly used search terms
- A quick and easy way to get some data about what key terms people are searching for to find products like yours
- Be careful not to blow all of your budget on this campaign and be aware that you will want to start honing it in eventually
- After the first few weeks, reduce the budget and add any successful keywords that we pull out into Manual Targeted campaigns as Negative keywords (more on this further along)
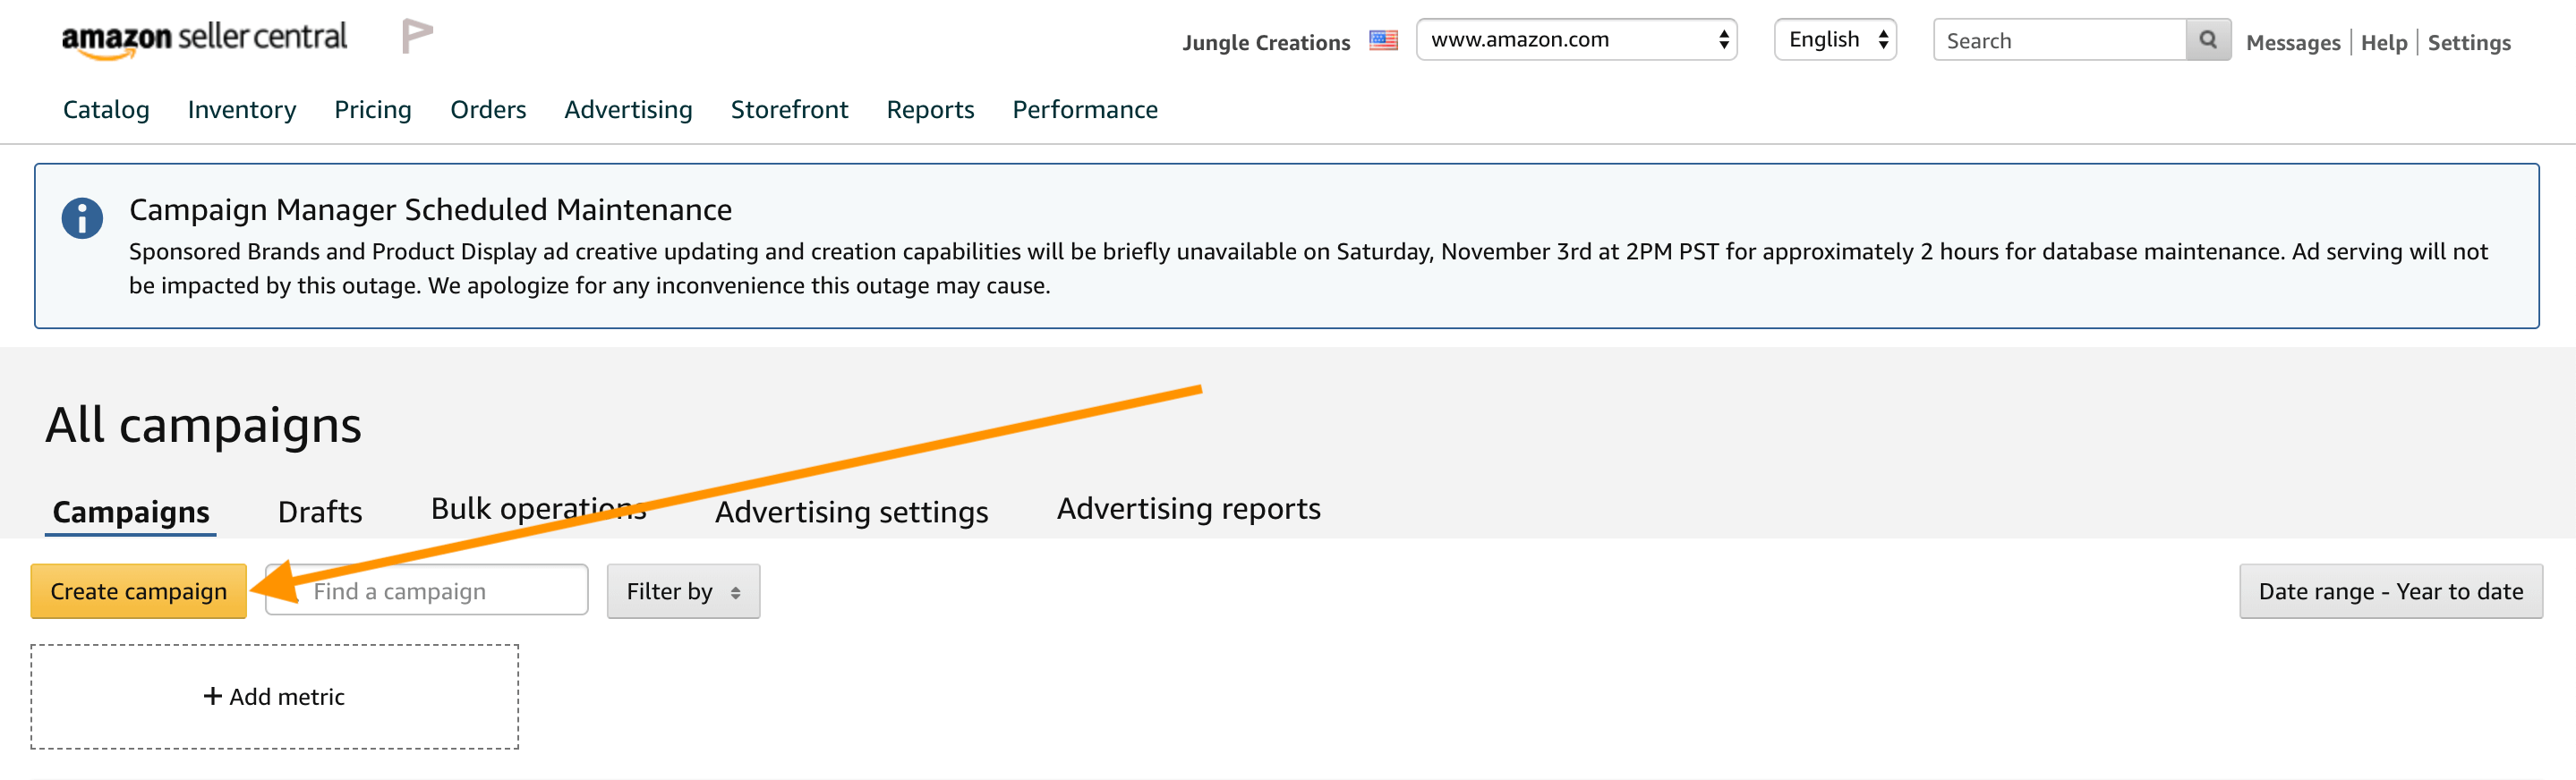
So the first thing you want to do is go over to the Advertising tab in Seller Central and click on Campaign Manager.

In here, you’ll see the Create Campaign button on the top left.
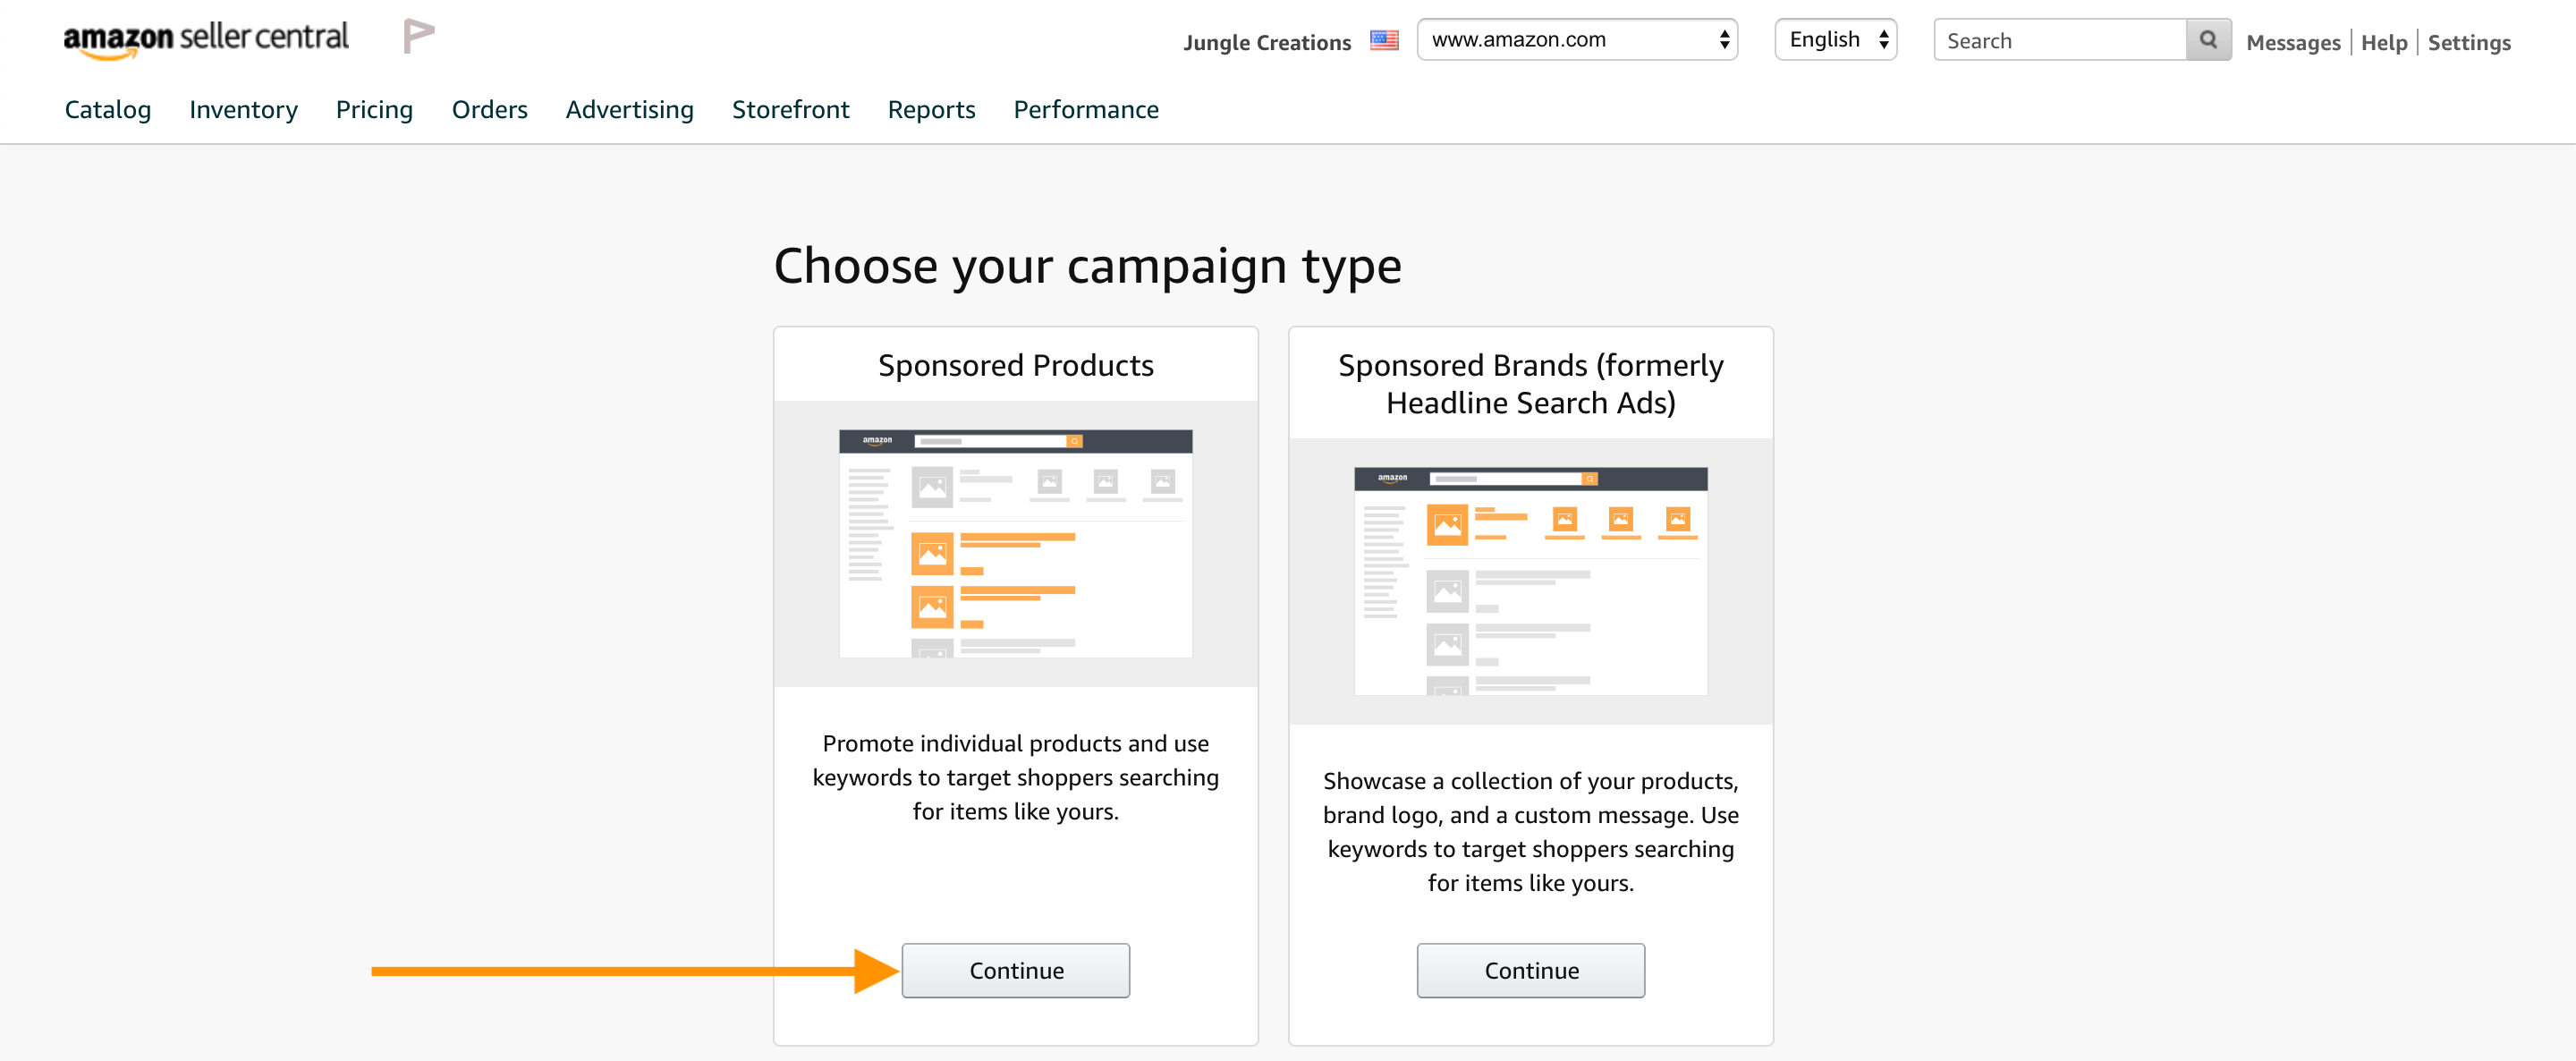
There’s two different types of campaigns that you can create inside of Amazon Seller Central. The first one is Sponsored Products and the second one is Sponsored Brands.
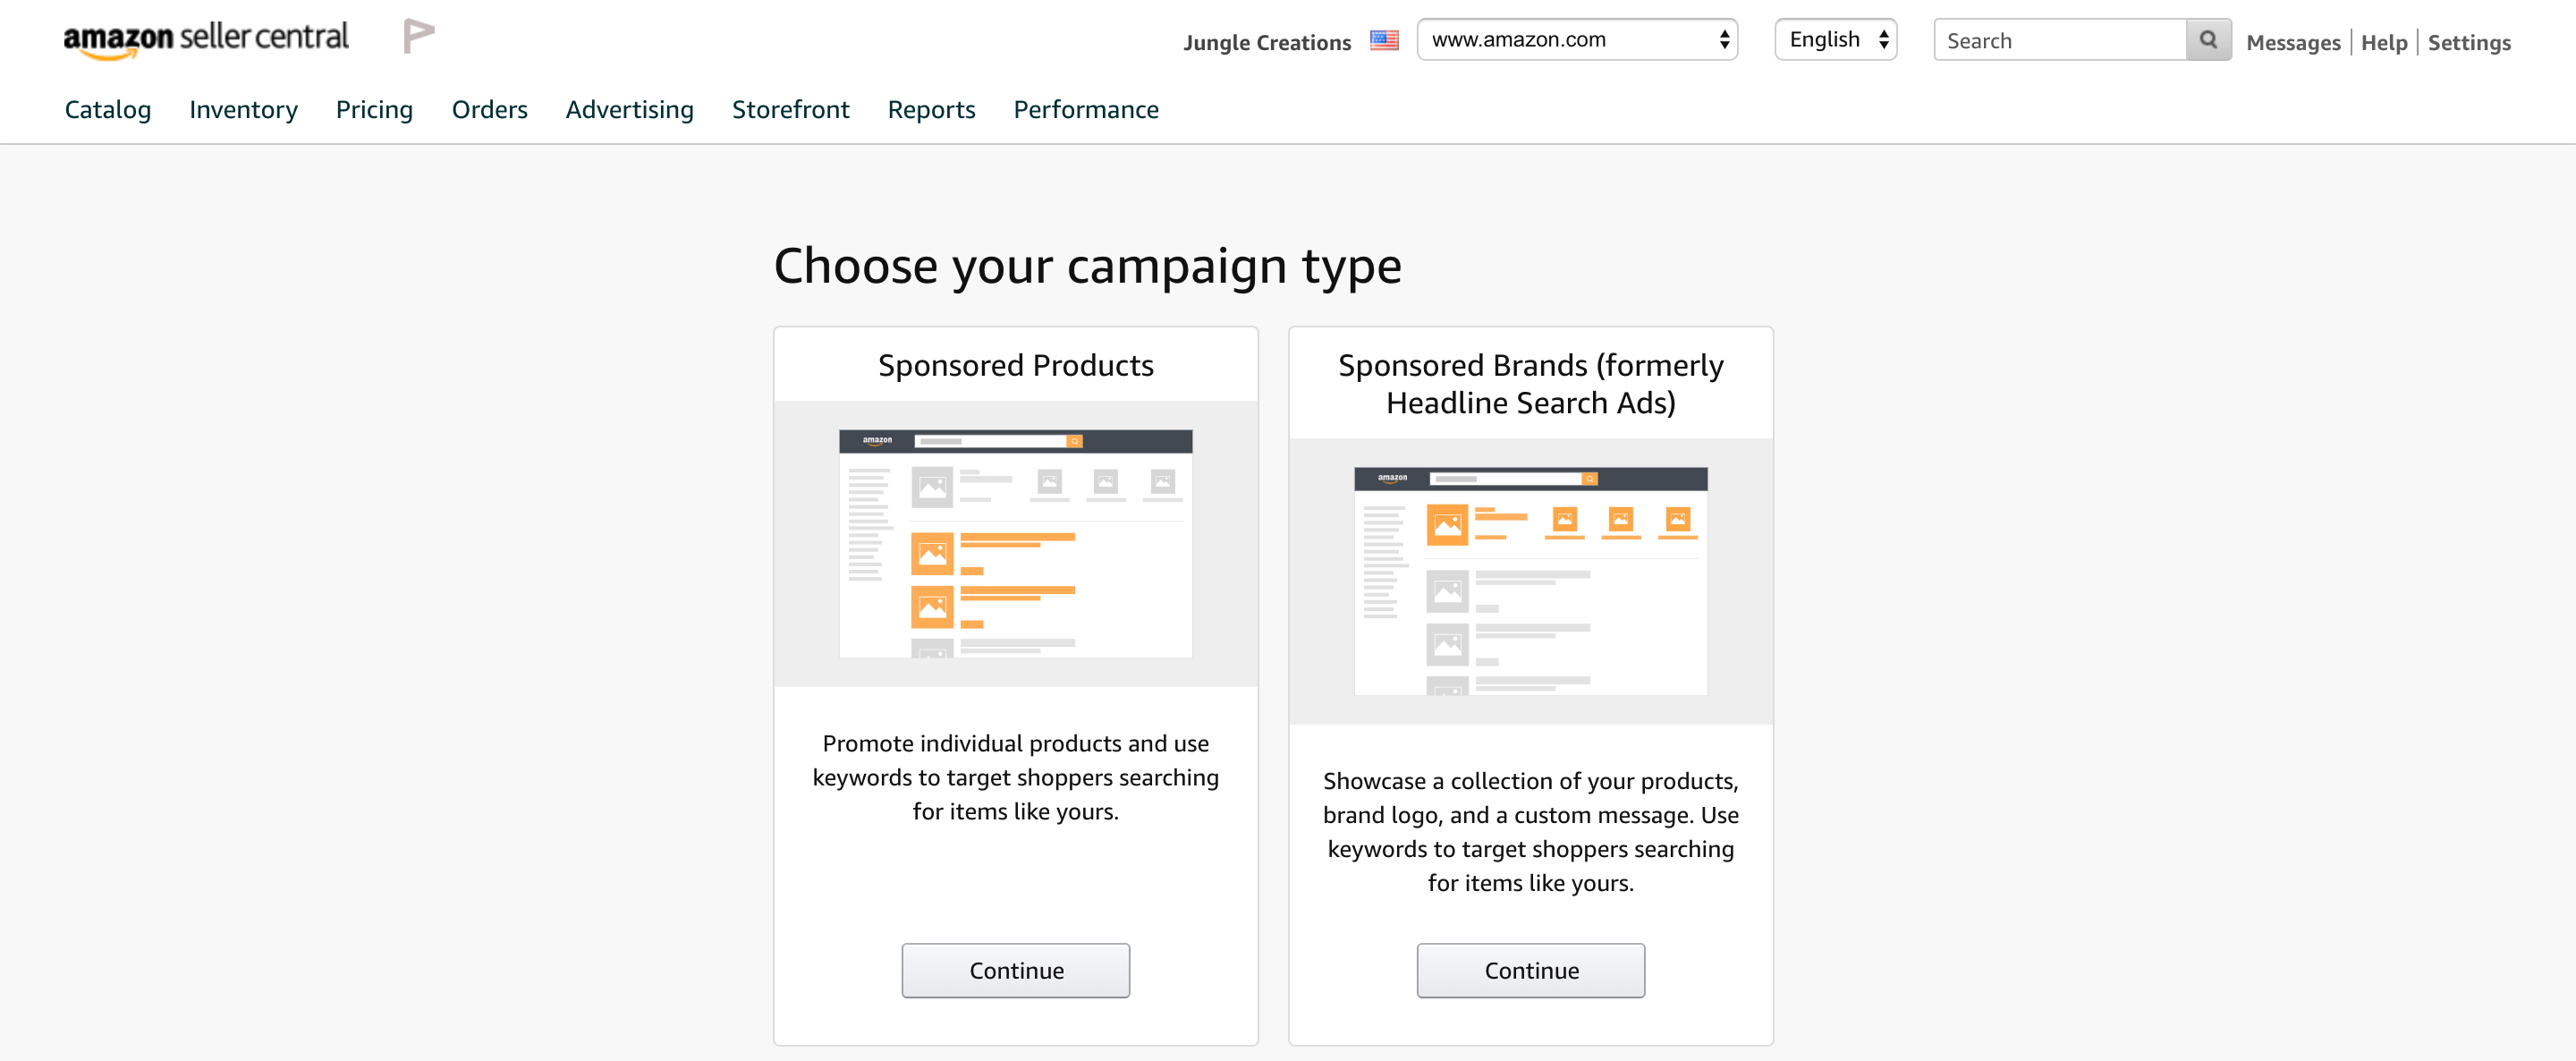
Let me digress for a moment and show you the difference between the two. I did a search for the keyphrase “hooded baby towel” and as you can see below the big bar at the top is a Sponsored Brand ad and the blocks below are Sponsored Products ads.
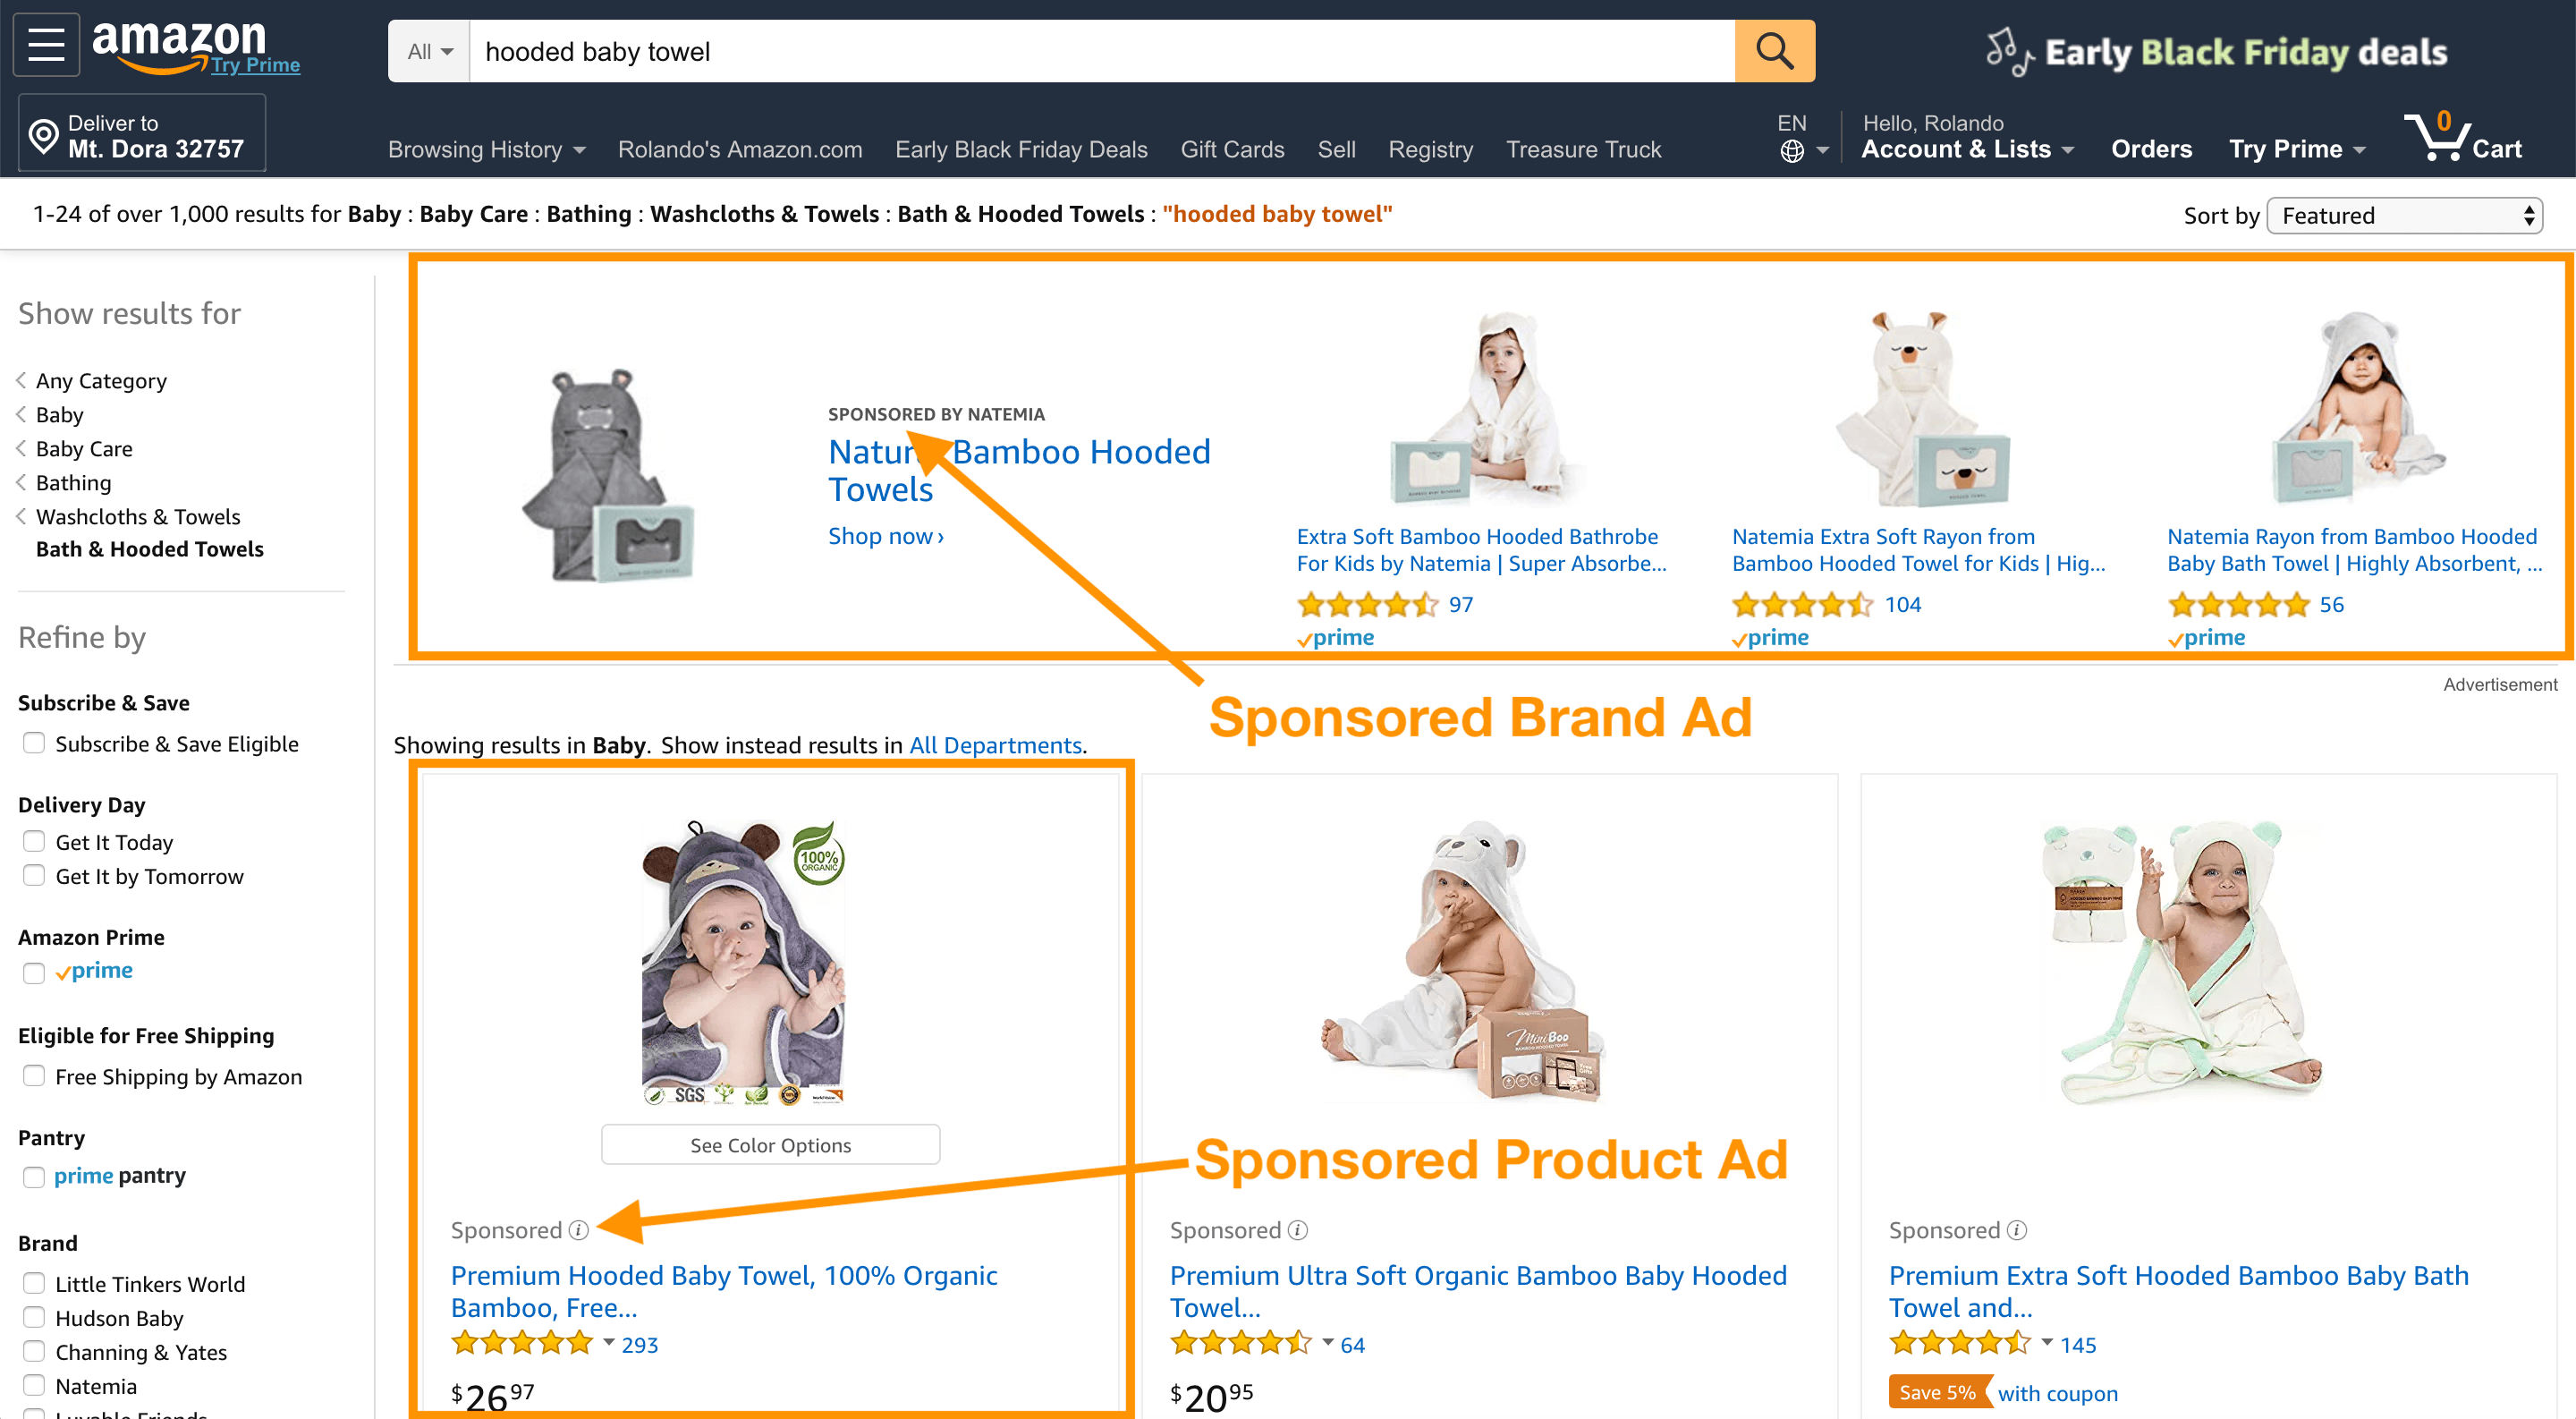
For the purpose of this Million Dollar Case Study episode, we’re going to be talking about Sponsored Product ads as they are the most cost-effective for us. Furthermore, in order to run Sponsored Brand ads you must be Brand Registered, which, if you remember from Episode 7 (Branding, Packaging and Trademarking), you have to have a trademark to begin the process of Brand Registry.
So now let’s go ahead and hit the Continue button.
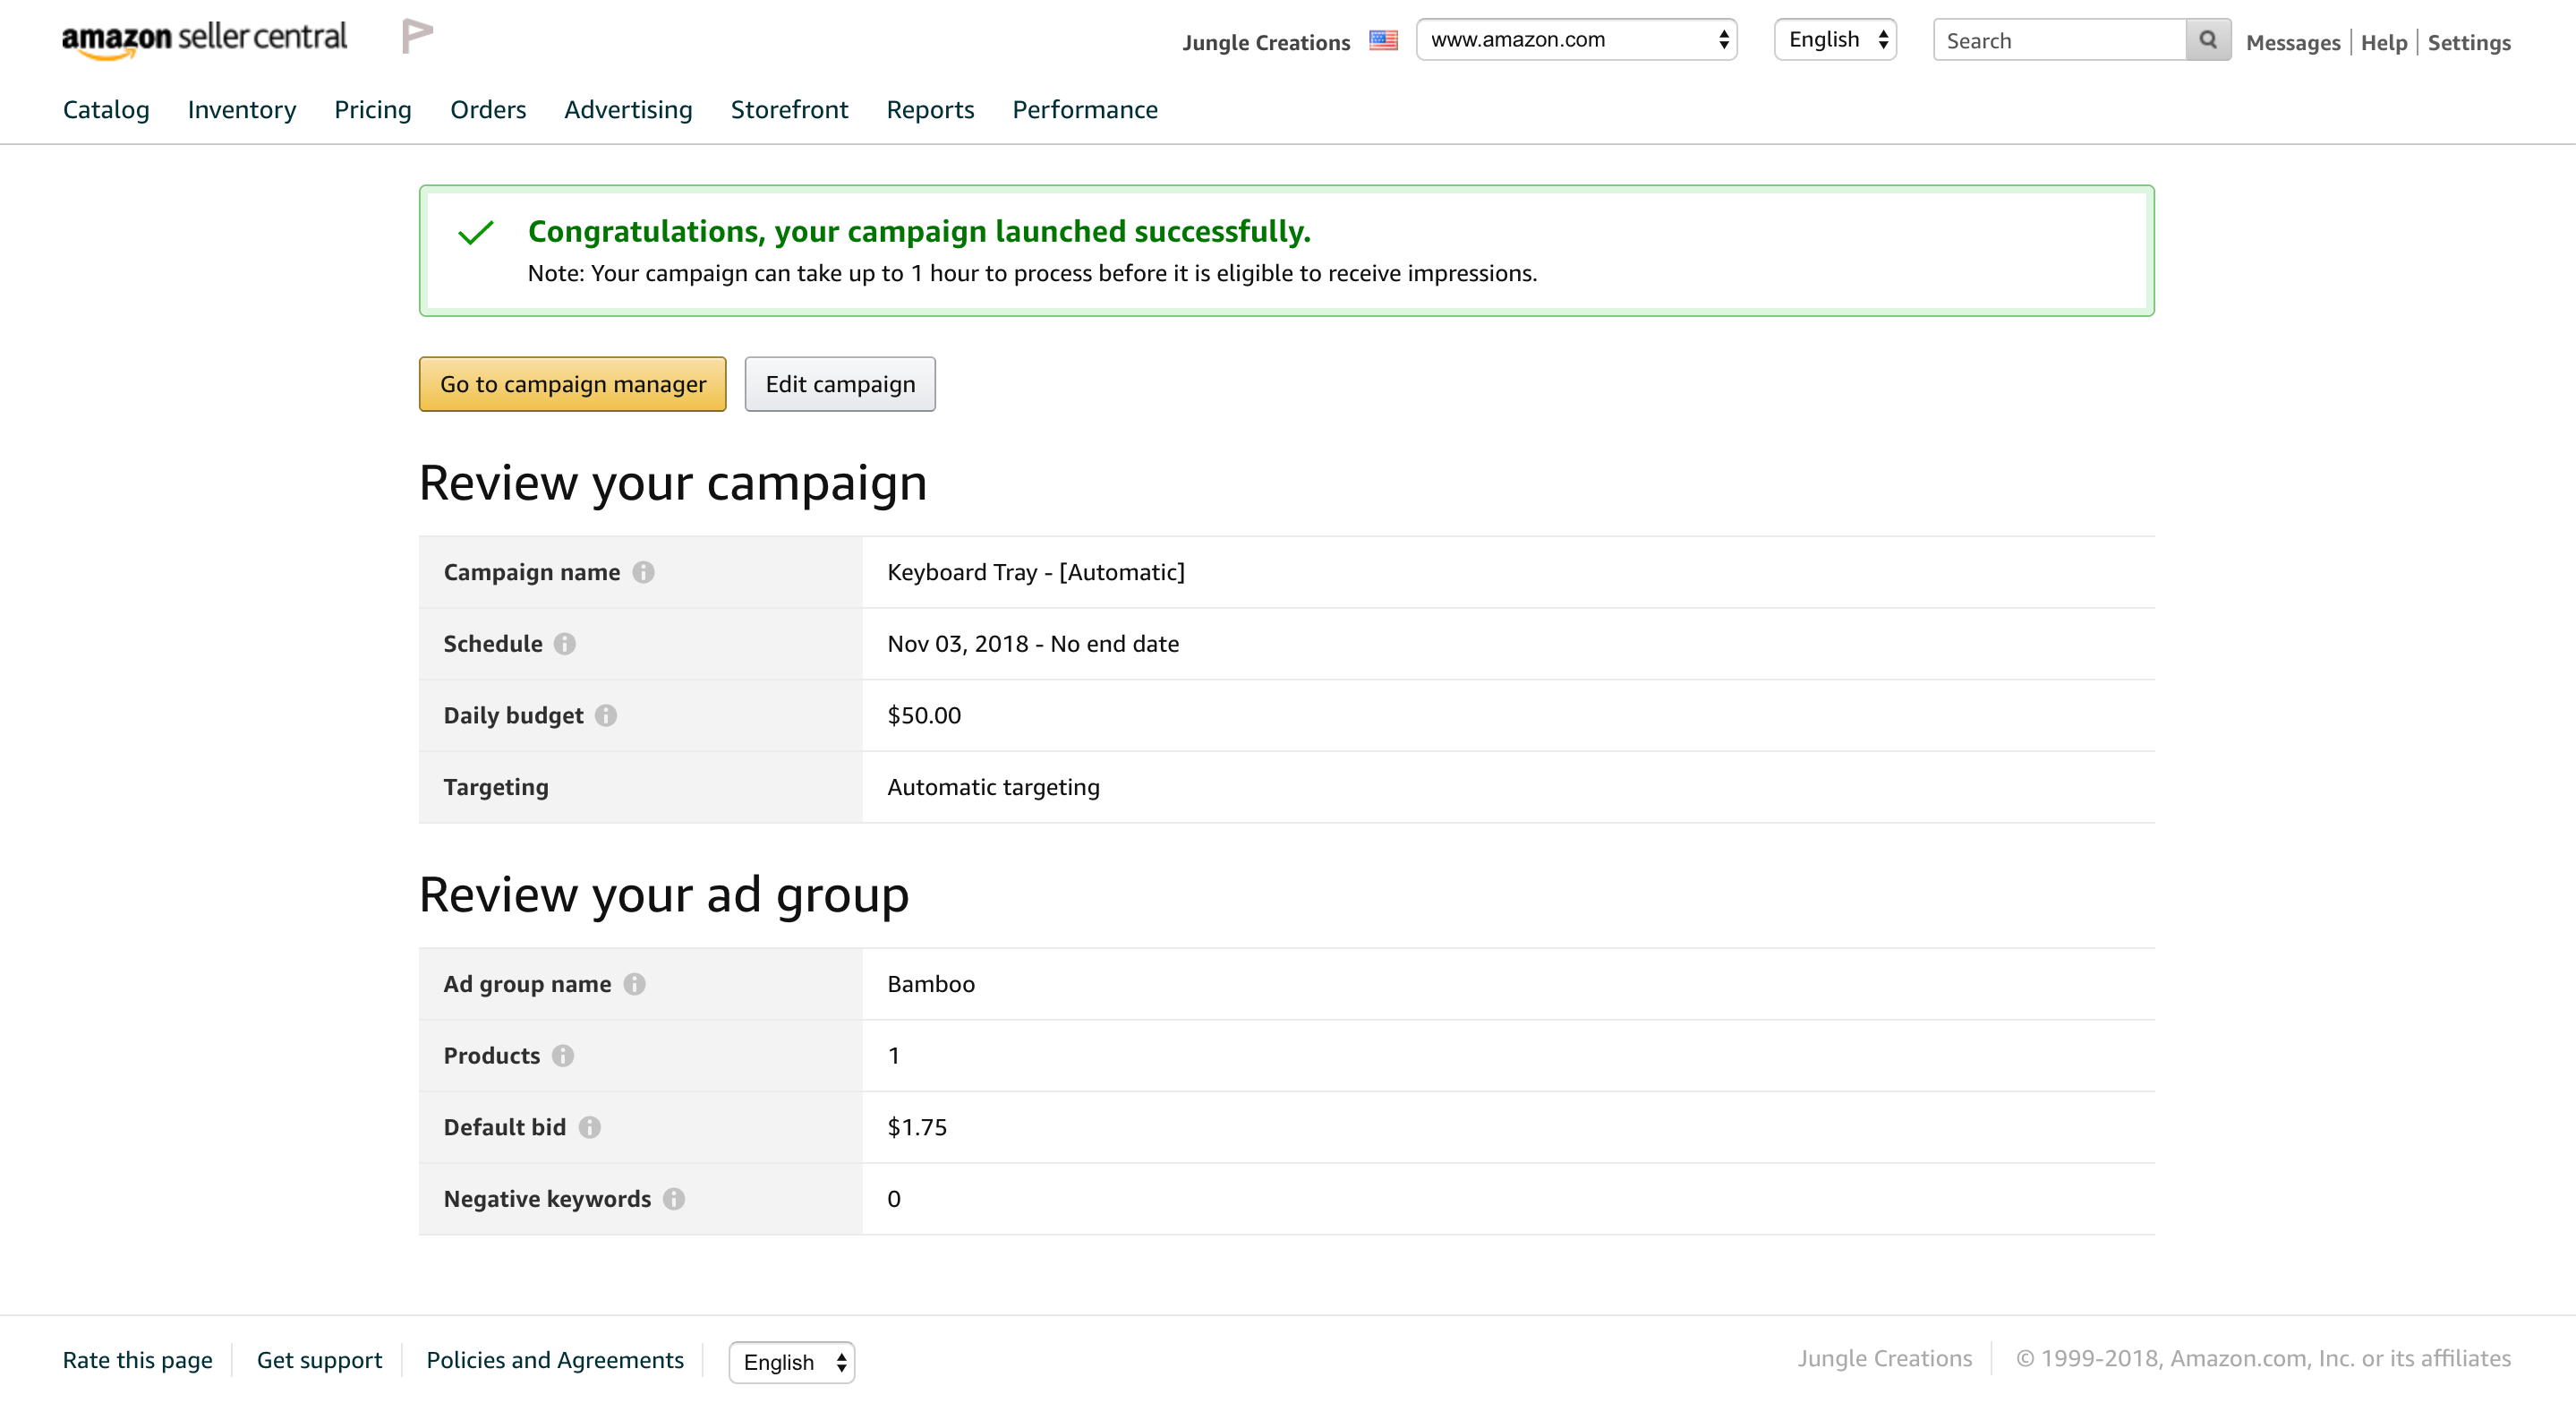
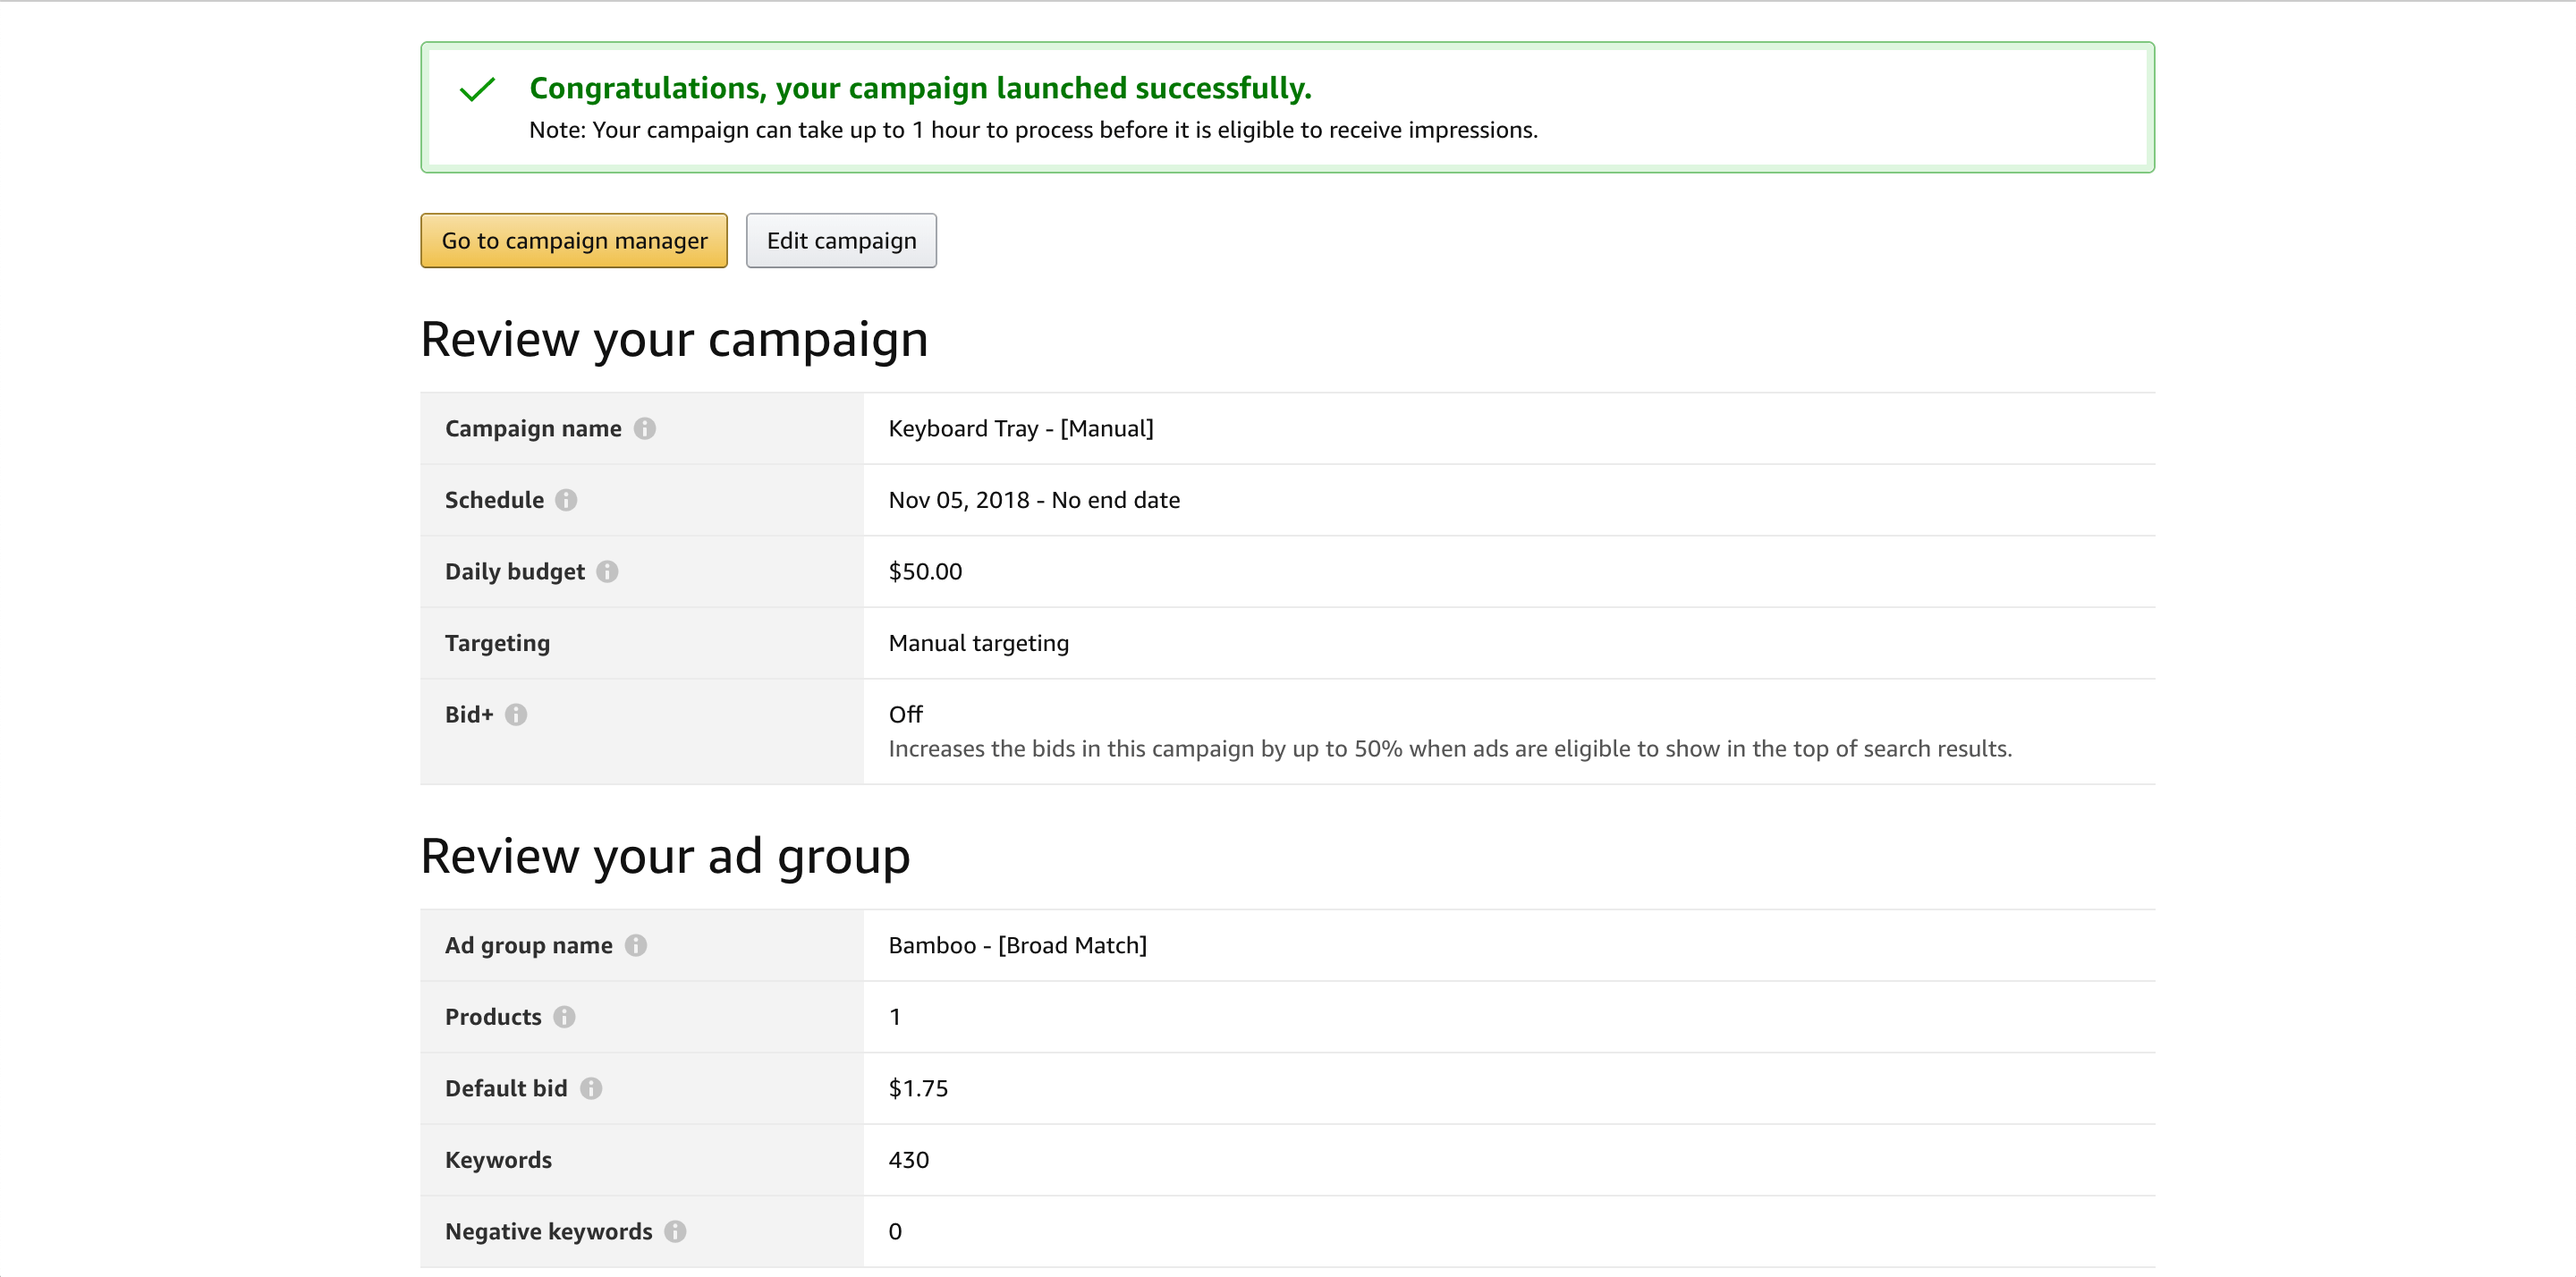
Create campaign
- For campaign name, we want to name our product type as well as the targeting type, either Automatic or Manual targeting. So for this campaign, we’ll name it “Keyboard Tray – [Automatic]”.
- We’ll start it today, and run it indefinitely until we kill the campaign
- For our Daily budget, I want to be a little bit more aggressive because I want to bolster my sales early on while I launch this product, so I’m going to put my daily budget at $50
- I’ve chosen Automatic targeting here
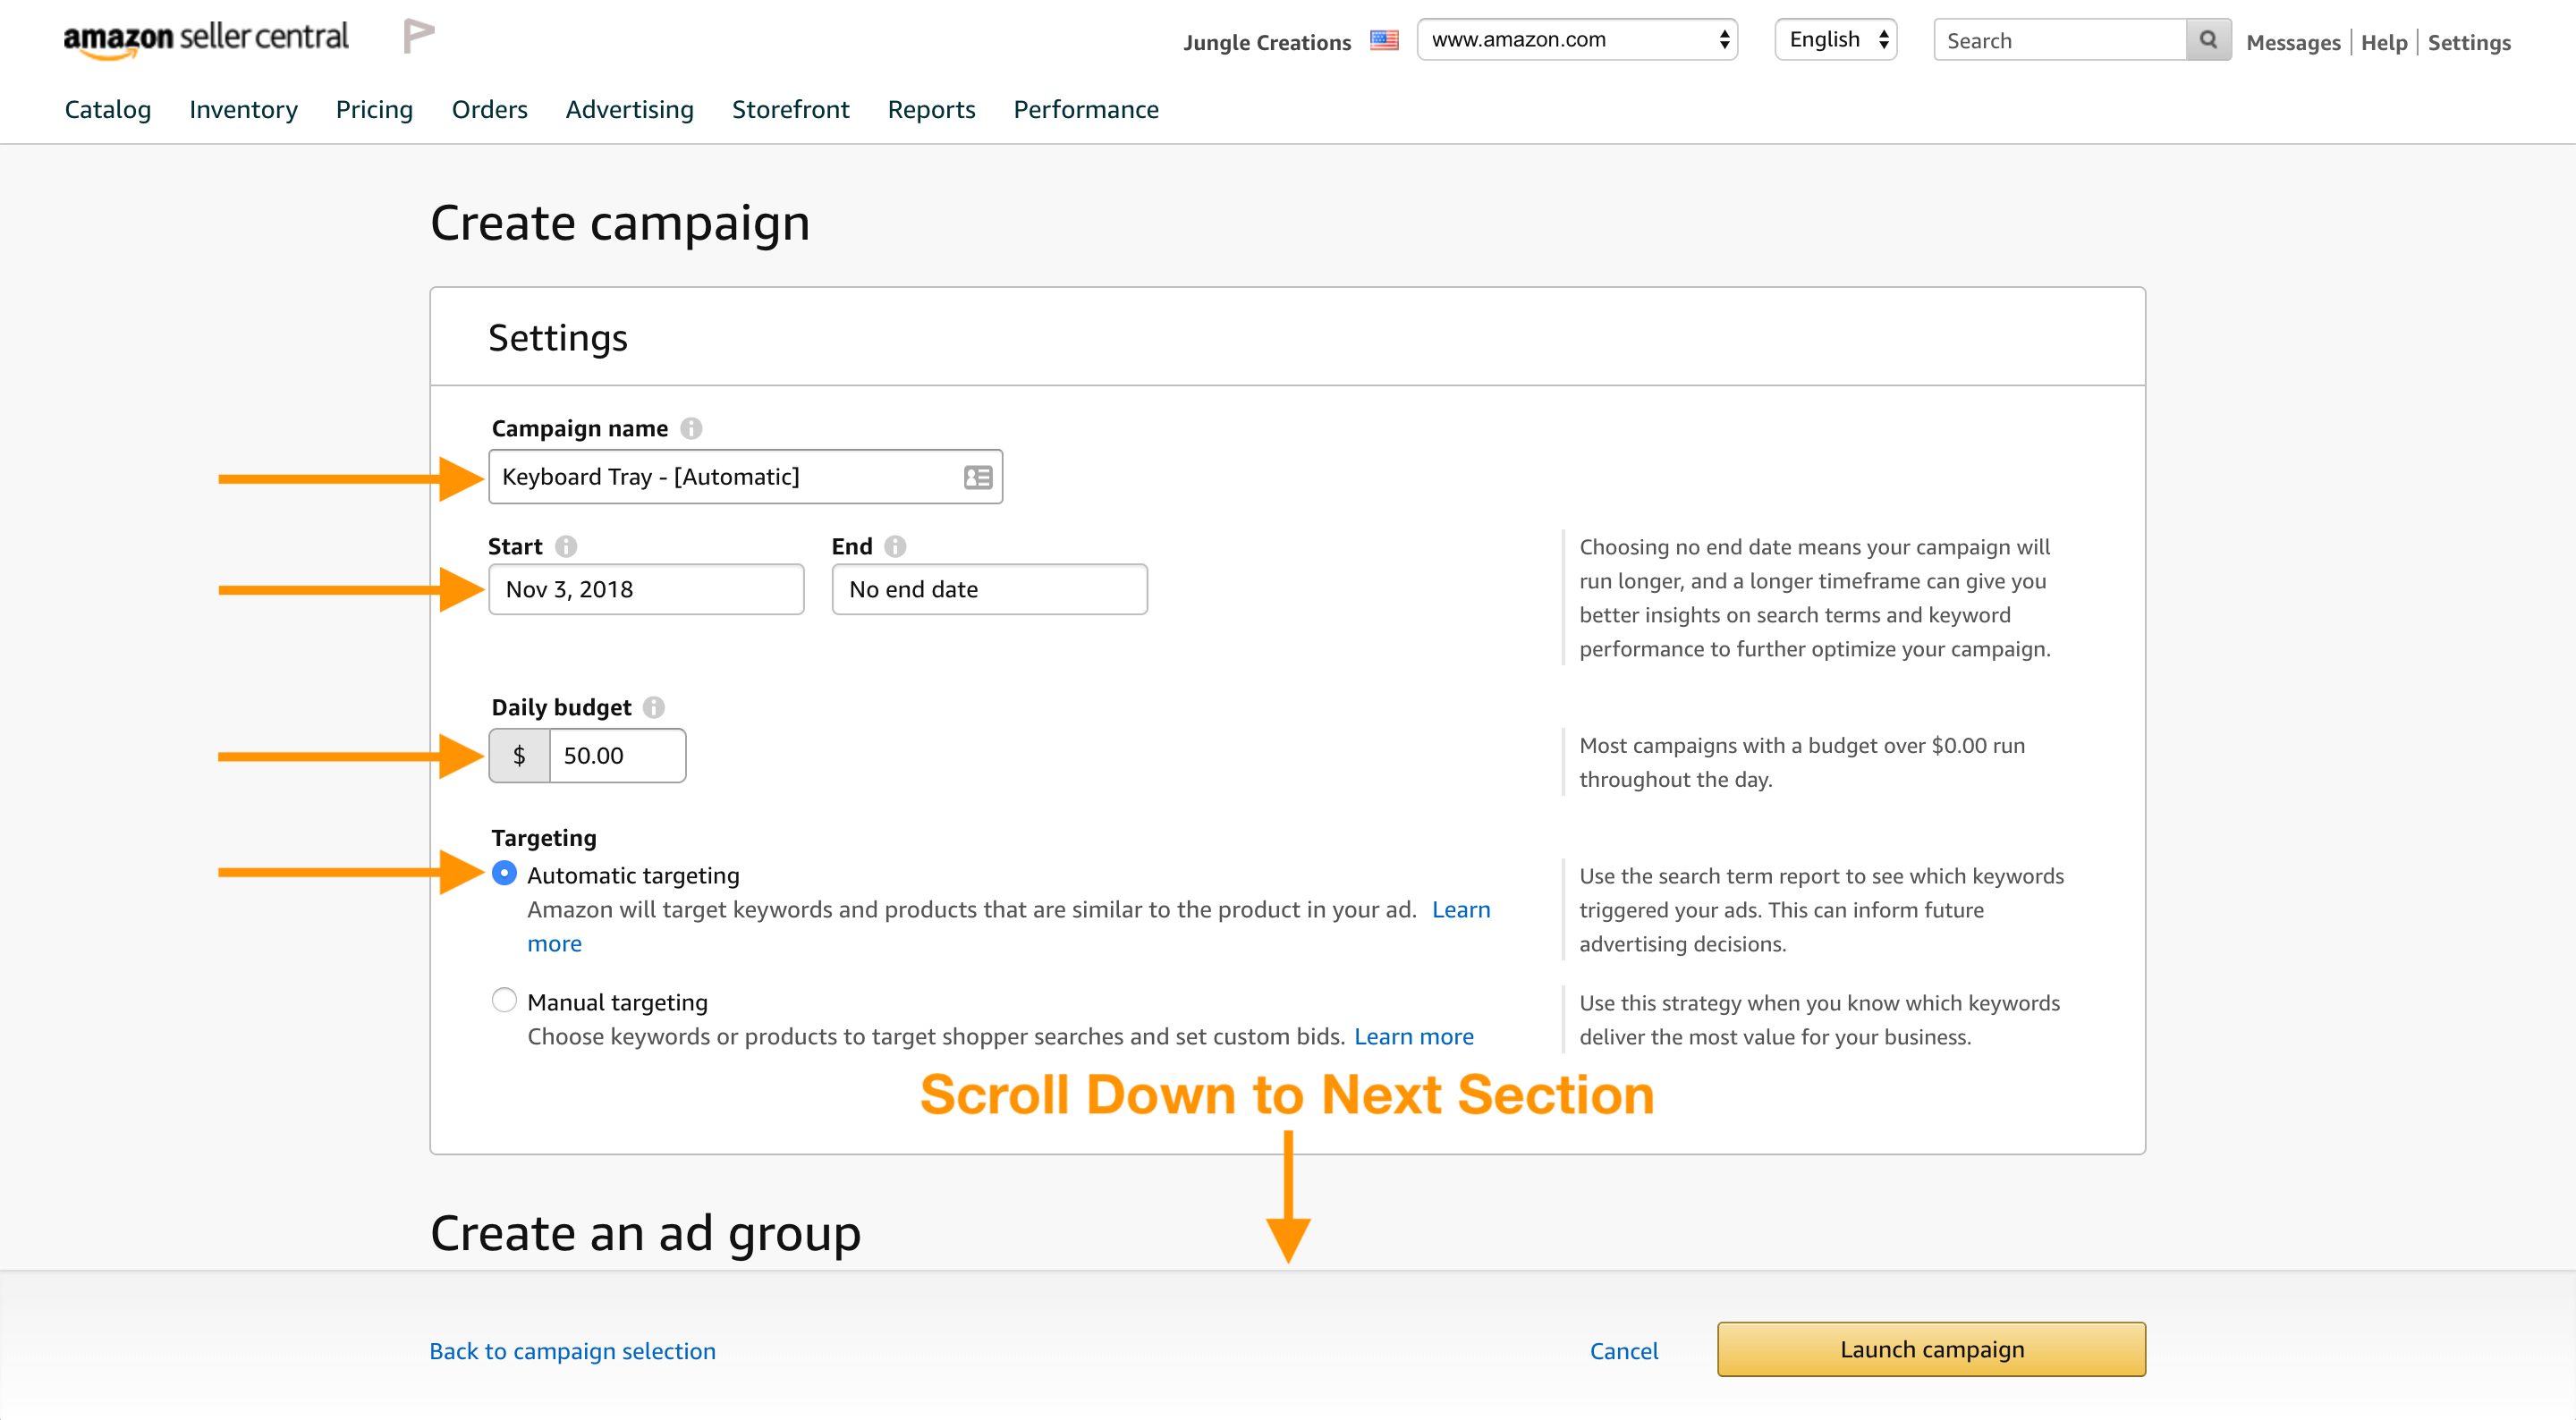
Let me explain the difference between automatic targeting and manual targeting. With automatic targeting, you actually don’t have to input any of the keywords that Amazon wants you to bid on. All you do is essentially turn it on with your budgeting and Amazon chooses what keywords they think are relevant for your particular product.
When I’m first starting out, I actually run automatic and manual campaigns, and then down the road when I’m trying to fine tune it, that’s when I switch to only manual targeting because you can fine tune it a little bit more, and you can get your ACoS down.
💡ACoS (Advertising Cost of Sale) – an Amazon-specific metric so it’s not something you would find on other PPC platforms. It measures the sum of your advertising costs and divides them by the sales revenue an ad generates. Advertising Costs / Sales Revenue = ACoS percentage
Create an ad group
For Ad group name, I like to split this up by variation and match type. With automatic targeting, there’s actually no match types so for this ad group we’ll name it based on our variation. We have a Black Keyboard Tray and a Bamboo Keyboard Tray, so here we’ll put “Bamboo”. I go down, I select that product and click Add.

Bidding
In the Bidding section, Amazon gives us a little insight as to what the competition is like in our category. If you look directly below the Default bid input field, Amazon has a suggested bid range of $0.59 to $2.50.
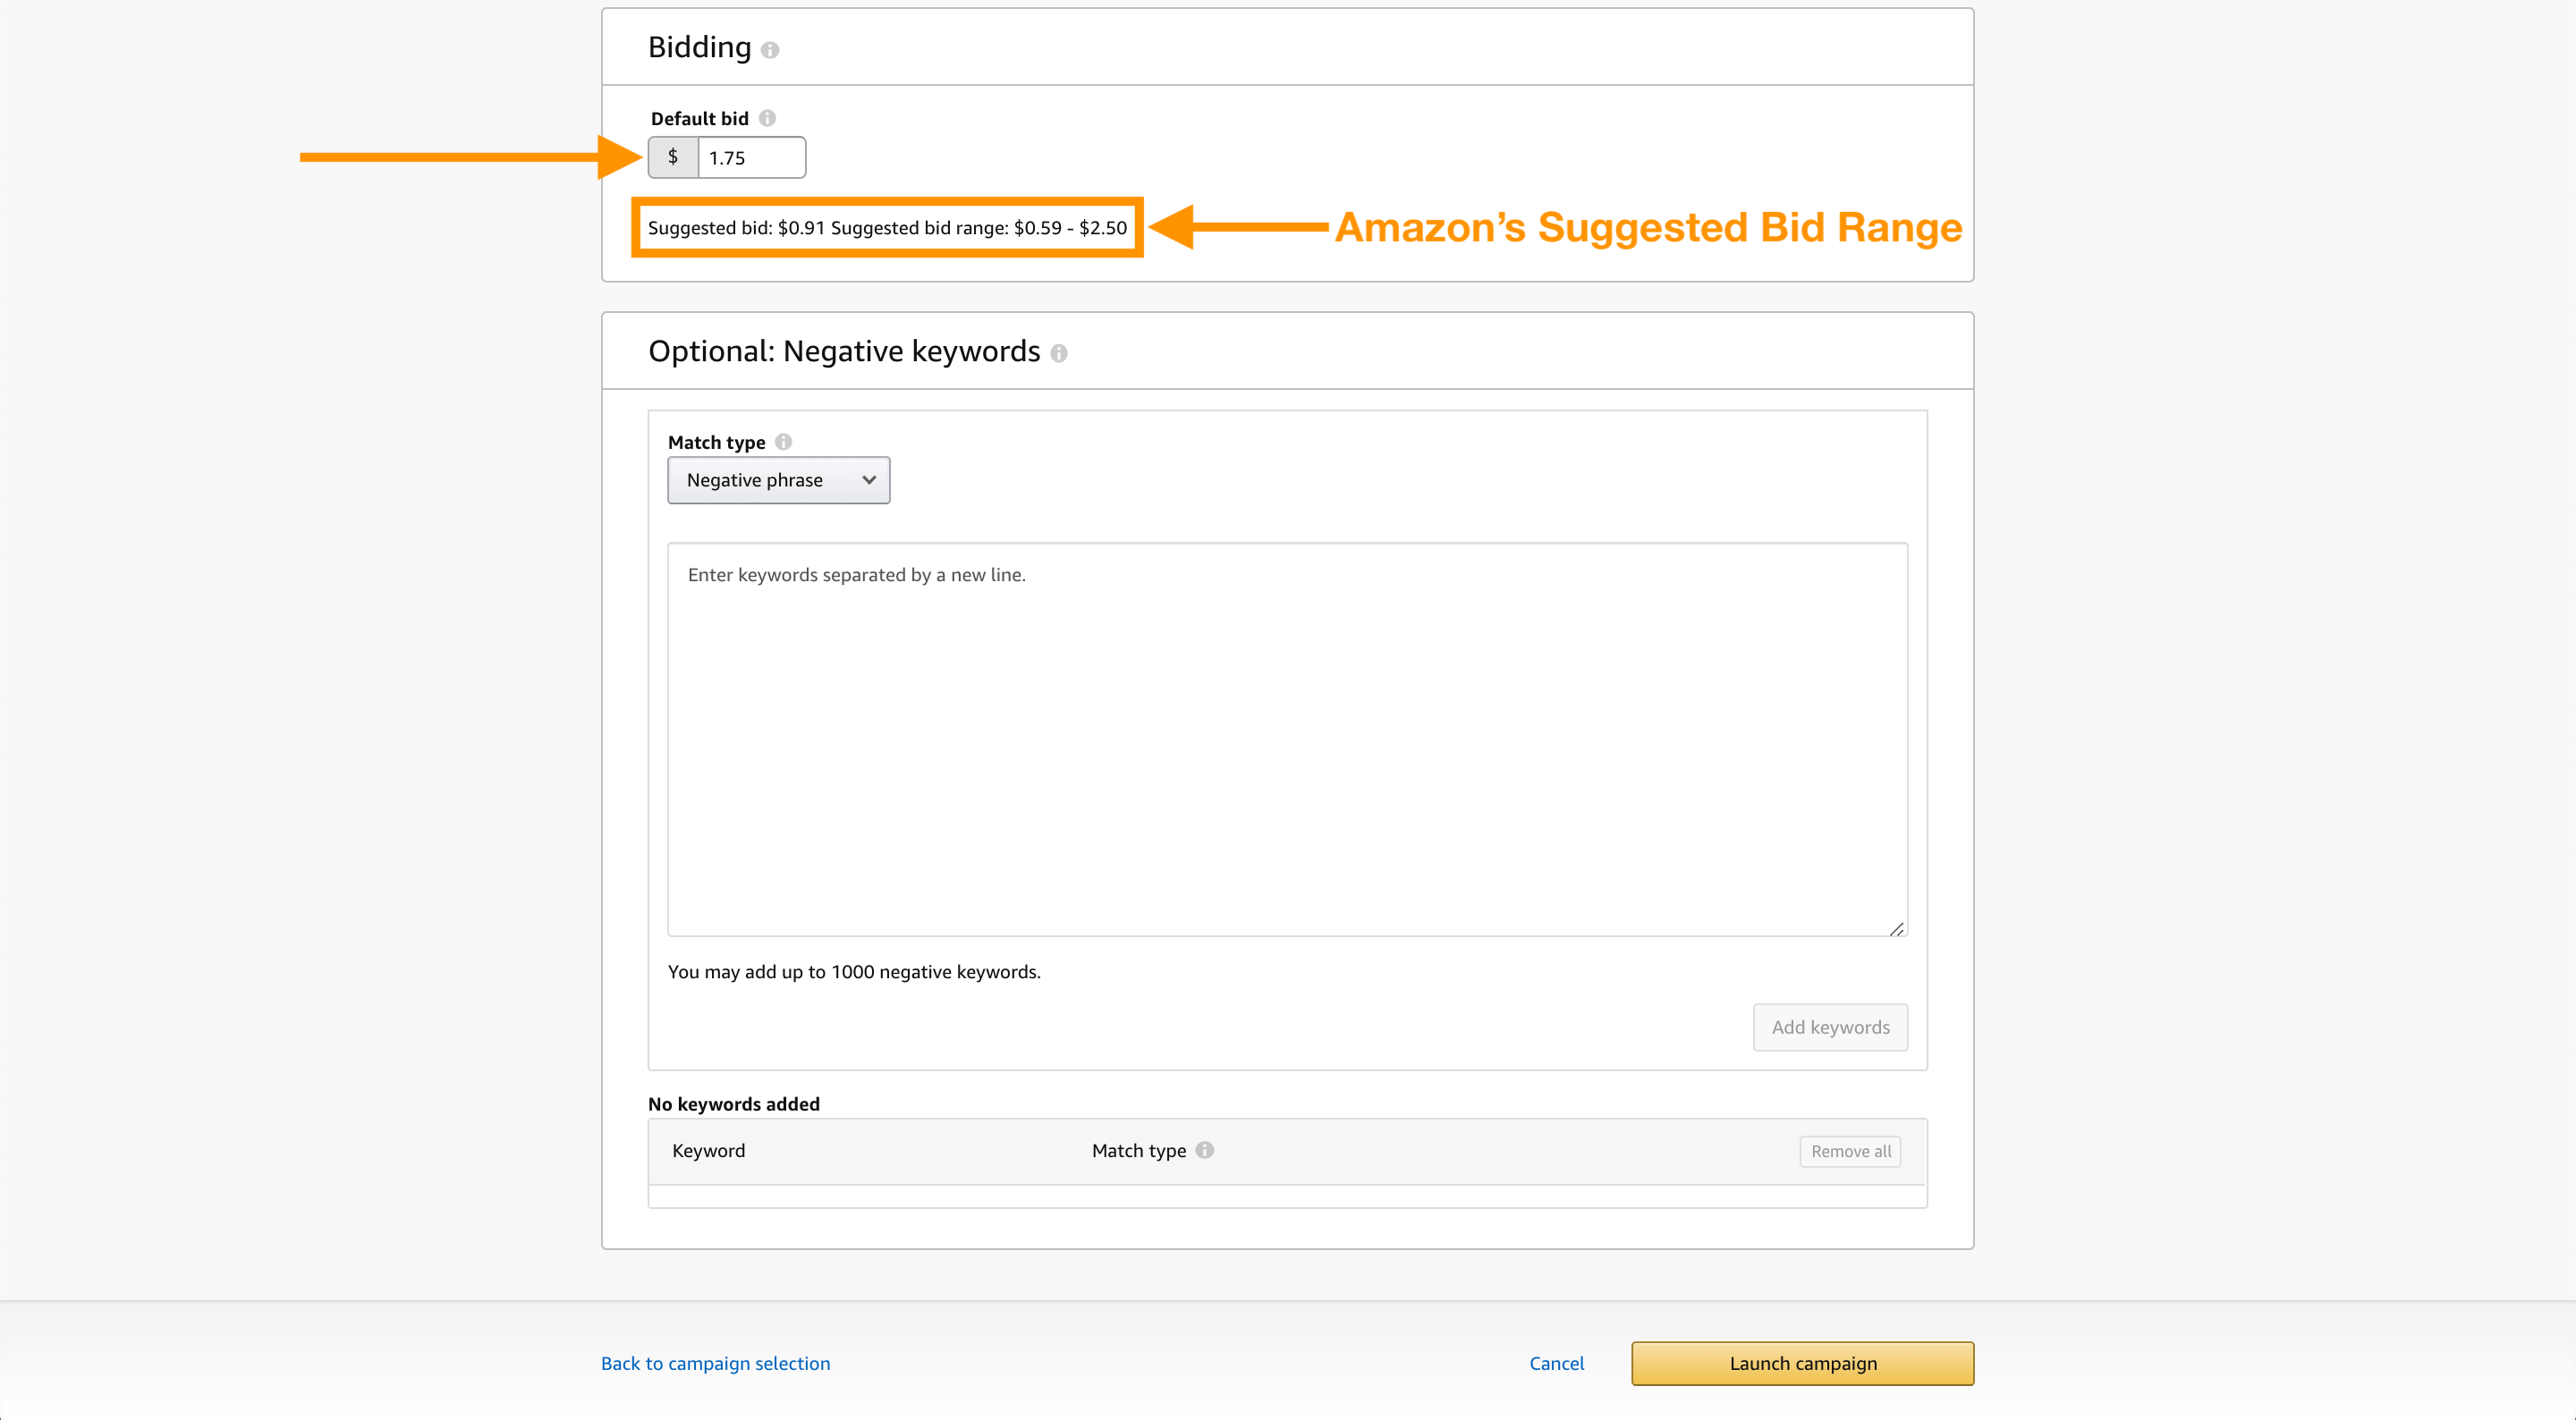
Again, since this is my launch phase and I’m trying to be a little bit more aggressive to get those extra sales, I usually go towards the higher end of their bid range, so I’m going to put $1.75, which is in the upper area of the suggested bid.
Optional: Negative keywords
You can add negative keywords at the campaign level or at ad group level. When you do this, it will prevent your ads from showing when consumers search for those terms. There are two main reasons why this is useful:
- It means you can stop your ads appearing for things that are irrelevant. For example, if you sell a garlic press, you might want to exclude “garlic slicer”.
- It means you can run more sophisticated campaigns without wasting money and targeting the same keyword twice.
At this stage we don’t have any negative keywords to enter so I’m going to go ahead click Launch Campaign and just like that I’ve set up my first campaign!
How this should flow:

Will Amazon use up my entire budget?
Amazon’s platform is a bid-type auction, and as per the automatic campaign I just set up, I’m telling them that I am willing to spend up to $1.75 per keyword (at a maximum of $50 per day). Now, if someone else is bidding for those same keywords for, say, $1.70, then Amazon will charge me $1.75 for that click. If the next highest bid is, say, only 40, 50 cents, then they’ll only be charging a little bit more than that, say 55 or 60 cents.
So do I get charged every time an ad is shown to a customer?
Amazon charges you every time a customer clicks on your ad. So it doesn’t matter how many times your ads are shown to customers; it also doesn’t matter how many times people end up purchasing your product. All that matters is how many times a customer clicks on your ad, that’s when Amazon charges you up to your default bid.
Starting a Manual Campaign
Because a manual campaign allows you to upload keywords you find on your own, you’re going to need some additional tools like Keyword Scout.
Back to Seller Central’s homepage
You’ll start off the same way as we did with the automatic campaign:
- From your Seller Central’s homepage go over to the Advertising tab and click on Campaign Manager
- Select Sponsored Products campaign
- For Campaign name, we want to input our product name as well as the targeting type, (e.g. Keyboard Tray – [Manual]
- For Ad group name, carve your campaign up by product variation and match type (e.g. Bamboo – [Broad Match])
- Select the product listing you would like to advertise
-
Next, you can select your default bid, which is the maximum amount you are willing to pay when someone clicks your ad. This does not mean you will always pay this amount, this depends on the competition and their bids.
- A default bid between $0.50 and $1.75 is a good starting point, but it depends on your niche and your keywords
- There is also the option to increase the bid only when your ad is eligible to appear as the top result
-
Once your default bid is set, now you can add your keywords
- Ensure you are using the correct match type for each ad group
- You can add your keywords in bulk by pasting them in and separating by line
- Once you add them, you will start to see suggested bids populating
Keyword Research
- If you recall, back in Episode 9 (Amazon Keyword Research) we created a “Master List” of keywords from the research we did on Keyword Scout
- Aim for 100 or more keywords in your Master List (keep in mind that Amazon does limit you to 1,000 keywords per ad group)
- Don’t spend too much time on keyword research, the main aim here is to generate a large list of keywords which you can import into your manual campaign and then refine and optimize them later
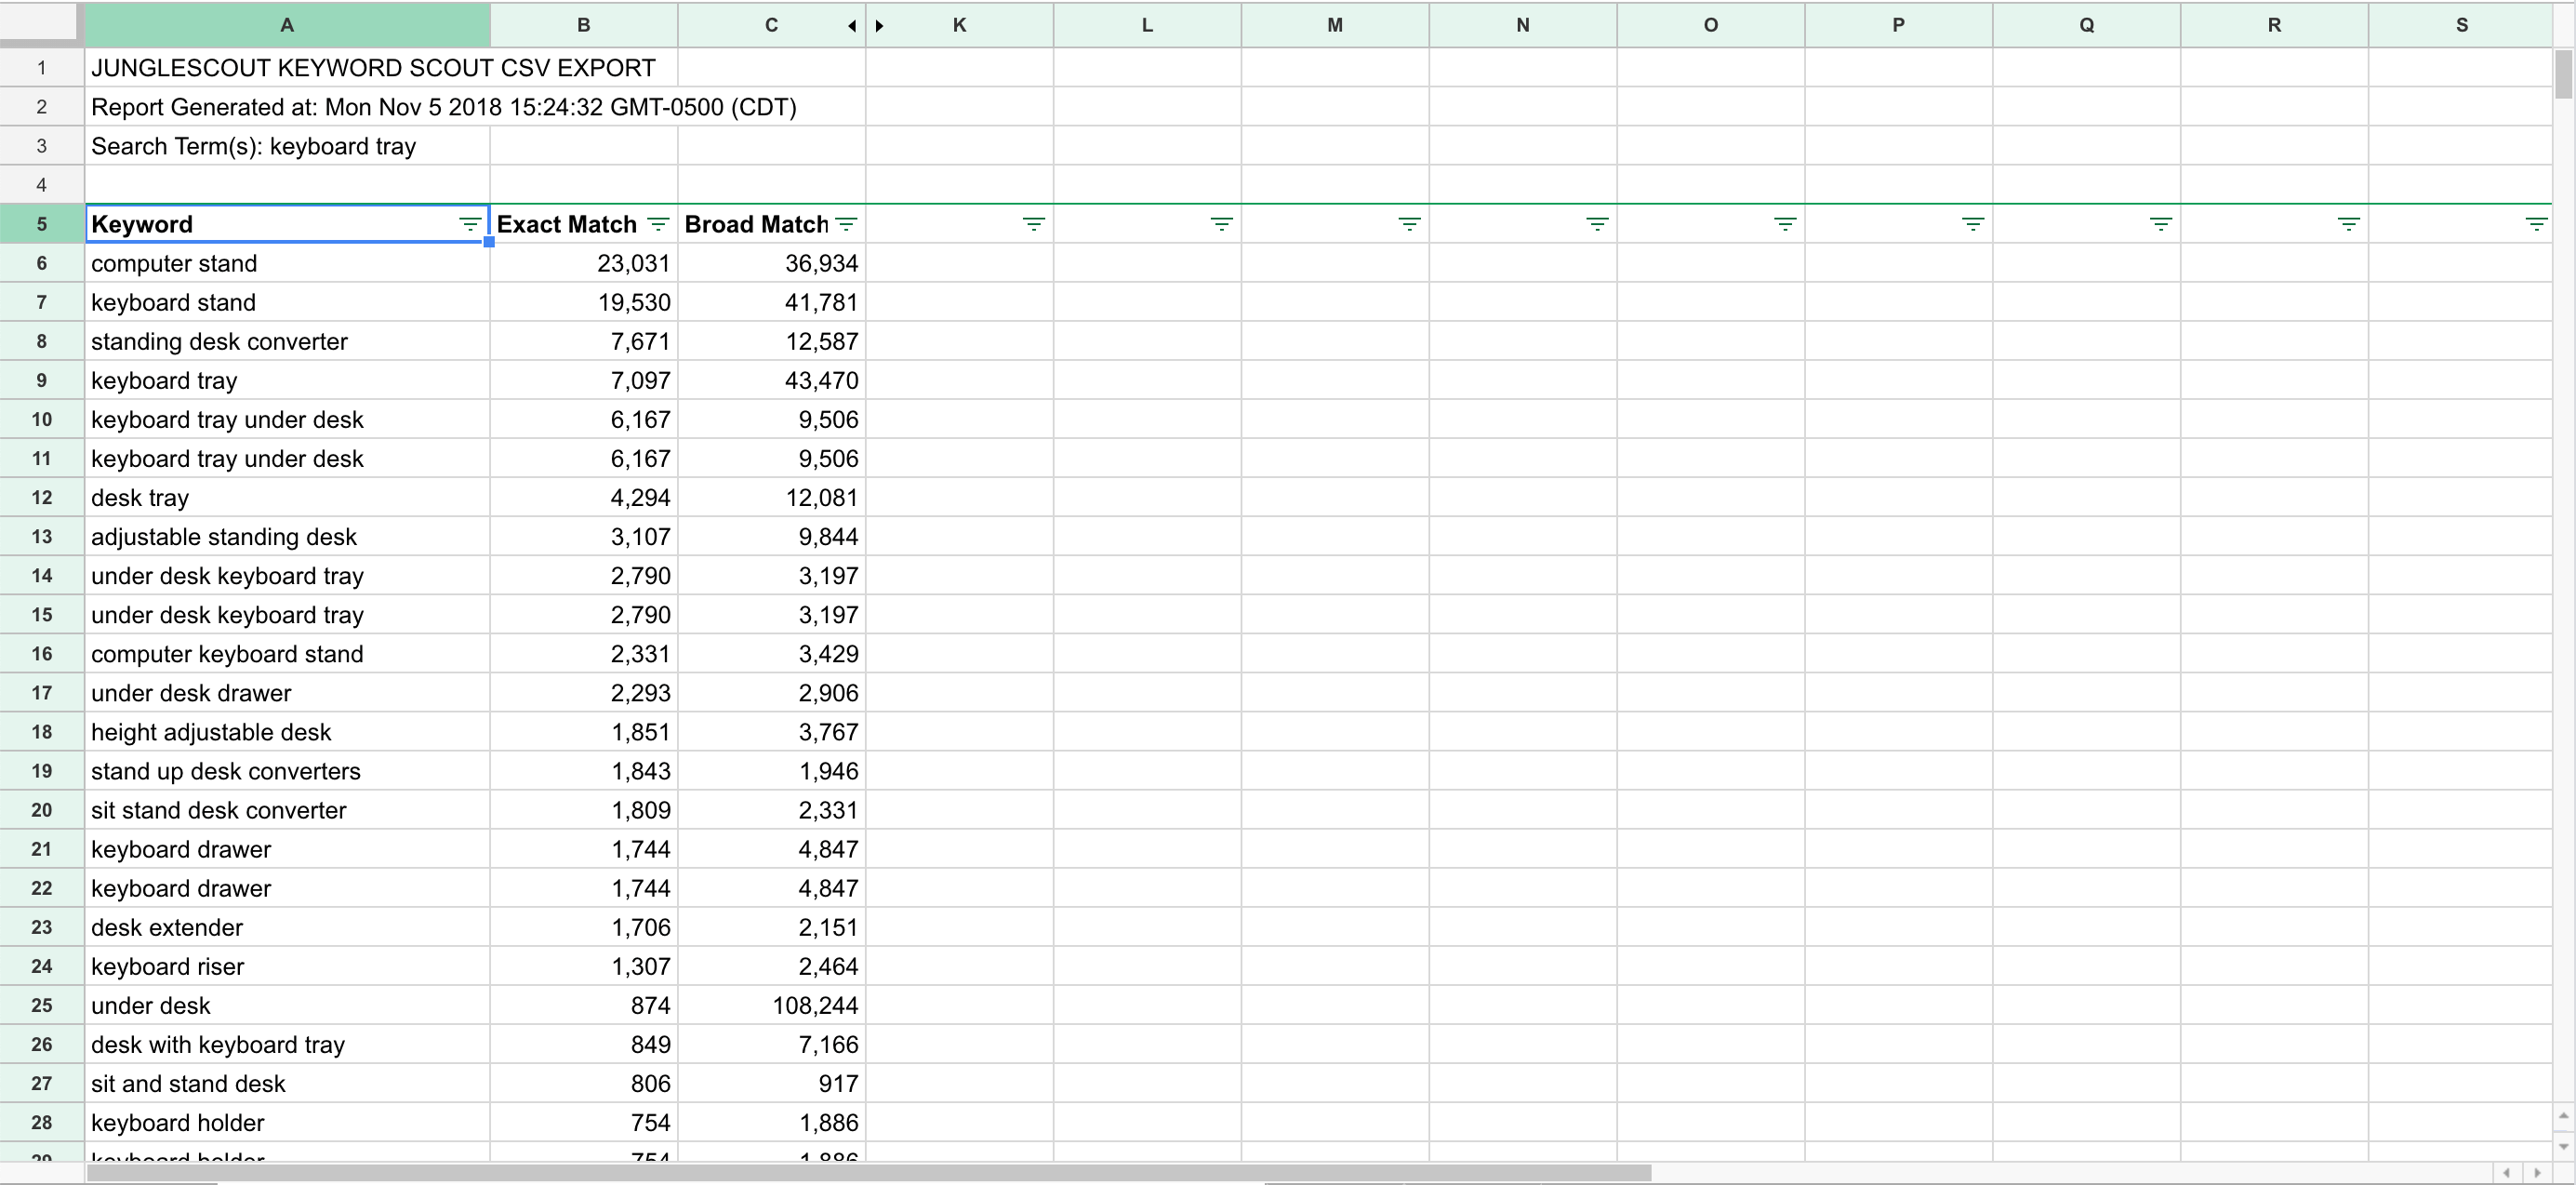
Let me show you how I generated my Master List of keywords from Keyword Scout, which is part of the Jungle Scout web app. If you already have access to the Jungle Scout web app, fabulous, you don’t have to spend any extra money, and you have unlimited access to Keyword Scout.
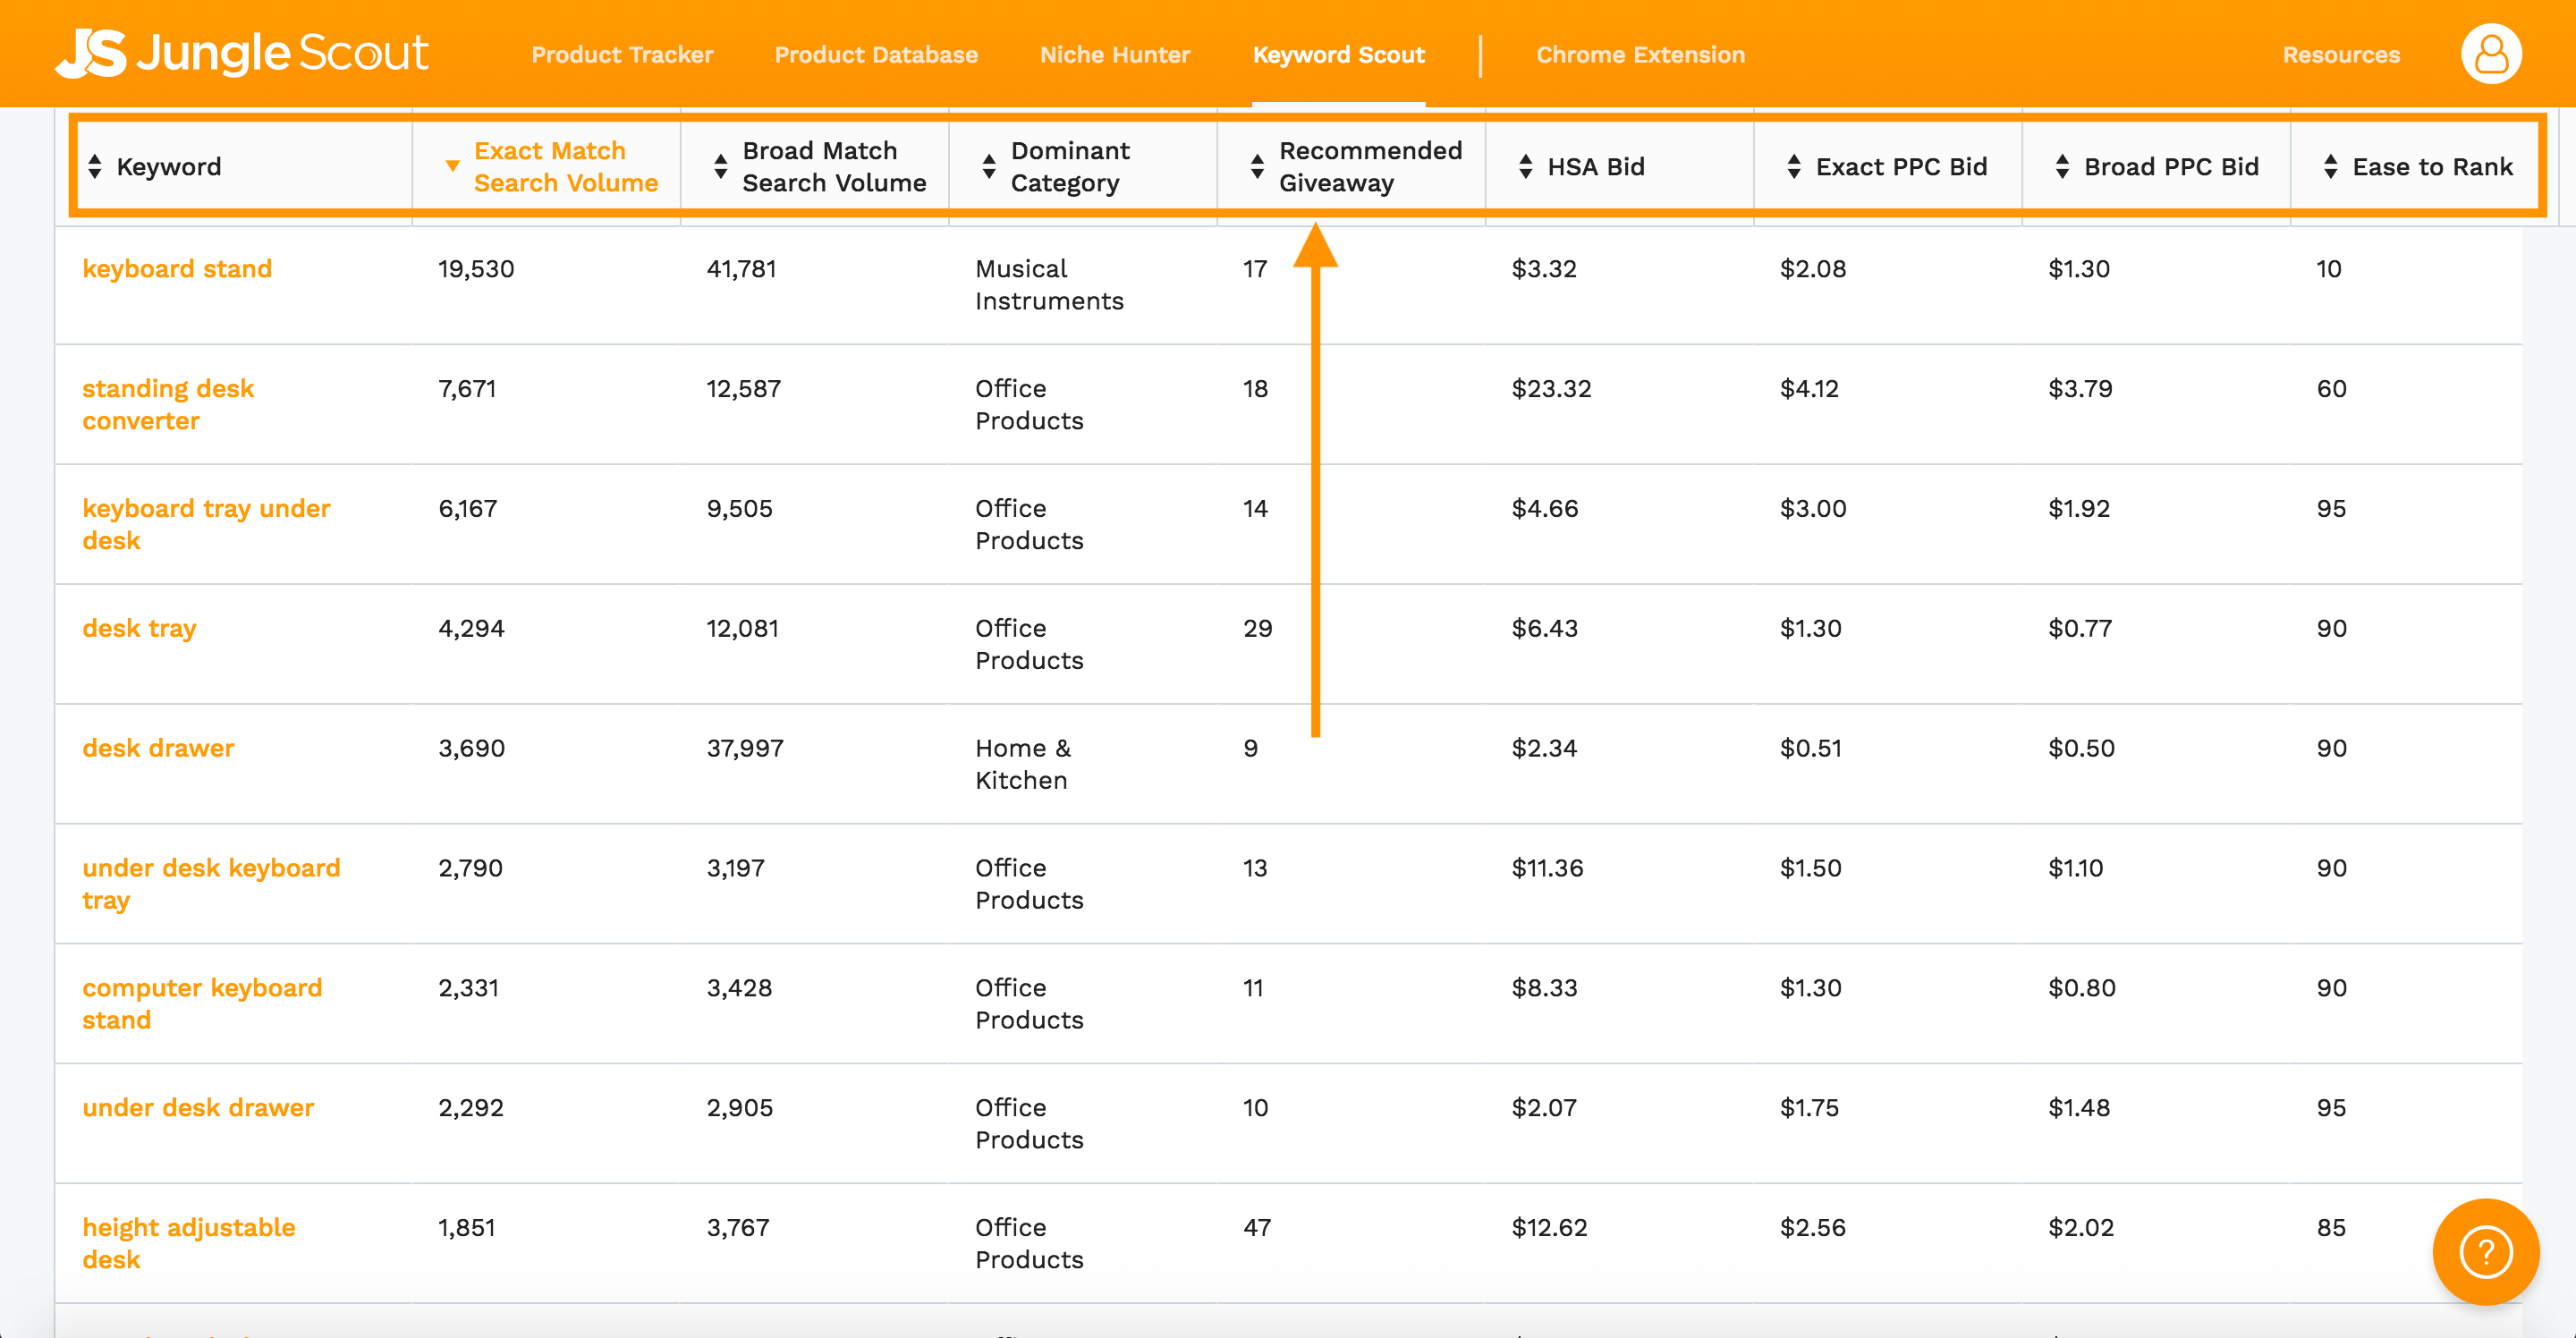
I’ll go ahead and enter “keyboard tray”, and right away I’m seeing over 2,000 results for suggested keywords.
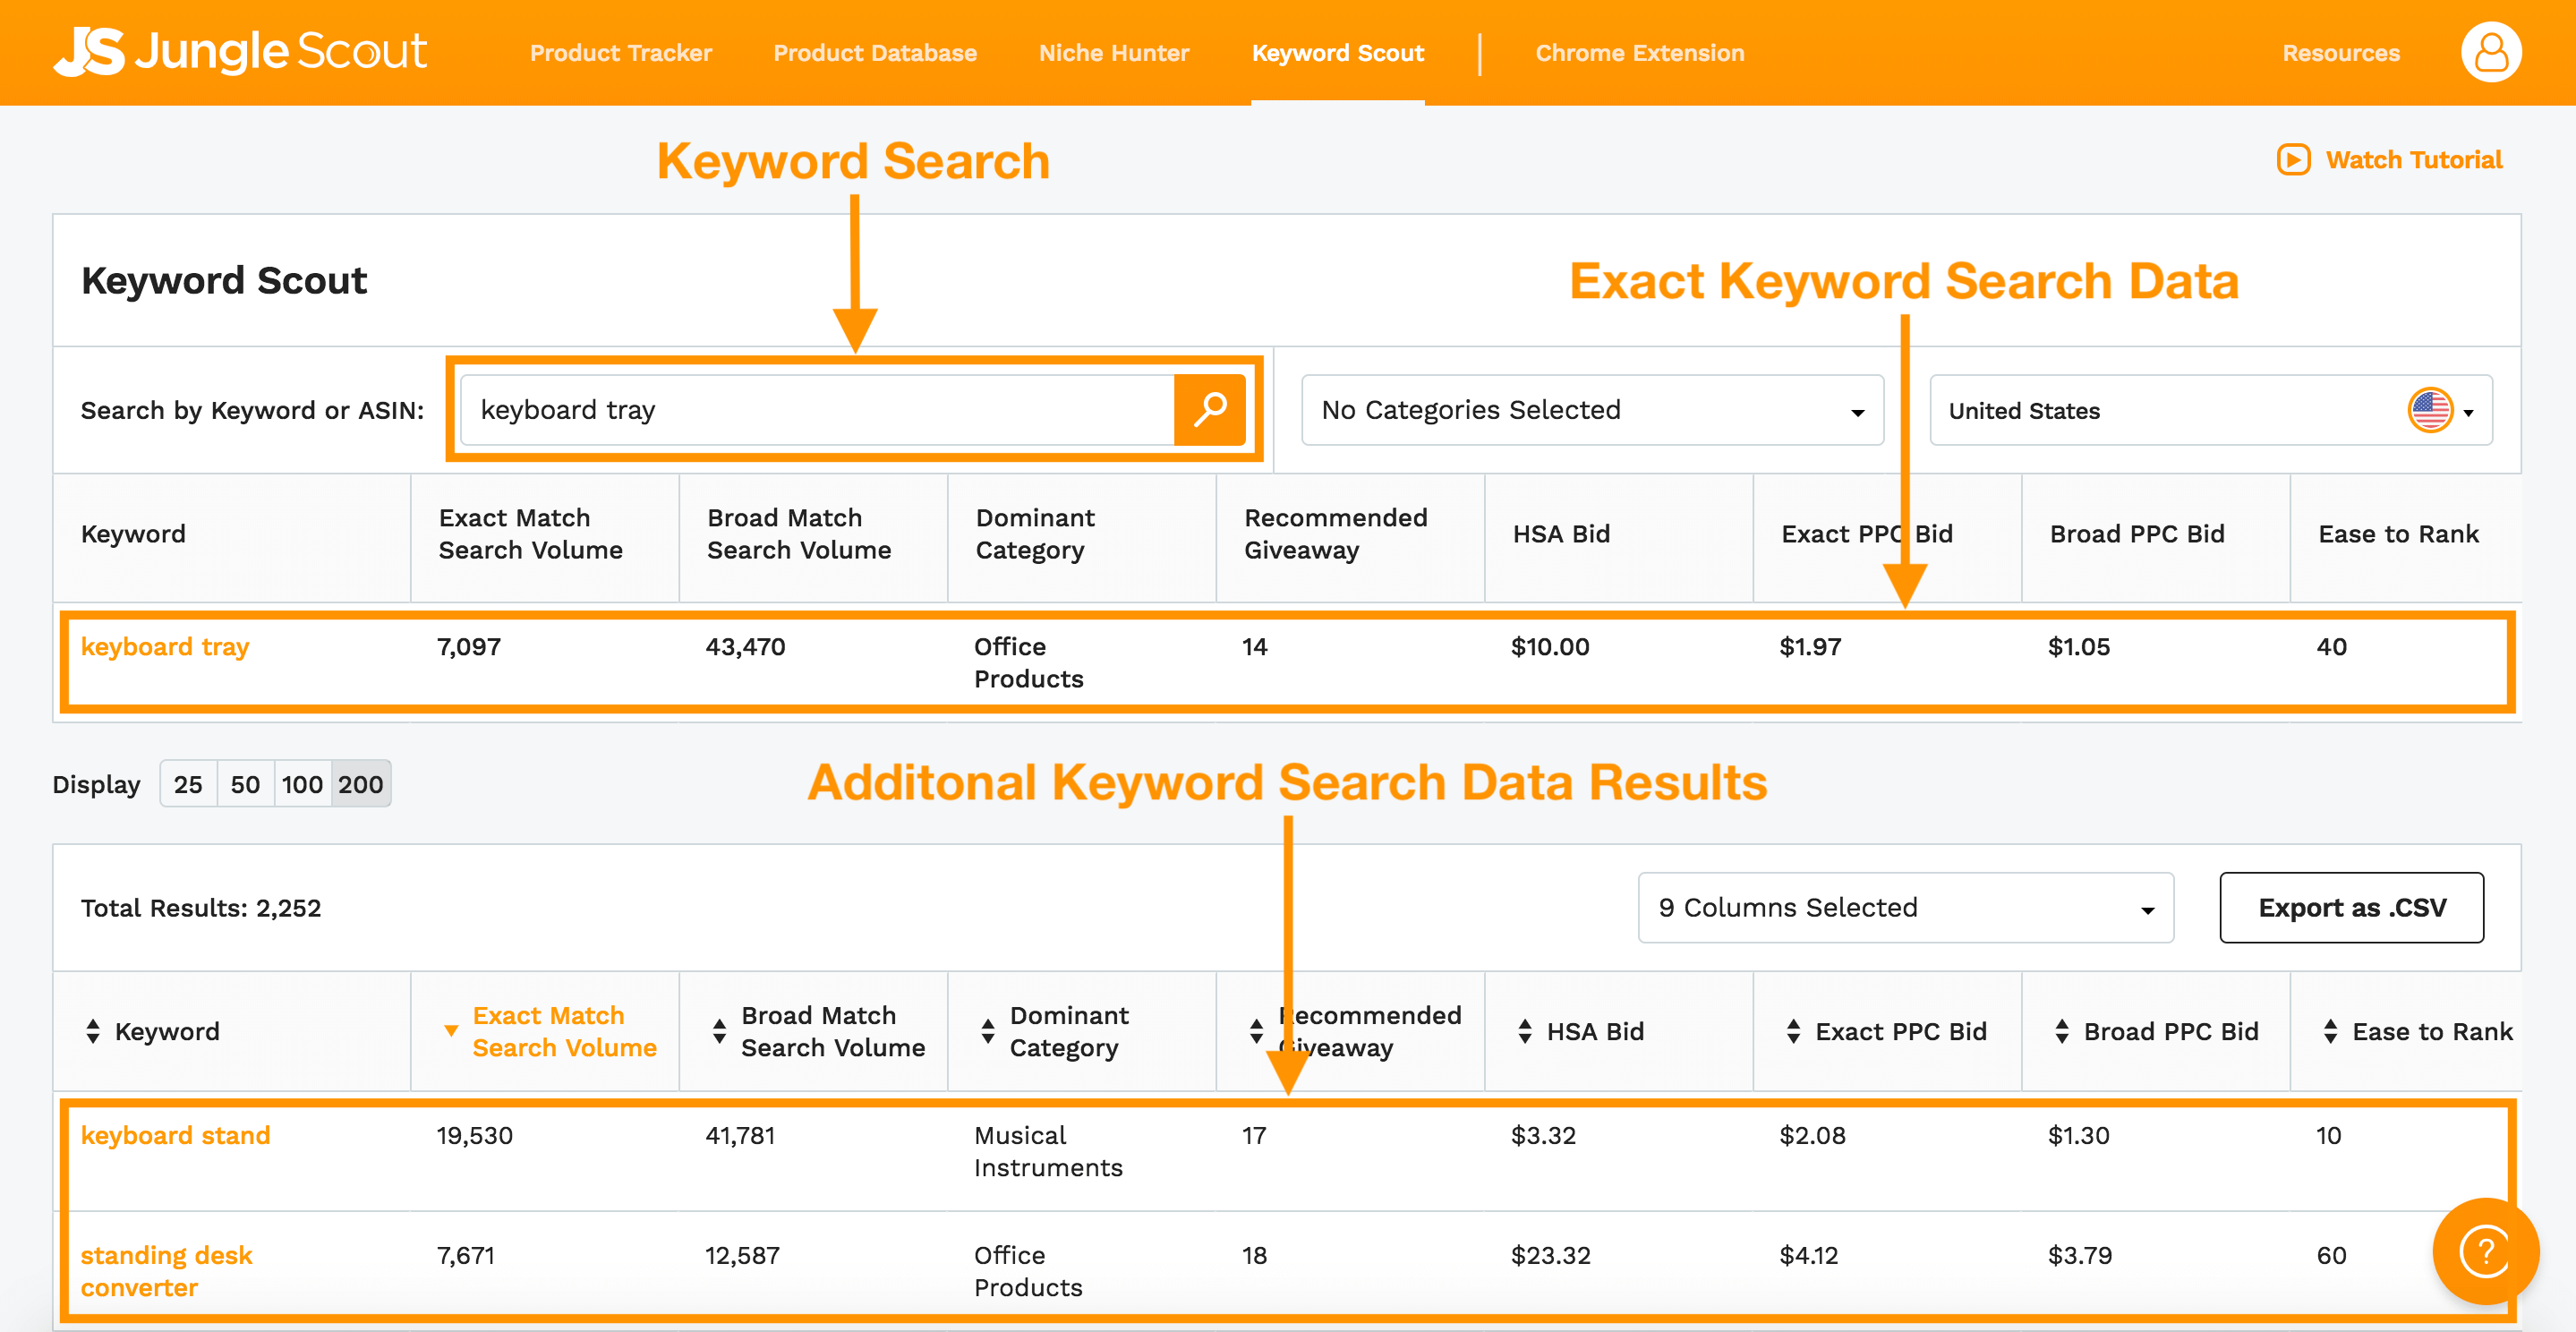
I’m seeing things like Search Volume, Recommend Giveaway, I also see over here the Recommended PPC bids, both exact match and broad match.
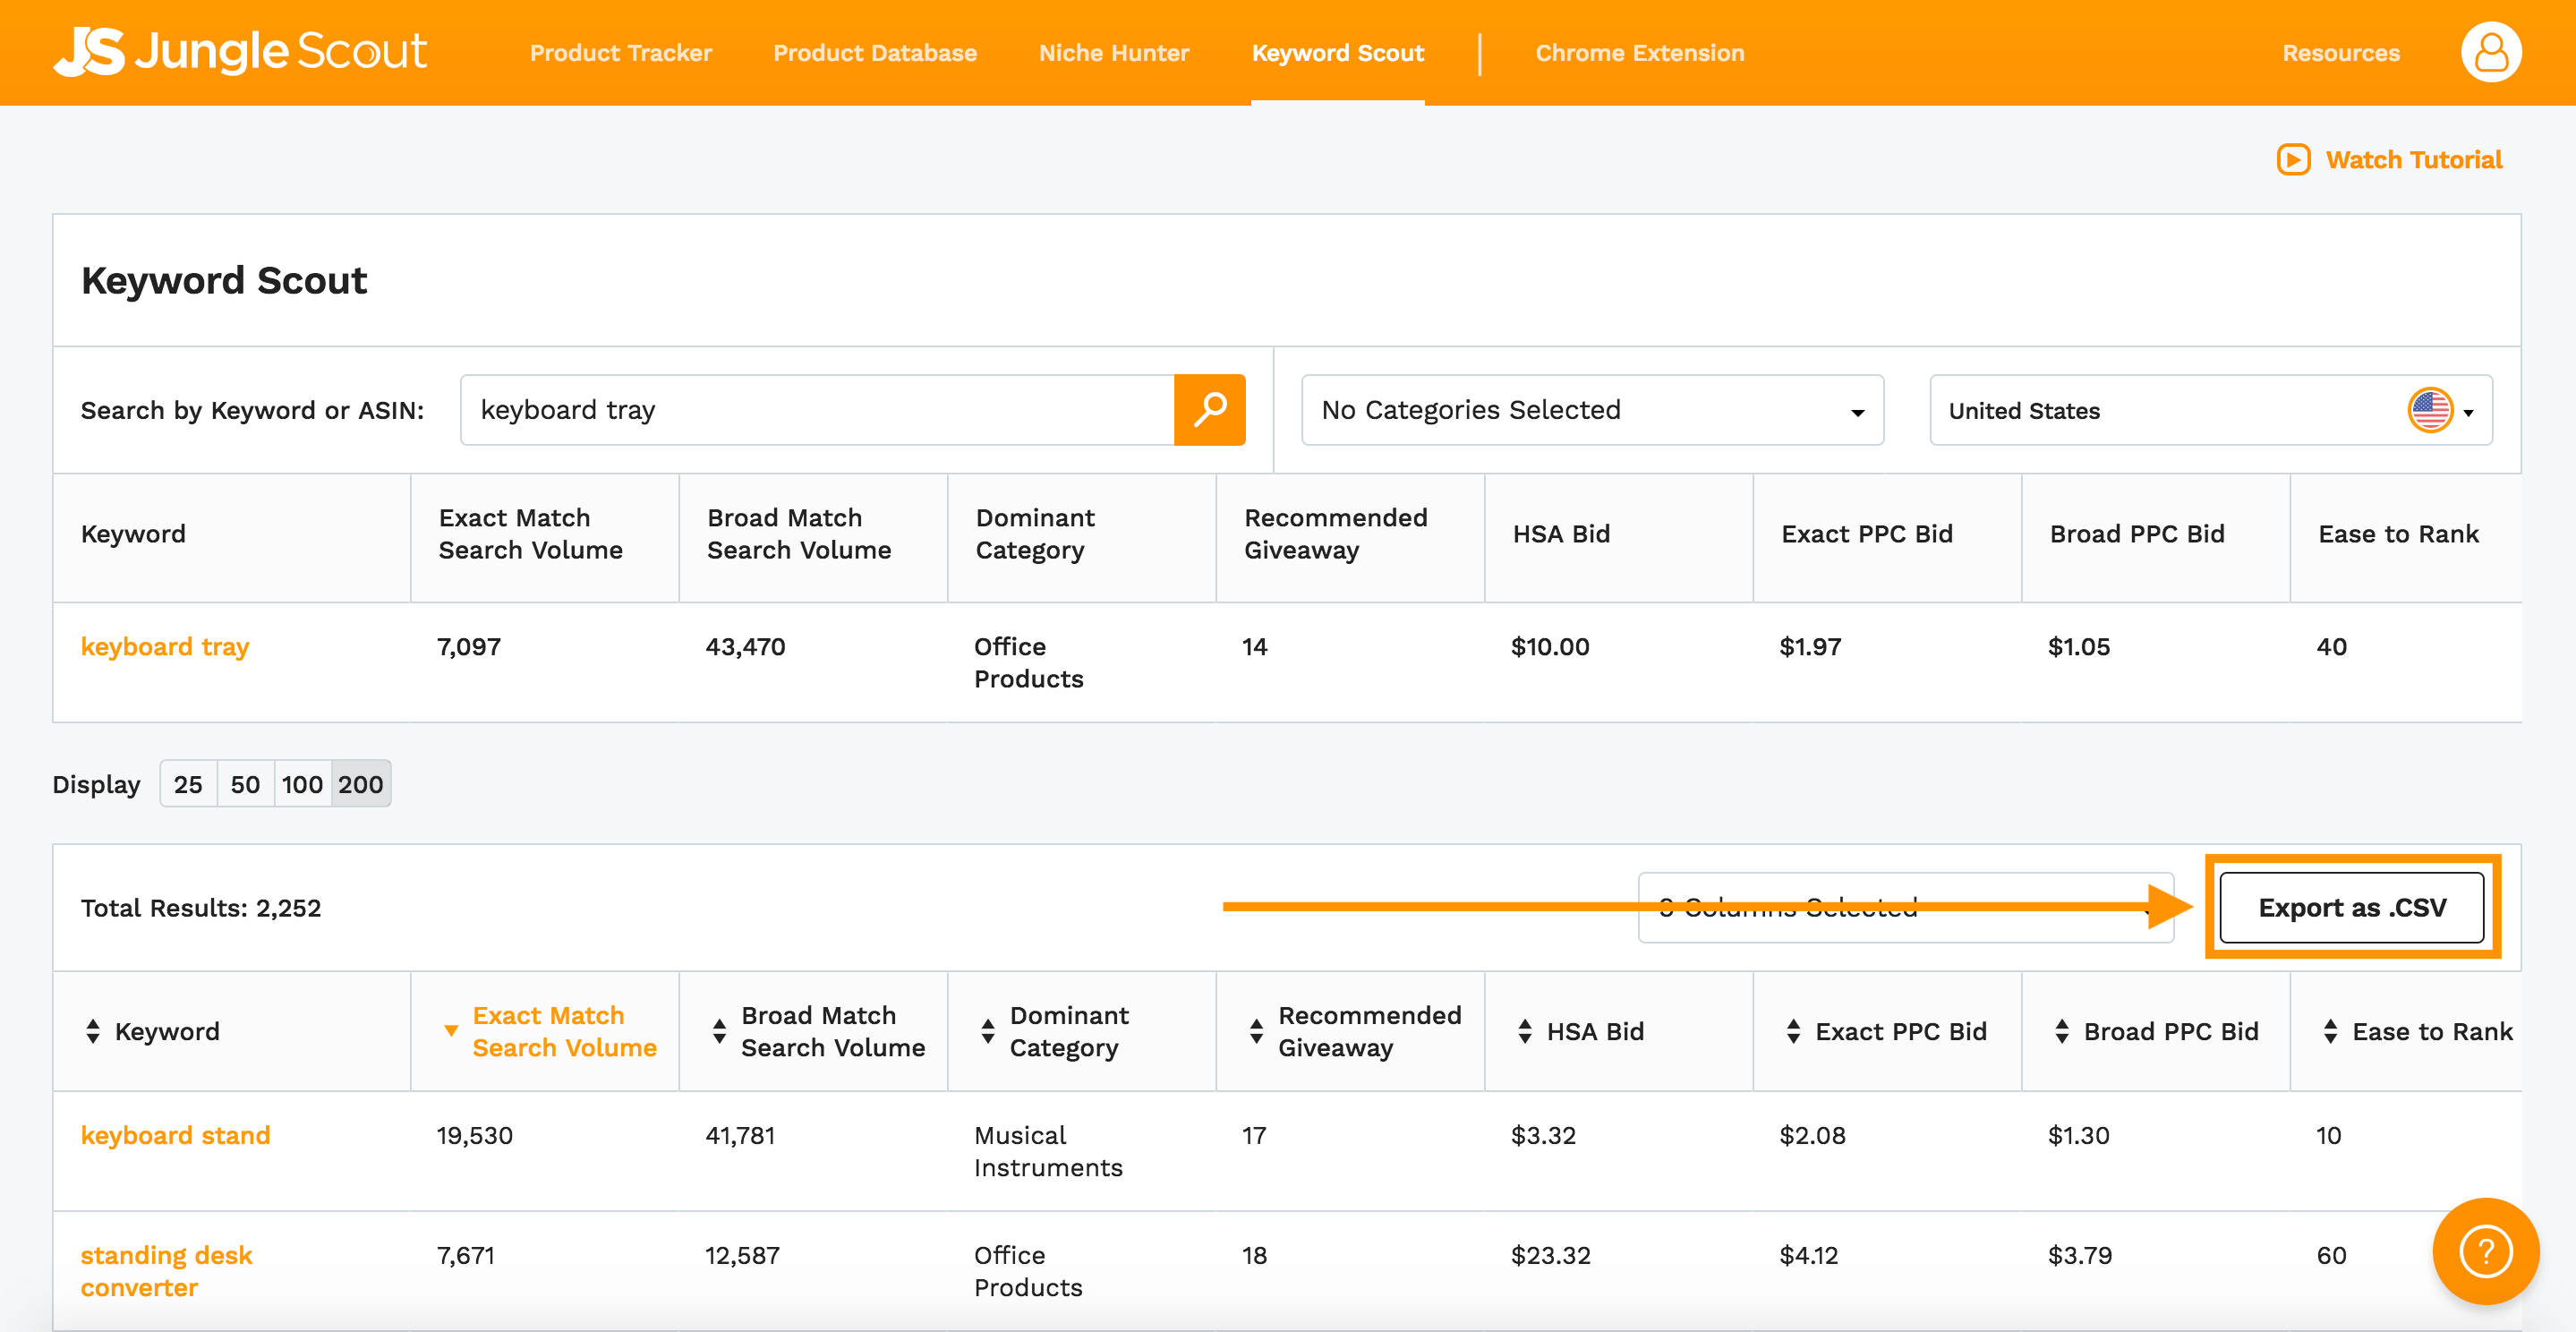
What I’m going to do next is I’m going to take all of the keywords from Keyword Scout and export them to a CSV file.
Importing Your Keywords
Next, I’m going to copy and paste in my keywords into a Targeting campaign. For Default keyword bid I’m going to put $1.75.

For the match type, I’m going to choose the broad match type, which is the same thing that I have for my ad group settings. 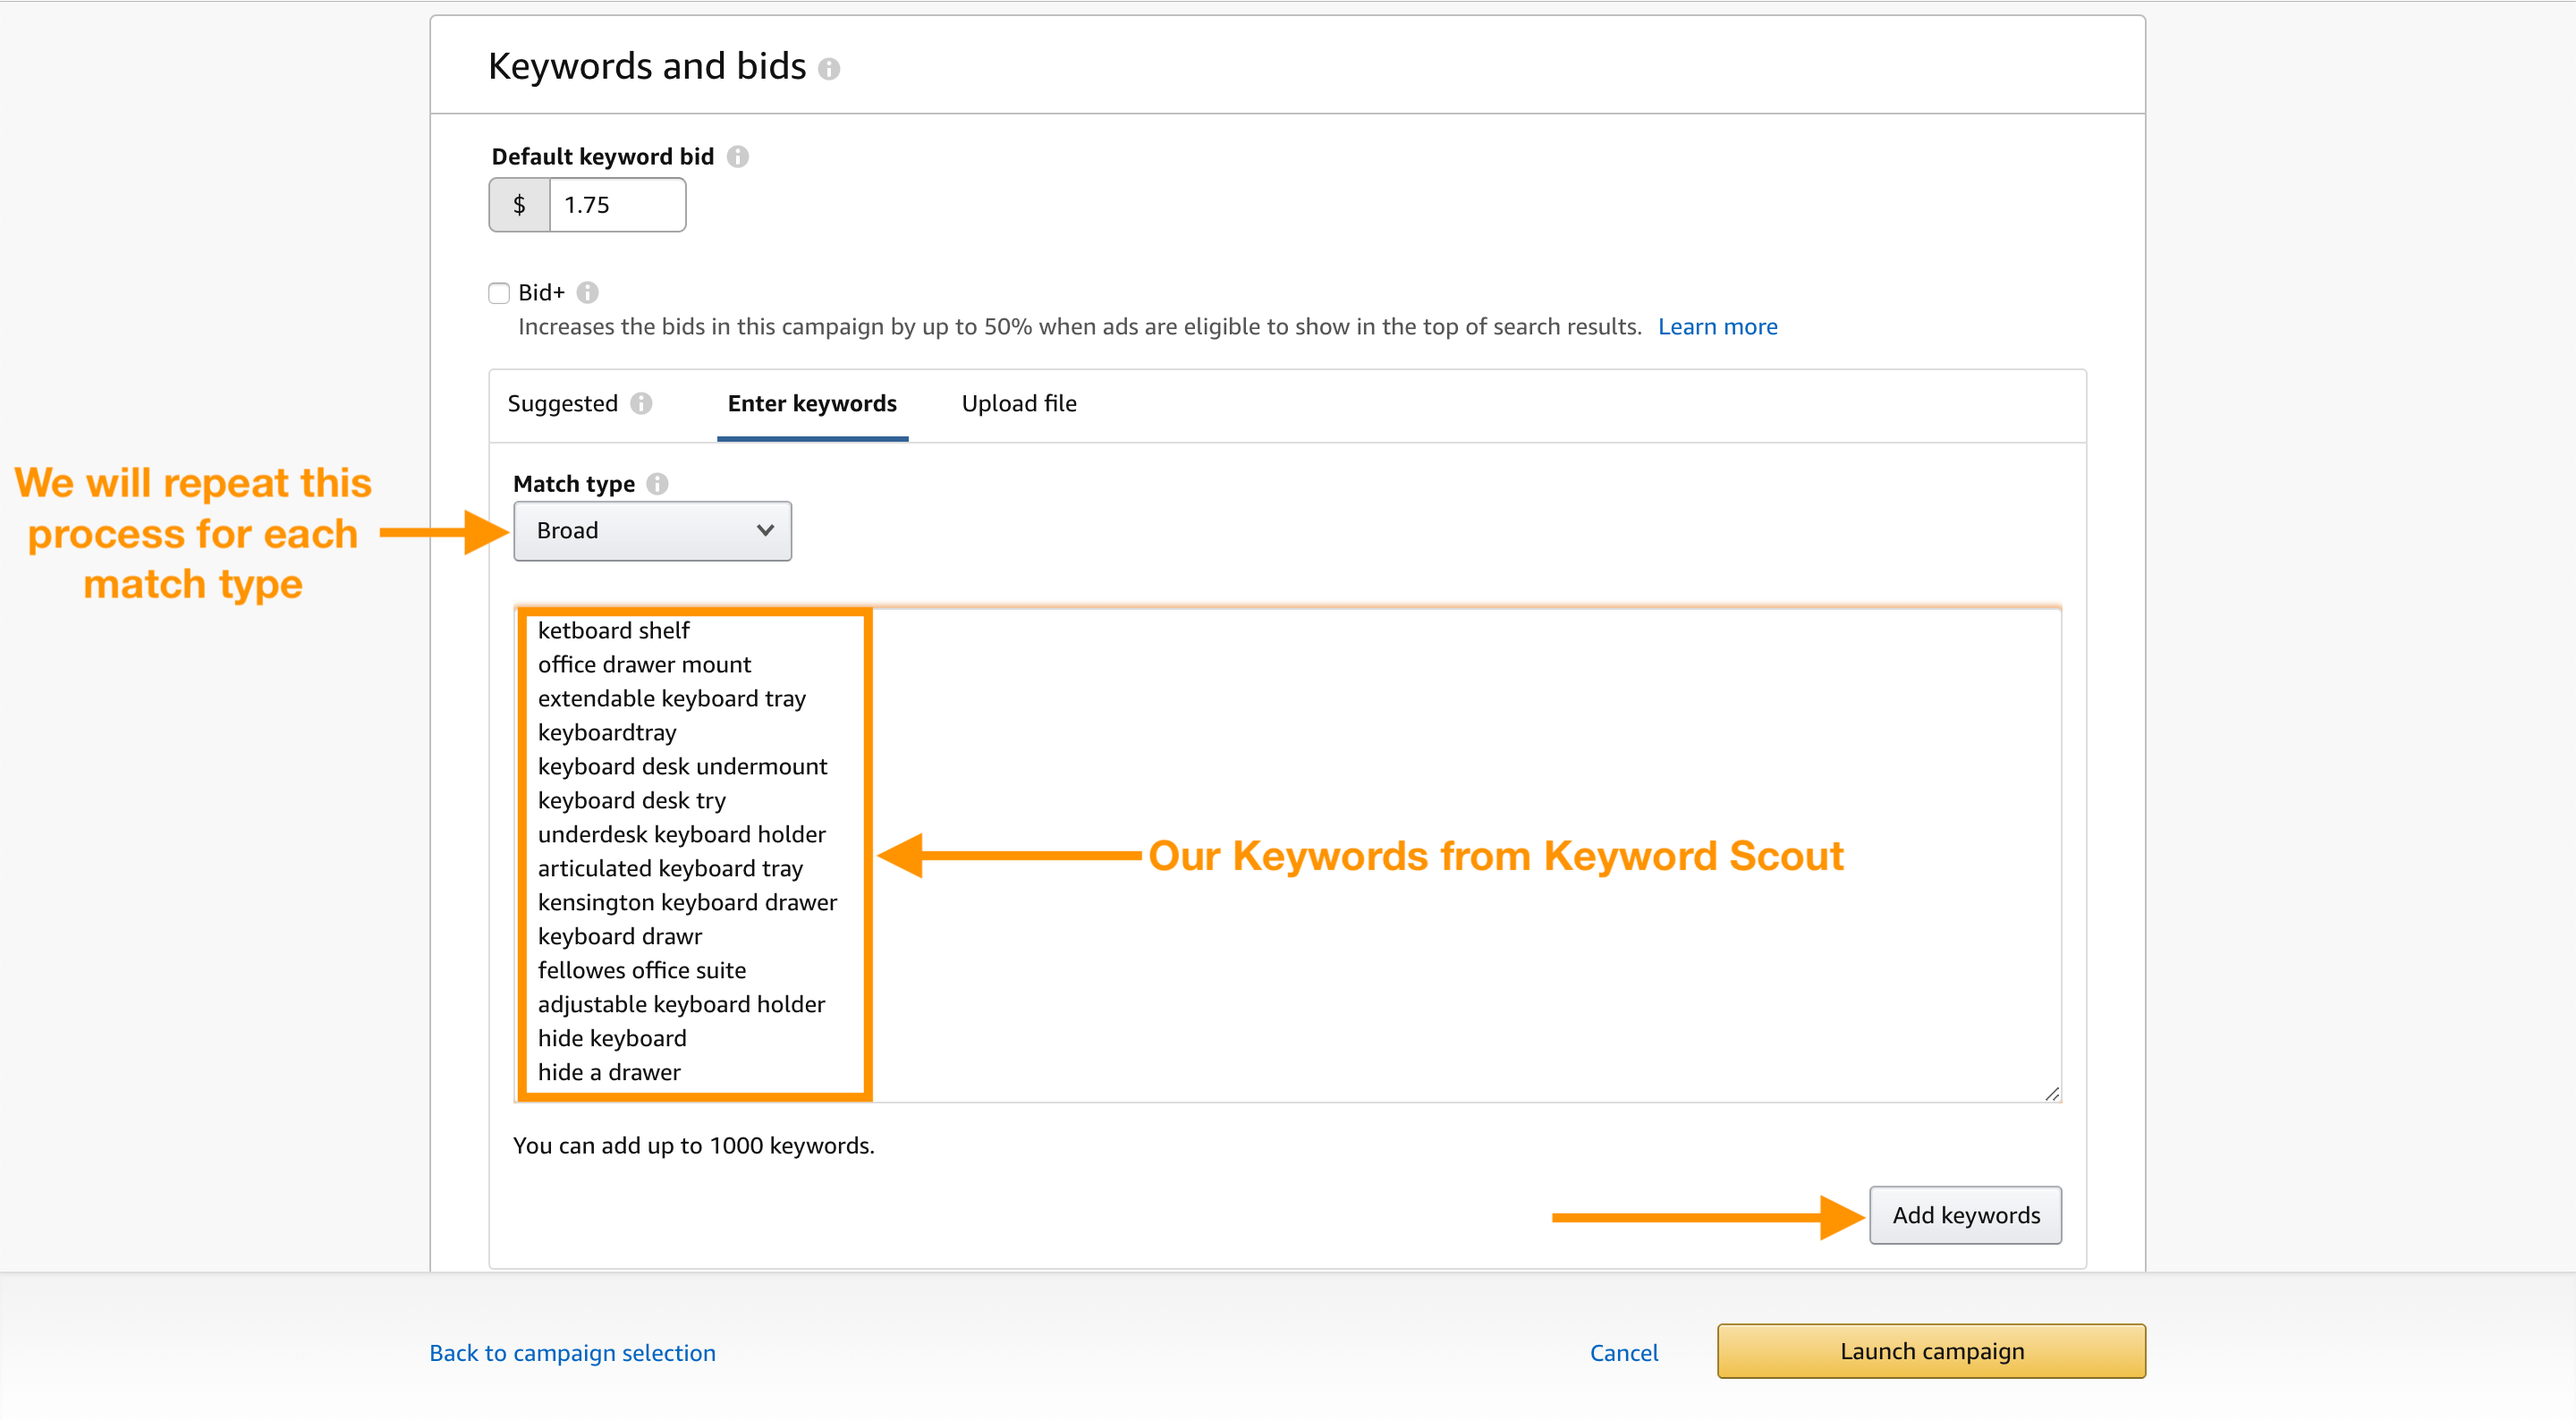
I’m going to go ahead and click on Add keywords. And after doing that, you’ll see that Amazon’s giving me suggested bids for each individual keyword.
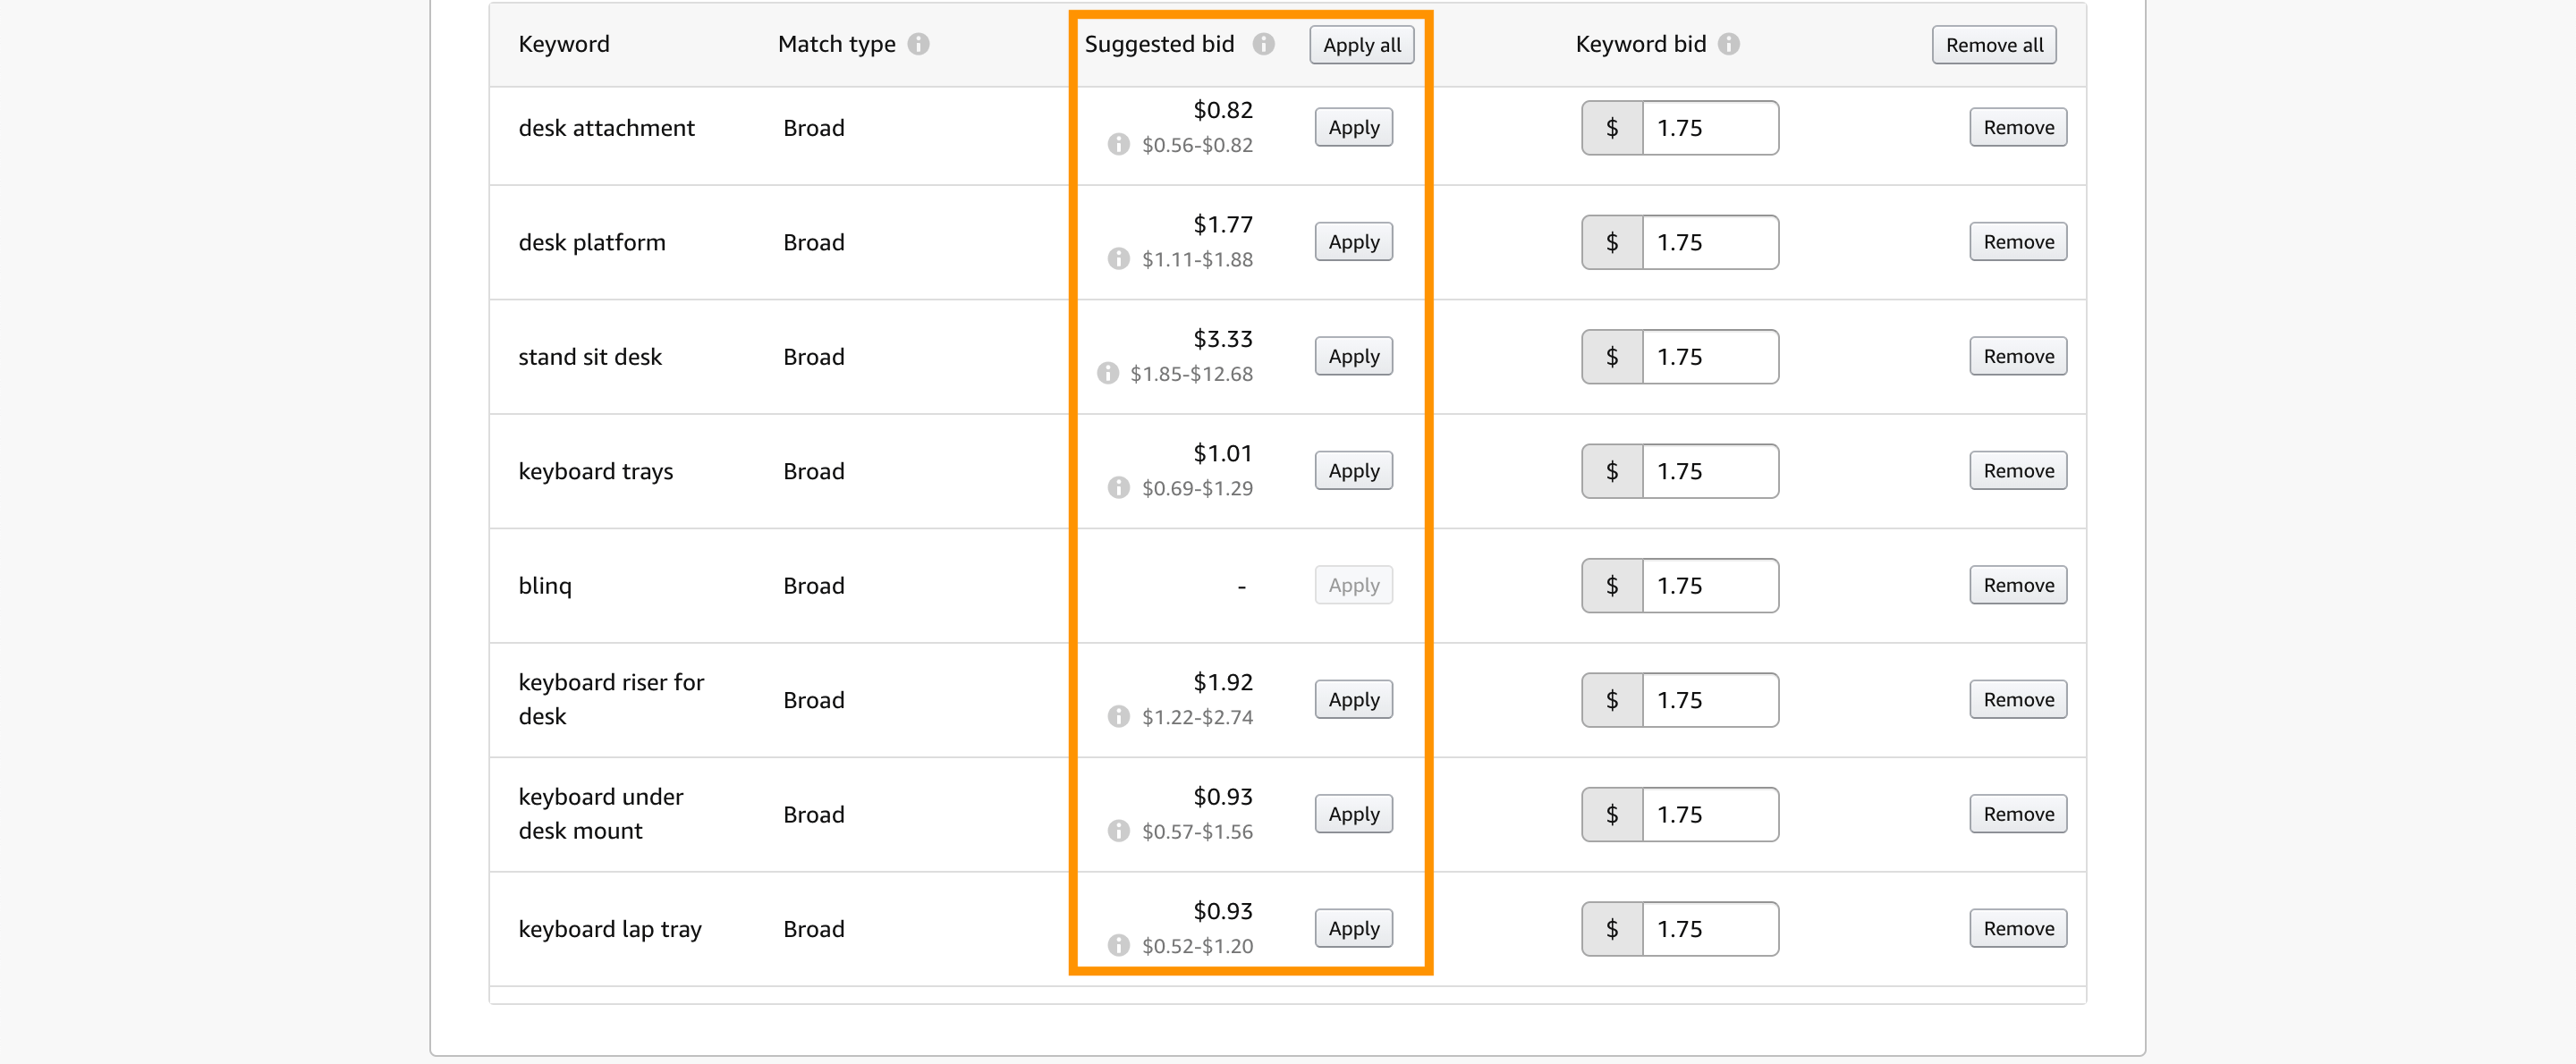
The nice thing about manual campaigns is we can optimize it on a keyword level, unlike automatic campaigns where we rely on Amazon to do the campaign optimization.
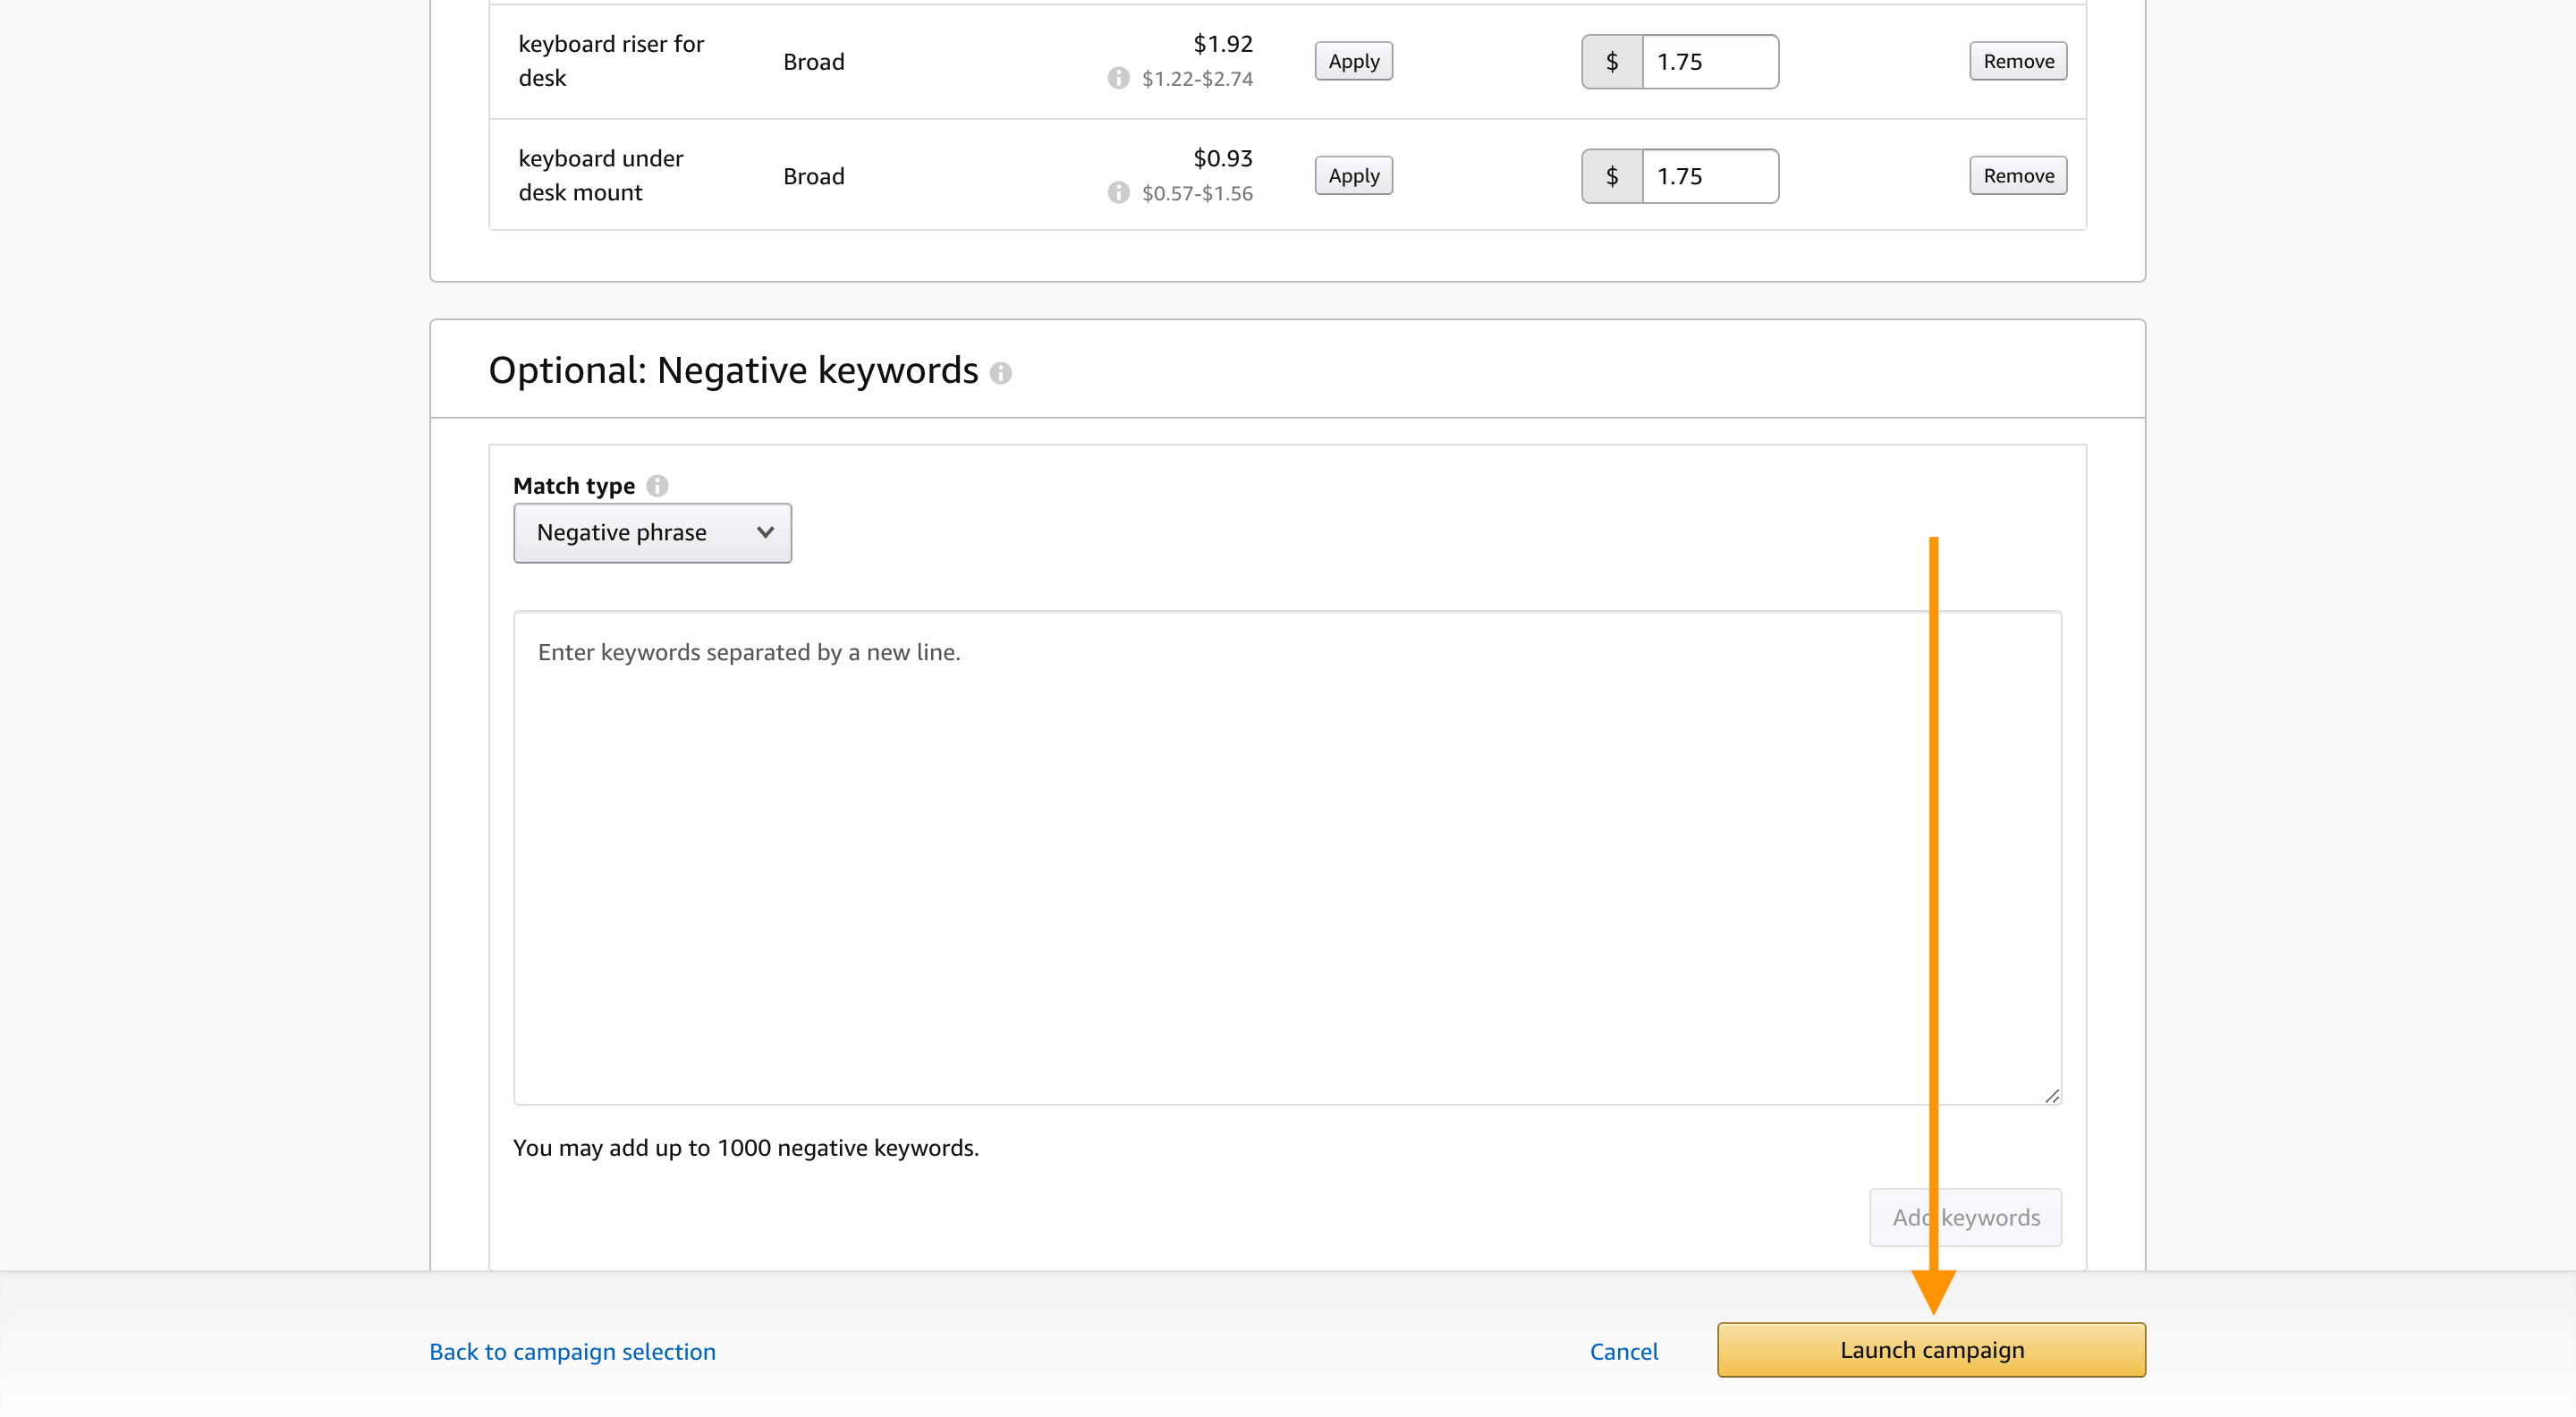
Just like we did with the automatic campaign, I’m not going to add any negative keywords until I have some data to work with. So I’m going to go ahead and click Launch campaign.
All I’ve done here is my broad match type manual campaign for the Bamboo Keyboard Tray so I need to repeat this same process for phrase match and exact match types for the Bamboo Keyboard Tray, and then do all three of those match types for the Black Keyboard Tray as well.
What you’ll find is different keywords perform better for different match types, and long-term when we’re optimizing these campaigns for particular phrases, that’s the different match types that we’ll use. However, without collecting some of this data first, we don’t know what keywords are going to perform best for different match types.
That’s it! Amazon can sometimes take 48-72 hours to report sales for a given keyword ad, so you need to wait it out. Let your campaigns run for at least two weeks before making any major decisions on how you will tweak them moving forward
Ongoing Campaign Management
Optimize Your Campaigns
Once the data is coming in, it’s time to look a little closer and see what’s working, what’s not, and sharpen up that money-making machine.
-
Dive into the data right within Seller Central using the filters function
- You can use filters at the campaign, ad group, and keyword level to really dig into which of each are working for you
- In the early days, I would advise that you dive into these filters at the keyword level at least once a week, to ensure you have full visibility of your campaigns and what you are spending your advertising dollars on
Filter the keywords by ACoS
- After a week or so, you should be able to identify which keywords convert to sales, and at what ACoS
- You will want to scan through the keywords and pause or decrease the bid on keywords that have an ACoS that is higher than your threshold. By the same token, you will want to identify any keywords that are at the low end of your ACoS threshold. For these, you should think about increasing the bid so that your ad will appear more frequently for converting keywords.
- Your ACoS threshold is entirely dependent on your strategy. Some sellers are comfortable losing money in the early days to generate sales. Some are much more conservative.
- I tend to be fairly liberal with my spend in the early days because I want to be set up for success in the long-run
How to calculate your ideal ACoS?
Here is the information you will need to know in order to understand what number works for you:
- Selling Price (that you are selling your products for)
- Cost of Goods Sold (cost of one unit that you pay your supplier)
- All FBA Fees
- Miscellaneous variable costs (cost of shipping, packaging, etc)
- Note: we will not incorporate any promotions or discounts here
Let’s use Jungle Stix as an example:
- Selling Price: $27
- Cost of Goods: $4
- All FBA Fees: $11
- Miscellaneous: $3 (this is just the shipping cost from the Chinese supplier to the Amazon warehouse)
Subtracting the COGS, FBA fees, and Miscellaneous from the Selling Price leaves $9 in profit per unit (27-4-11-3=9). So we can spend up to $9 to get a sale and still be profitable. To calculate our ACoS threshold for our break-even point, simply divide the net income from the Selling price, ie $9/$27=.33. This leaves us with a 33% ACoS threshold, meaning that we would be making money on any keyword that has a Cost of Sale at 33% or less.
Filter by Order Numbers
- This metric is perhaps most important at a high level, so you know which keywords are driving the most conversions
- You will want to cross-reference this number with how much it costs you to acquire the sale
Filter the Keywords by Spend
- You will want to filter by Spend just to make sure that you know which keywords are costing the most
- Make sure that these are converting keywords for you, and that it is a profitable investment for your ad to appear for the given search query
Bids
If a keyword is converting but at an ACoS that is above your targeted threshold, you don’t necessarily need to pause the keyword. Instead, you can just adjust your bid accordingly. Try reducing bids in small increments so that you can find the sweet spot between getting conversions and keeping your ACoS down.
Assessing Keyword Performance
- Overall, the key things you are looking out for are Sales (conversions) and ACoS (return on investment)
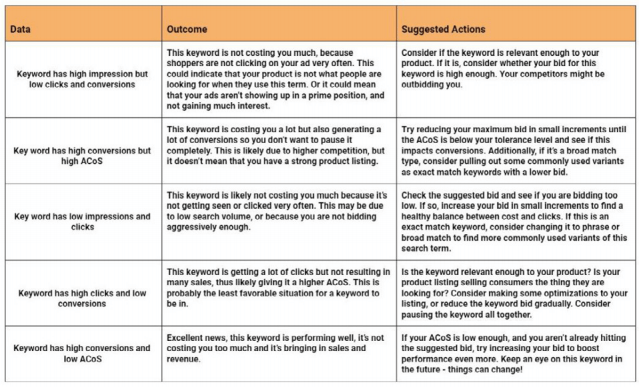
Should I pause or delete keywords that don’t convert?
- Some people prefer to do this, while others try a tactic of reducing or increasing the keyword bid in small increments, to see if it will improve performance.
Conclusion
I know this can seem a little overwhelming at first but unlike other PPC platforms (Facebook Ads, Google AdWords), Amazon’s PPC platform is relatively easy to learn. You’ll be a pro in no time. All it takes is a little bit of practice and you’ll be well on your way to raking in those sales!
Now, if you’re a busy person, you could also outsource this to a savvy PPC virtual assistant through Jungle Market.
Well, that’s all for now! Now it’s YOUR TURN!
Start doing some research of your own! Every week, we’ll be giving you your Action Items and Weekly Workbook and exclusive hacks to make the most of your MDCS journey.
Get your FREE MDCS Workbook HERE!
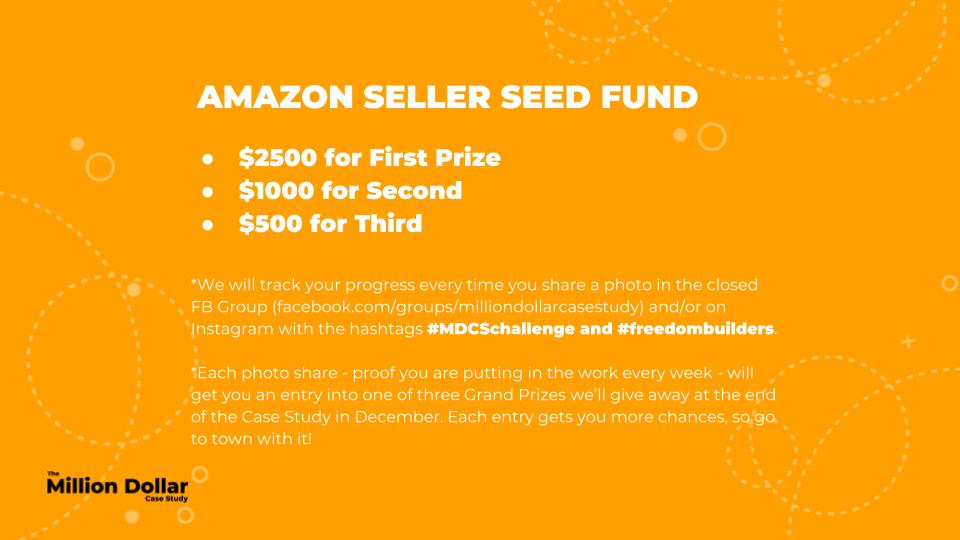
After you’ve completed the Action Items found in the Workbook, post your progress in the Million Dollar Case Study Facebook Group! You don’t have to reveal all of your best ideas – just let us know you’re working on them! You can also post them to Instagram with the hashtags #mdcschallenge or #freedombuilders.
Here’s what you could be eligible to win at the end of the MDCS! We’ll be drawing for names and the more photos you post and share as the weeks go on, the more chances you get.
We donate 100% of our product proceeds to Pencils of Promise.
They build schools in developing countries to help children get access to the education they need for a strong foundation.
Our favorite project is the Million Dollar Case Study. It’s a team-wide effort and we value every opportunity it gives us to connect with sellers like you.