Blog: Amazon Storage Fees are NEW in Q4 2018
Amazon Storage Fees are NEW in Q4 2018
- Amazon storage fees for the holidays are increasing from September through December.
- New long-term storage fees have been in effect since September 15th
- The cost to remove or destroy inventory at Amazon fulfillment centers will cost less than the long-term storage fees, so you should remove excess inventory immediately if you haven’t already.
If you’re an experienced Amazon FBA seller, then you no doubt know about Amazon storage fees and how they’ve recently changed. And if you’ve really been selling for a while, six months or longer, then you probably know all about the long-term storage fees, too. Hopefully, you were prepared for those new fees without losing too much $$$, but we’ll catch everyone up on where the new fees currently stand.
What are Amazon storage fees?
When you sell goods via Amazon FBA and send your inventory to Amazon’s fulfillment centers, Amazon charges fees to keep your inventory there.
Currently, there are two types of Amazon storage fees:
- Monthly Amazon storage fees. These fees come out once a month and are subtracted from your earnings. They are based on the number of cubic feet your combined inventory takes up in Amazon fulfillment centers.
- Long-term storage fees. Before September 15th, these fees were assessed semi-annually. Now they are assessed on a monthly basis along with a new minimum per unit fee as well.
Why does Amazon have Amazon storage fees in the first place?
While Amazon Fulfillment Centers are huge million-acre facilities capable of holding tons and tons of products, they do have only so much space. And if every seller was sending slow-moving inventory to it and cluttering up that space, pretty soon, there’d be no room for all of the stuff that does sell well.
Therefore, Amazon storage fees are put in place to deter sellers from abusing Amazon’s FBA system.
How much are Amazon storage fees?
Amazon’s upped their inventory fees considerably this year. In fact, if you weren’t aware of the changes in advance, you could’ve easily lost a lot of money.
Amazon Monthly Storage Fees
This chart from Amazon shows you the breakdown of monthly Amazon storage fees:
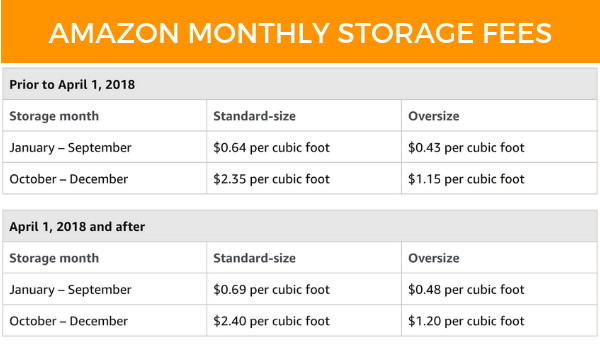
Monthly storage fees break down into two periods (Q1-3 and Q4) and then by two sizes (standard-size and oversize). As you can see, after April 1st, 2018, all of the monthly storage fees went up by $0.05. Not too big of a deal. But still, costs are costs.
Be aware of Q4 Amazon Storage Fees
Now that we’re already into Q4, you should really be concerned with what your storage fees will be during the busiest time of year. Amazon only has so much space in their fulfillment centers. So it’s important that you’re aware of what your inventory needs will be during the holiday season. Otherwise, you could end up paying almost 4x what you normally do for inventory.
My recommendation is to only bring in the inventory you need for post-Black Friday/December sales in mid-to-late November. And preferably after the 15th so you don’t get hit with fees for the month of November. Of course, it might still be cutting it close to the Black Friday date as shipping slows down considerably in those months.
Amazon’s Long-Term Storage Fees
Amazon’s long-term storage fees have already taken effect, but this chart from Amazon will show you the current breakdown:
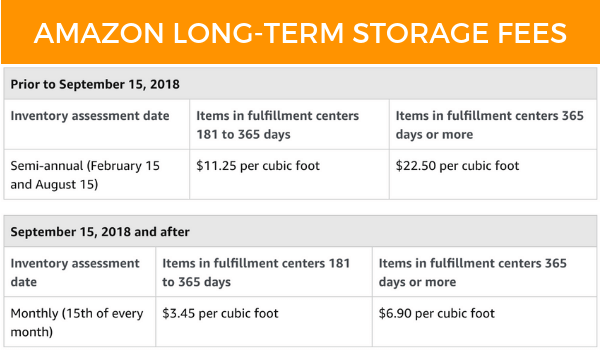

Here are the biggest things you need to consider with these Long Term Storage Fees:
- Monthly Long Term storage fees instead of semi-annual. On September 15 and every 15th of the month thereafter, long-term storage fees will be assessed monthly.
- Double fees for slower moving inventory. A cubic foot of inventory that has been in the fulfillment centers for 365+ or more costs double what inventory 181 to 365 days costs.
- All LTSFs nearly doubled after September 15th. Prior to September 15th, long-term storage fees were roughly $1.88 per cubic foot per month for items that have been there for 6 months to a year and $3.75 per cubic foot per month for items that have been there for 12 months or longer. Now those fees nearly doubled to $3.45 and $6.90 per month respectively.
- Minimum Storage Fees. The biggest and costliest change to Amazon’s long-term storage fees are the minimum fees that will accrue per unit at $0.50 per unit per month
How can I prepare for Amazon Q4 holiday storage fees?
Now that we understand the basics of Amazon storage fees and the recent changes to their long-term storage fees, it’s time to assess your potential Q4 fees in 5 simple steps:
1 – Check how many products are “old age”.
On your Amazon seller central account, scroll down to the bottom right widget titled “Inventory Planning.” There’s a lot of useful information here. But what we want to focus on is the bottom notification telling me that I have 995 units that will get slammed with long-term storage fees on August 15.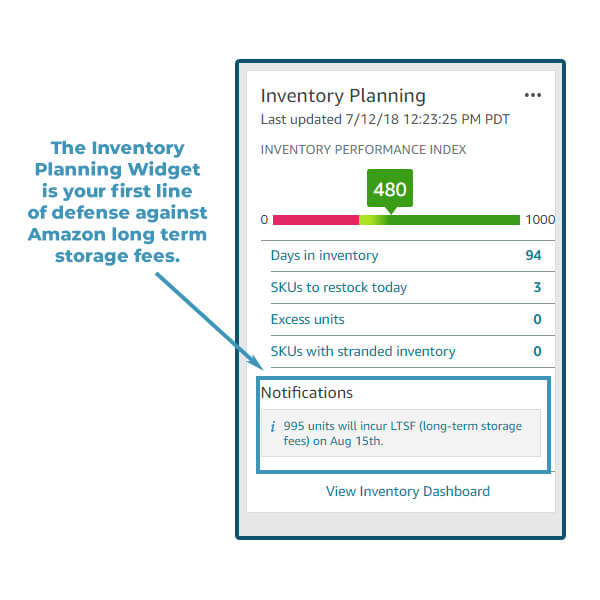
Remember: back on August 15th, Amazon started charging $0.50 per unit. So that means I’m going to get clobbered with $497.50 in long-term storage fees! Ugggh!
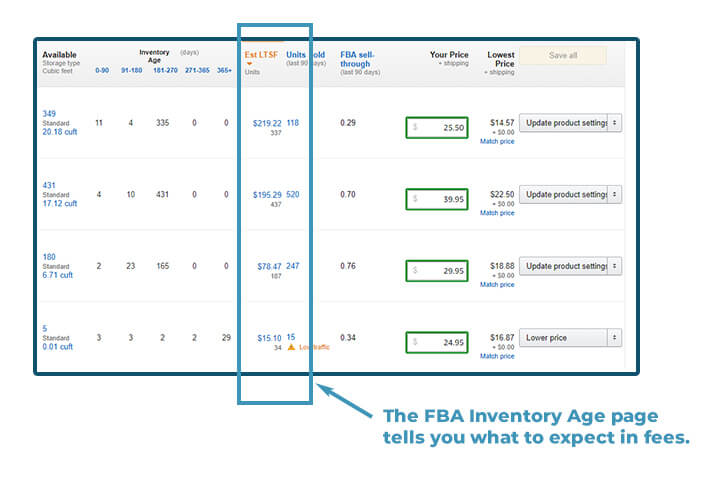
2 – Review the items that are going to accrue storage fees.
Click the notification. It takes you straight to the Amazon inventory age page which shows you which exactly products are old age units and need to be removed.
3 – Dispose of, remove, or liquidate your old age units.
Here comes the tricky part. Now you’ve got to decide what to get rid of and more importantly, how to get rid of it. You’ve got three options: dispose of, remove, or liquidate.
Each method comes with its own set of fees, too.
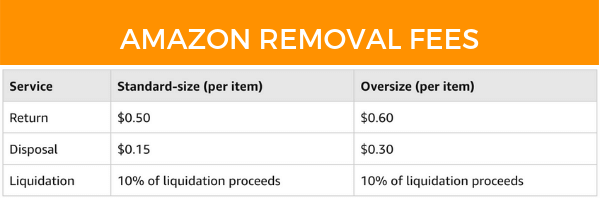
Notice how each of the methods are either less than or equal to the minimum long-term storage fees. Coincidence? Not likely 😉
Disposing of Inventory
The first option you have is to dispose of your inventory. You pay Amazon and they simply get rid of it. This should be a last resort. Try selling it or returning it to yourself before you destroy your inventory. Furthermore, I’d save this only if you’re doing wholesale or selling used books and have individual SKUs that just aren’t selling at all.
Removing Inventory
Next is removing inventory. It’s $0.50 per unit, so it’s the most expensive option. However, it does save your inventory from destruction. You can send it back to yourself, of course. But, if you’re able to wholesale your inventory on eBay or to another seller, this is an easy way for you to send the inventory to the buyer.
“Boomeranging” Inventory
Okay, so you might be thinking, “I’ll just send it back to me, then ship it right back to Amazon to restart the clock.” And that seems like a great idea! In fact, a couple of years ago, you could do just that. However, Amazon’s pretty smart and caught on fast.
Now, whenever you return inventory to yourself, you’re not allowed to send back any of that SKU for a minimum of 30 days.
Liquidating Inventory
Finally, there is liquidating inventory. In this instance, Amazon puts your inventory up for auction and it’s bid on by wholesalers. This might sound ideal, but I’ve found that the amount you end up earning from inventory liquidation is incredibly low. Like pennies-on-the-dollar low. And then Amazon takes their 10%. And the worst part? There’s nothing stopping whoever bought your old inventory from reselling it on your listing.
4 – Calculate how much inventory you should get rid of.
Now that you understand your options for getting old age units of Amazon’s fulfillment centers, you need to decide on how much you want to get rid of and how you’re going to do it. The best way to determine this is to estimate how much inventory you’re going to need in stock for the next 45-60 days and keep that amount there. Then, send back the rest.
The 3-Month Sales Rule
As a rule of thumb, never keep more than 3-months sales worth of inventory in stock. So if Fetcher shows me that I’m selling 200’ish units per month, then I need to keep no more than 600 units in stock. The remainder of any stock I own I keep at my distribution center and then send it as it depletes at the FC’s. While this may require a little more work on my part (roughly 15 minutes per month… backbreaking labor, I know), it does save me from getting smashed with massive Amazon storage fees.
Additionally, as soon as you’ve sent the last “chunk” of inventory from your distribution center to Amazon, that’s the perfect time to place an order with your supplier as it will take roughly 60 days to get your inventory ordered, manufactured, and shipped.
5 – Create your removal order.
Now that I know how much inventory I need to remove from Amazon’s fulfillment centers, it’s time to create a removal order. The process is simple.
Simple click on the “Update Product Settings” button to the far right of the listing column. Then, when the drop-down menu appears, click Create Removal Order. Then you’ll see this screen:
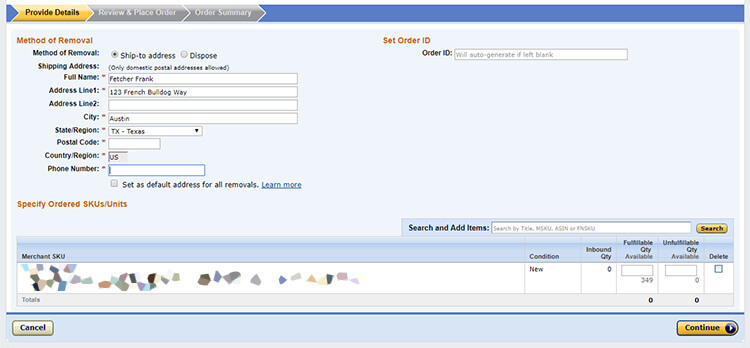
Make sure “ship-to-address” is clicked. Then enter in your name, address, and phone number. Finally, at the bottom of the screen, enter the number of units you wish to send to that location.
From there, click continue, review it, and place the order.
Don’t get caught!
Believe me, there’s nothing worse than getting smooshed with a bunch of fees that you could have otherwise prevented. It can easily erase half a month’s profits. And every dollar you spend on something dumb like Amazon storage fees is another dollar you could have spent buying new products and taking your Amazon business to the next level.
Final takeaways:
- Use the 3-Month Sales Rule. If you’re having trouble keeping track of your inventory, use Forecast.ly’s powerful inventory forecasting tools to protect yourself.
- Track your margins. There are three apps I check every day: Gmail, Slack, and Fetcher. If you aren’t using Fetcher, you probably have no idea what your real Amazon FBA profits are. Not even joking. Get it now.
- Don’t hate on Amazon. Amazon’s a business. And the rules they put into place are here because people abused the system. I won’t lie… even I took for granted how much inventory I could keep at Amazon FC’s without feeling the pinch of Amazon storage fees.
If you have any questions or comments, let us know!