Blog: The Million Dollar Case Study Session #7: Branding and Package Design
The Million Dollar Case Study Session #7: Branding and Package Design
Now this is where the rubber meets the road in the Million Dollar Case Study. The deposit has been placed, and the wheels are in motion for the Jungle Scout baby towels! It will be 30 days for the production run to be complete of the initial 500 units.
How will we market these towels, to stand out from the existing competitors on the market? That is exactly the topic of Session #7 of the Case Study—branding and package design.
But first, what is the name of the brand? It is still to be determined, so please drop some suggestions in the comments section below!
Here is the video replay of the webinar:
And the accompanying slides, which have a lot of valuable information for how to package your product in a cost-effective and streamlined manner:
Packaging Requirements
The most important part of the packaging is to figure out what the requirements are, and adhere to those. That refers to both governmental or regulatory requirements, as well as Amazon requirements.
Here are the requirements that you need to include:
- Barcode
- Country of Origin (ie made in China)
- Brand Name (for the Amazon brand registry)
- Potentially other certifications or guidelines, depending on the product. Google “packaging requirements for [your product]” to nail this down
The first step is to get an idea of what your factory normally uses for its packaging. This is the most straightforward and foolproof way to figure out your basic packaging. As an Amazon seller, you can afford to not get too picky with the packaging. Instead use their standard packaging, as it minimizes the likelihood of mistakes or increases in cost.
For our baby towels, Greg opted for a box to package the product, as it conveys more “high-end” look and feel than a shrink wrap or poly bag.
If you still have questions that your supplier can’t answer directly, you can also ask an inspection company (like www.asiainspection.com) for their insights, as they have likely dealt with a similar situation.
Amazon Package Requirements
- Poly bags will need a suffocation warning
- FNSKU & no other barcodes
- For plush/fabrics and baby – max 1”x1” opening
- All around durable packaging, so won’t break if dropped or open
Amazon has tons of detail for their Inventory Requirements on this page. This is a great resource to help you navigate through the requirements for labeling, packaging, and getting your inventory delivered without a hitch to Amazon’s distribution centers.
UPC vs. EAN vs. FNSKU
Greg is a big proponent of simply printing the FNSKU onto your product packaging.
Let’s back up a second. What does these codes mean, and what do they look like?
UPC – Universal Product Code, which is a 12 digit barcode that is unique to every item. It is used to scan items at checkout–whether Walmart, Safeway, or any other point of sale. It looks like this: 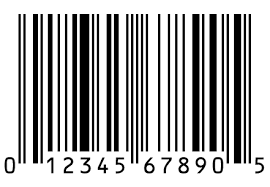
EAN – The European Article Number, pretty much the same in function and appearance as the UPC code (except the EAN has 13 digits, instead of 12).
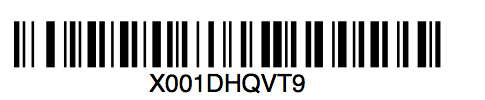
FNSKU – stands for Fulfillment Network Stock Keeping Unit. It is a code specific to Amazon that ties the product to a particular seller, and is used to track the product in the Amazon fulfillment system. it looks like this:
Greg prefers printing an FNSKU on the packaging as opposed to simply a UPC barcode (a universal barcode that can be read at any retailer, Walmart, Target, etc). Ultimately, as we are starting out by focusing on Amazon as a main sales channel, it is easiest to create a packaging that makes it easiest to ship and fulfill from Amazon. This means just printing the FNSKU on the package.
Manufacturers Barcodes
If you just use the manufacturer barcode (particularly relevant for wholesale sellers or retail arbitrage sellers, who are selling the same exact product as other sellers), then your inventory is identified and tracked using the same barcode as the other sellers.
Here is Amazon's explanation of how they handle comingled inventory:
If you choose to use manufacturer barcodes, when customers purchase a product from you, Amazon can send the item that is closest to them, even if you didn't send it to the fulfillment center. When that happens, you get the credit for the sale, and we transfer an item from your inventory to the seller whose inventory was used to fulfill the order. In addition, if you use the manufacturer barcode, you don't have to apply an Amazon barcode to each item yourself.
Even though inventory tracked using the manufacturer barcode is commingled within the network, the source of the inventory is tracked by our fulfillment systems and is taken into consideration if inventory problems arise.
Though Amazon says that it tracks which seller sent in which product, it can lead to potential headaches for you as a seller.
Bottom line: don’t do stickerless commingled inventory. Instead, just print the FNSKU directly onto the packaging!
How Do You Get Your FNSKU From Seller Central
So how do you get your FNSKU? Let’s dig into this now, or you could also watch a quick 5 minute tutorial that Greg put together.
The first step is that you will need an EAN or UPC code to create a listing in Amazon. You can get a UPC code for a nominal fee at speedybarcodes.com.
There is a small snag by purchasing your UPC code from a reseller like Speedy Barcodes: Amazon requires that each UPC code is registered under the seller’s brand. However, if you buy a UPC from Speedy Barcodes, your UPC is going to be registered under “Speedy Barcodes”.
The simple solution is to simply register the brand with Amazon, and change your unique identifier to a specific model number (doesn’t have to be anything fancy, just “Hooded Towel 1” would work). Once you do this, the UPC is no longer associated with the product, but instead the model number is associated with the product.
How To Get Your FNSKU
Follow these simple steps to set up your new product in Seller Central and find your FNSKU so that you can pass this on to your designer.
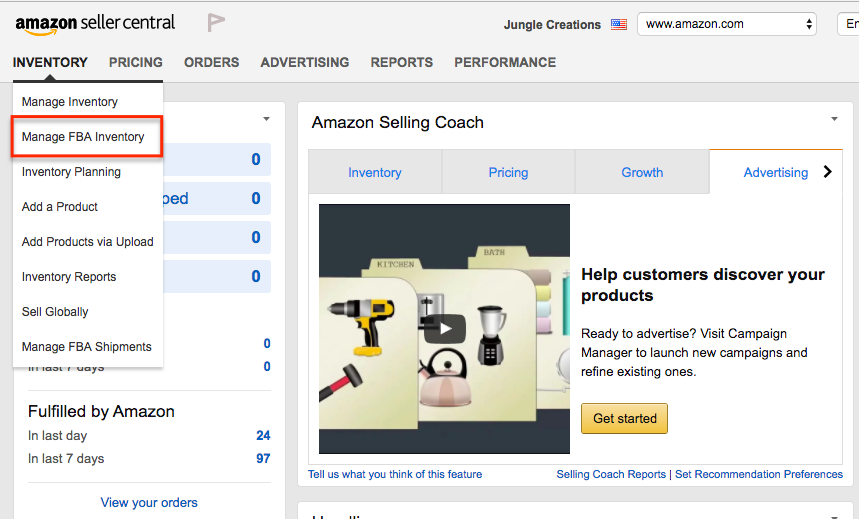
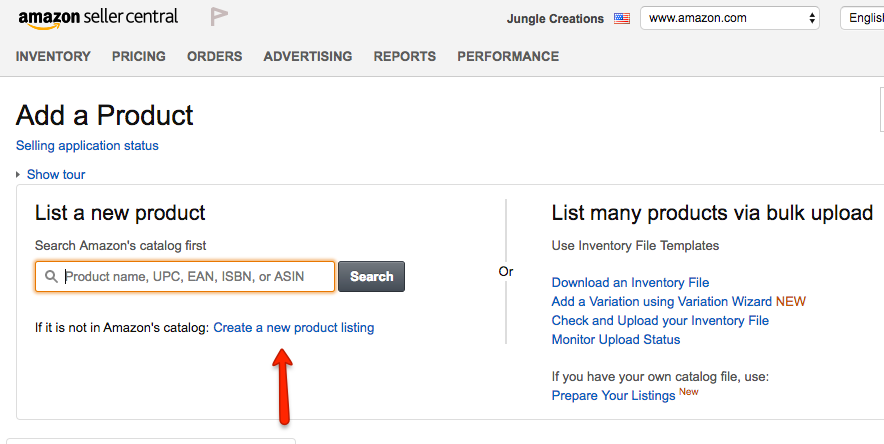
- Go to Seller Central, and click Manage FBA Inventory:
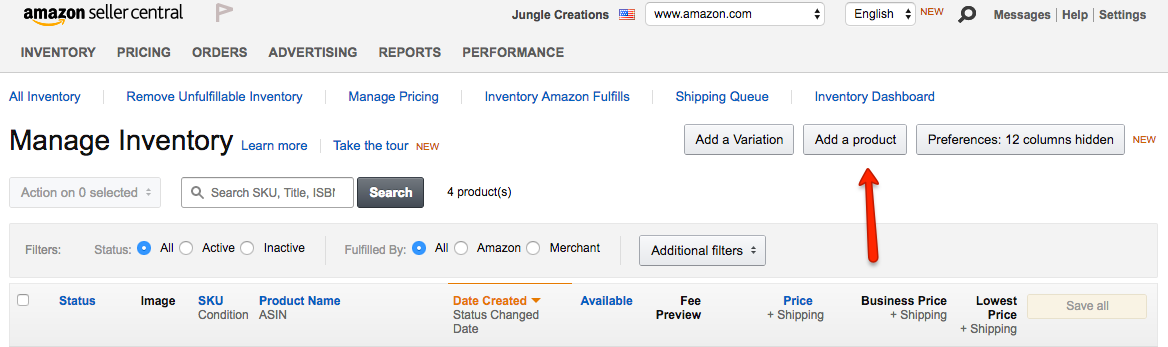
2. Add a product:
3. Create a New Product Listing:
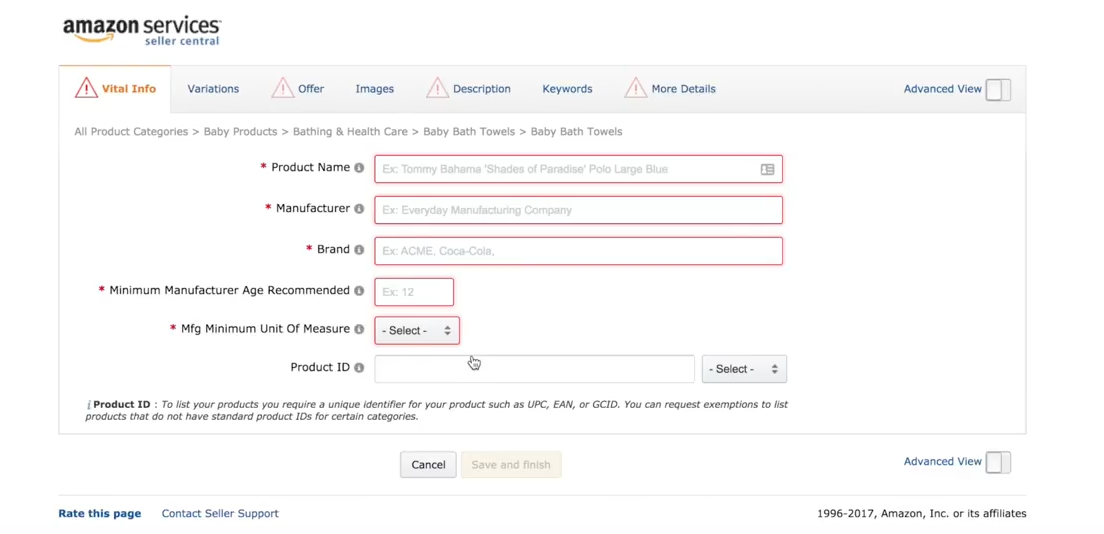
4. Add the basic product information. This can be filled out and edited at a later point, so you can just drop in any text just to move the process forward:
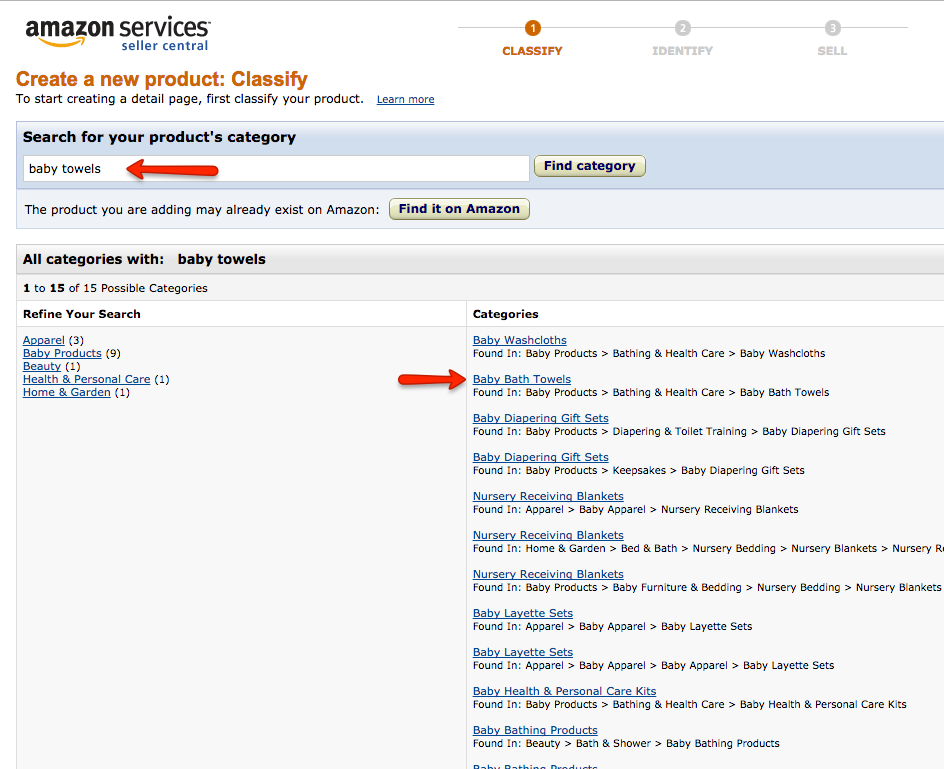
5. After you have entered the product information, choose the most appropriate category. This can also be changed at a later date, though requires an email to Seller Central Support, so easiest if you get this right the first time:
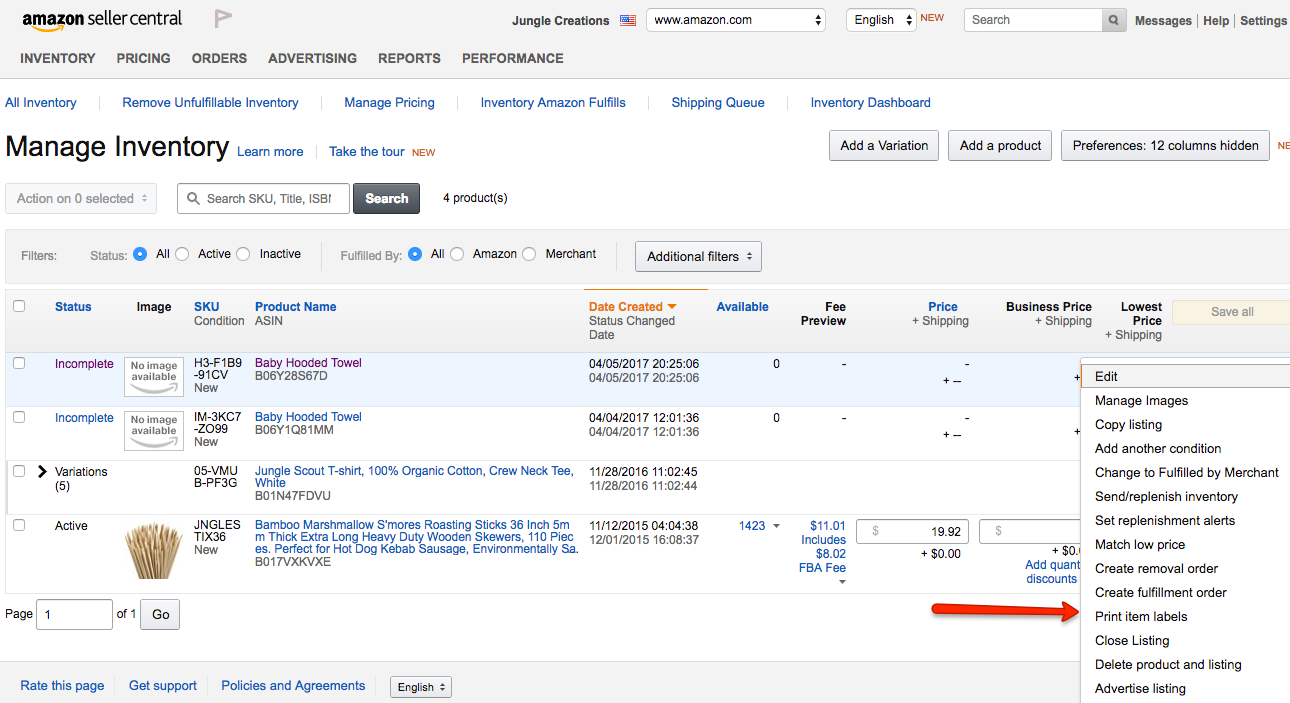
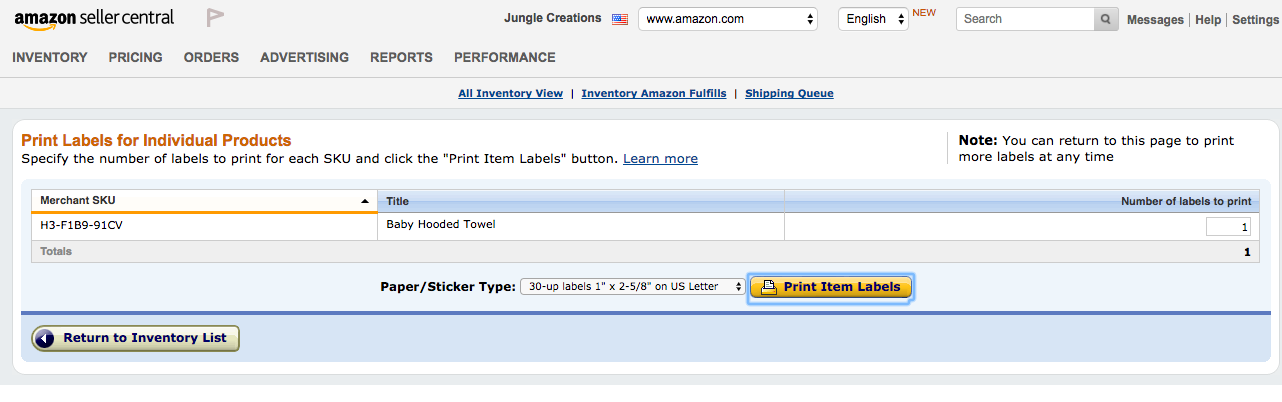
6. Now that your product is created, you can access your FNSKU. From the “Edit” dropdown on the right, select “Print Item Labels”:
7. Print the labels:
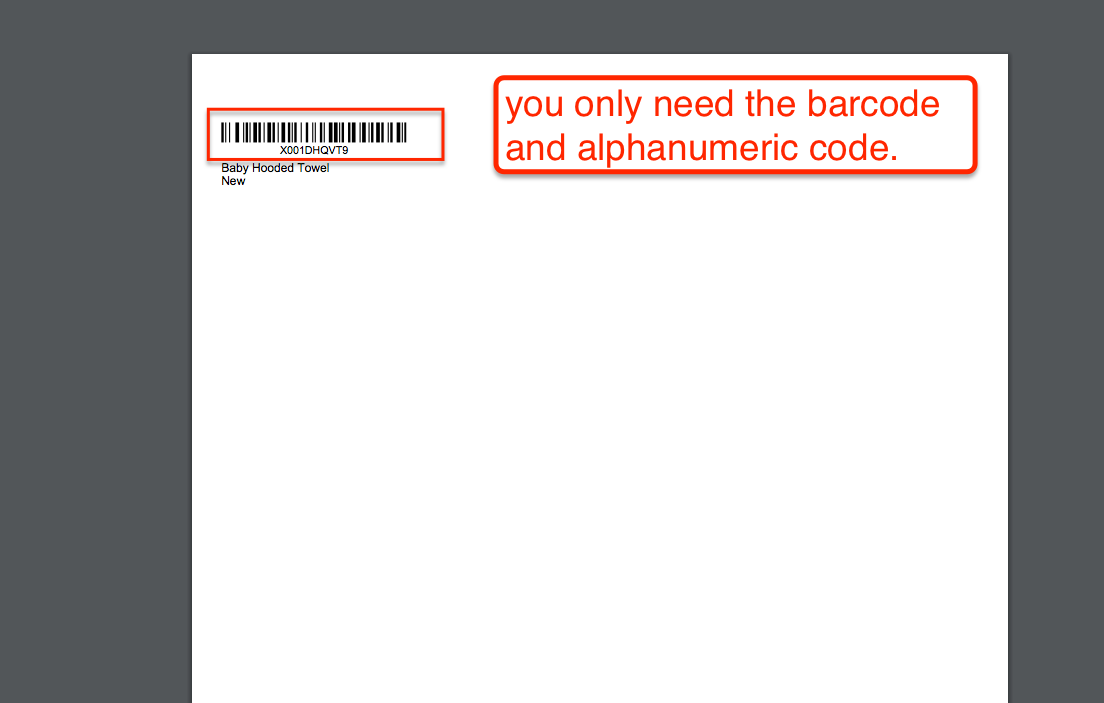
8. You will automatically get a download, which is our goal: the FNSKU! Note that you do not need to keep the text beneath the barcode and alphanumeric code. Just the barcode and the FNSKU below it is fine:
Simple as that. You can send this to your supplier and designer, and ensure that your packaging is correctly labelled for the Amazon fulfillment centre.
Note: that if you do not include your barcode and FNSKU, you will have to pay an additional $0.30 per unit to have Amazon apply this to your products. If you have 1000 units being shipped, that would be an avoidable $300 spent on something that can be addressed in your package design.
So let’s get into the fun part – the actual design!
Package Design: Overview and Best Practices
We have an experienced designer on the Jungle Scout team, Adam, who started his career in print design, before moving on to digital products. Adam kicks things off by explaining a few terms that you need to get to grips with.
Resolution
Resolution refers to the sharpness and richness of an image. It is generally described in Dots Per Inch, or dpi. You want to aim for 300 dpi, which is the standard these days. If you go to say 75 dpi, you are likely going to have a pixelated image as a result.
Bleed
Bleed allows you to design all the way to the edge of a page. Generally, you want to allow a bit of space, or “bleed”, in the printing process so that after printing, you can trim down your image to the appropriate size. Ultimately, you want to allow for some of the outer image to get trimmed away.
Print and Color
For laymen, there are two types of color: Digital, which is basically four colors (CMYK, or cyan, magenta, yellow and key, or black) which can be mixed together to create new colors. Or Offset and Flexographic, which are individual colors that are stamped on to a box. Digital is cheaper, and can get most colors you would want. Flexographic and Offset are good for high volume printing, and can meet a higher quality, which of course costs more.
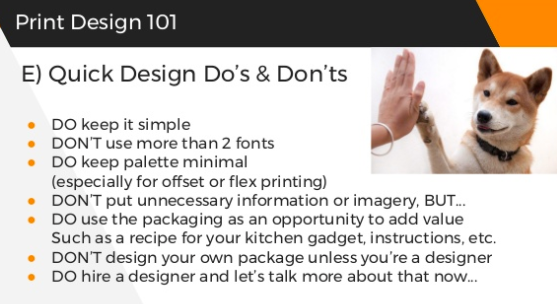
Design Best Practice
Here's some of the top do's and don'ts from Adam's slides:
One key point that Adam makes is that it is usually faster and more effective to pay a professional to design your packaging. So although you don't need to learn how to become a designer, it's important to know how to communicate with designers and breif them. It also helps to develop an eye for what is a good design and be able to give any critical revisions back to your designer.
Hiring Designers
So where do you actually find the designers to create your packaging design?
Adam recommends 99 Designs—a marketplace to find designers at an affordable price and easy sourcing. 99 Designs is very simple to use: create the specifications of the project that you want to be completed, give some guidelines of what you are looking for, and a bunch of designers will create designs for you. You only pay for the design that you like.
Wrapping it all up, these are the steps that you want to consider to put together the best package design possible:
- Work with the manufacturer and in-house options
- Get the template
- Get print specs
- Decide on and assemble your package info
- Submit to 99 designs
- Select final and apply art to template
- Send to your manufacturer
- Approve the proof
You can save on time and costs by sticking to these steps and ensuring the manufacturer ends up with a design they can work with.
Next Steps
That wraps up our session on Branding and Package Design.
In our next session, we will have freight expert Philip von Mecklenburg-Blumenthal, Senior Director Marketplace at Freightos, explain everything you need to know about shipping your Amazon product. Philip is not only an expert on freight, but has a focus on FBA sellers. This will be an essential session in figuring out how you will import your product in the fastest and most cost-effective way possible.
JOIN THE SHIPPING & IMPORTING SEMINAR