Blog: Million Dollar Case Study: Shipping Your Product
Million Dollar Case Study: Shipping Your Product
- In this episode, we cover how to ship your product to Amazon warehouses
- What is a freight forwarder? Do you need a freight forwarding company?
- How to create your shipment plan in Amazon?
- Timelines, pricing, and expectations
- Missed an episode? See them all here.
We’re covering all of this today in our eighth episode of the Million Dollar Case Study. Watch the video, keep reading and don’t forget to claim your exclusive Flexport and Jungle Scout discount!
Subscribe to the Million Dollar Case Study list here, so you never miss an episode!

Before you get started, if you’re not already using Jungle Scout, you’ll need to get a Jungle Scout subscription to follow along with us and complete your product research.
To help you out, we’ve put together a Jungle Scout discount code that gives you more than 30% off Jungle Scout – both the Web App and Chrome Extension! Plus, you get a pretty fantastic FREE t-shirt to go with it.
Welcome Back to the Million Dollar Case Study!
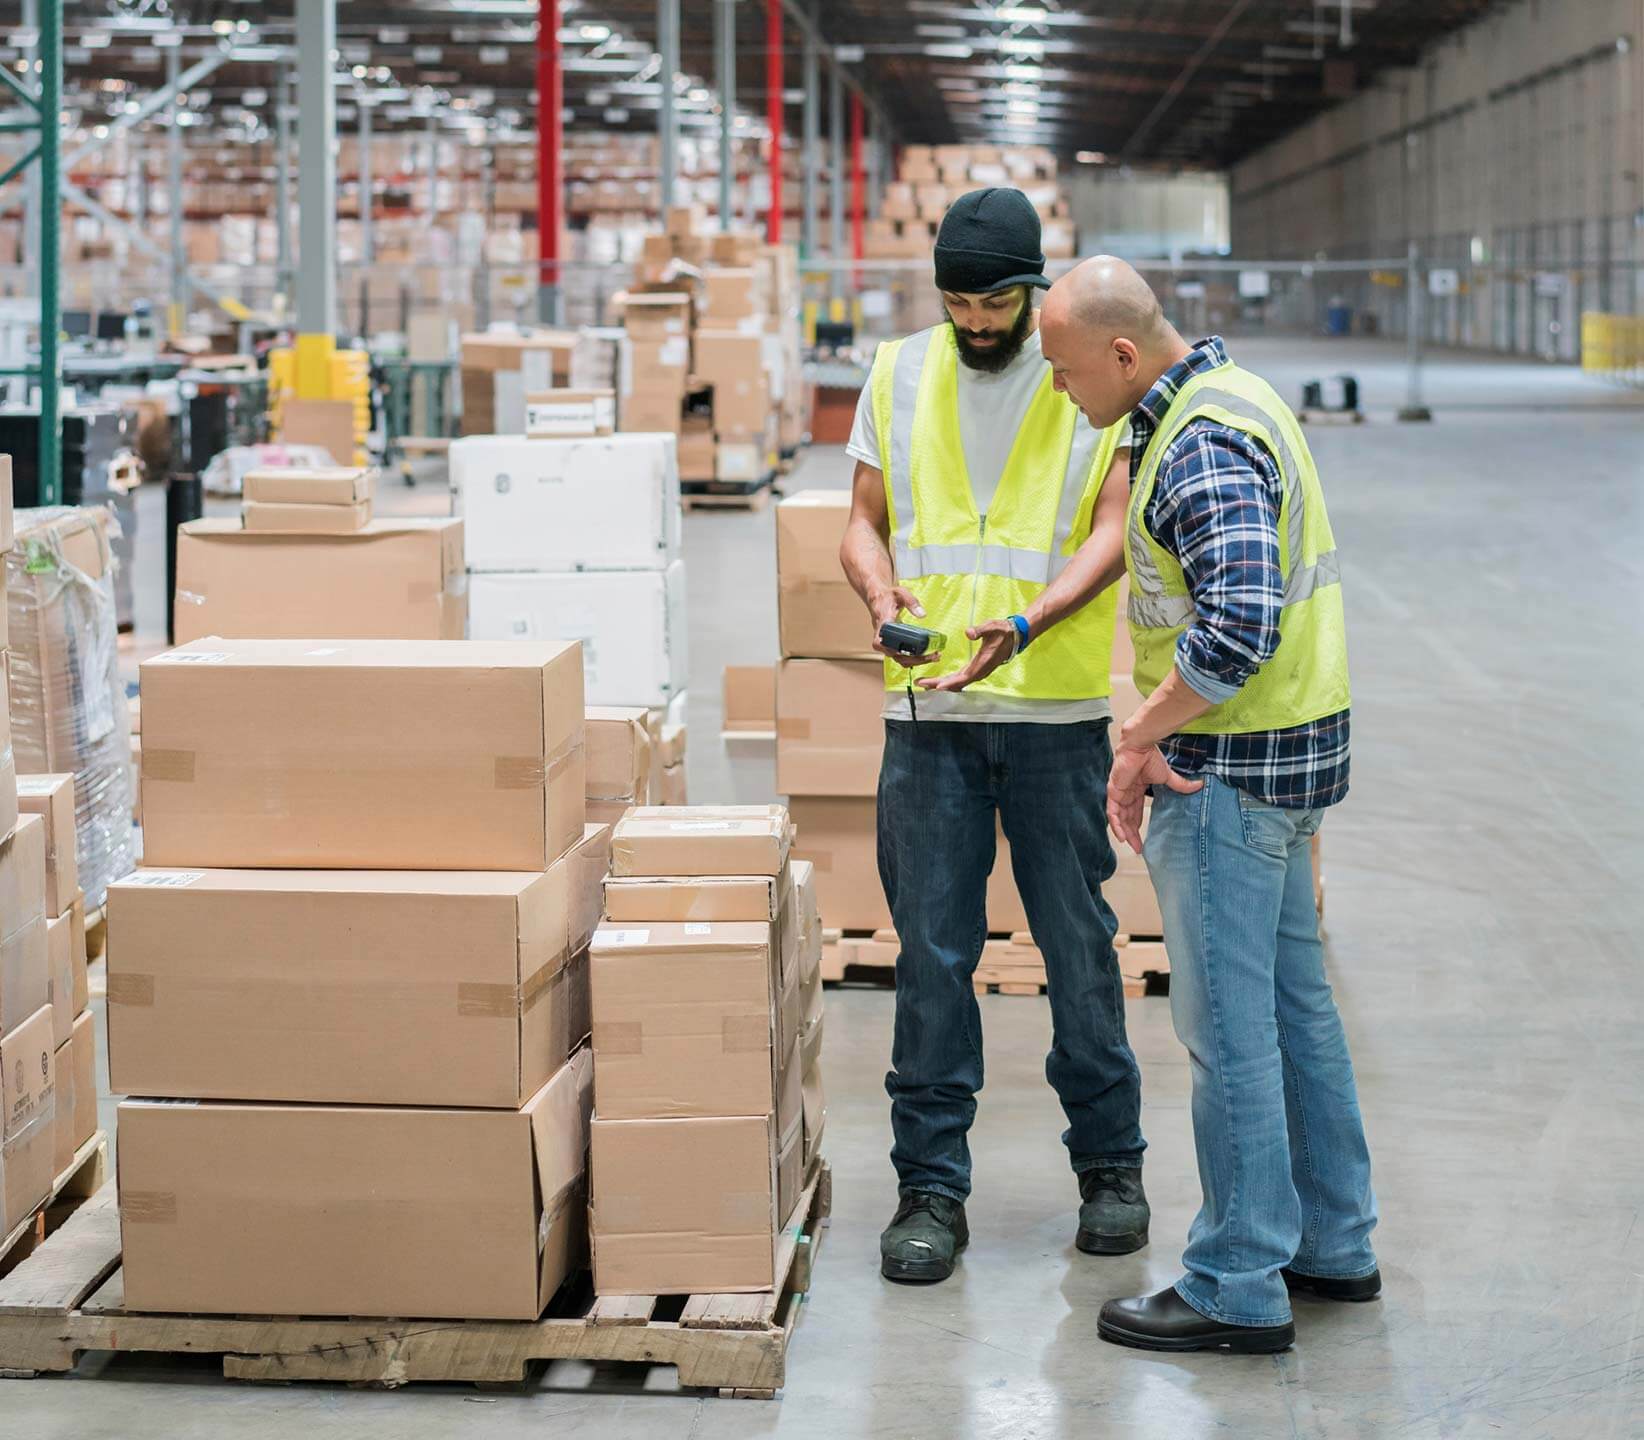
For this episode, I interviewed Michael Gallardo from Flexport. Michael has years of experience in the shipping industry and explained how to get our private label product from China into Amazon warehouses.
So where do I begin when it comes to shipping my goods from China to Amazon warehouses?
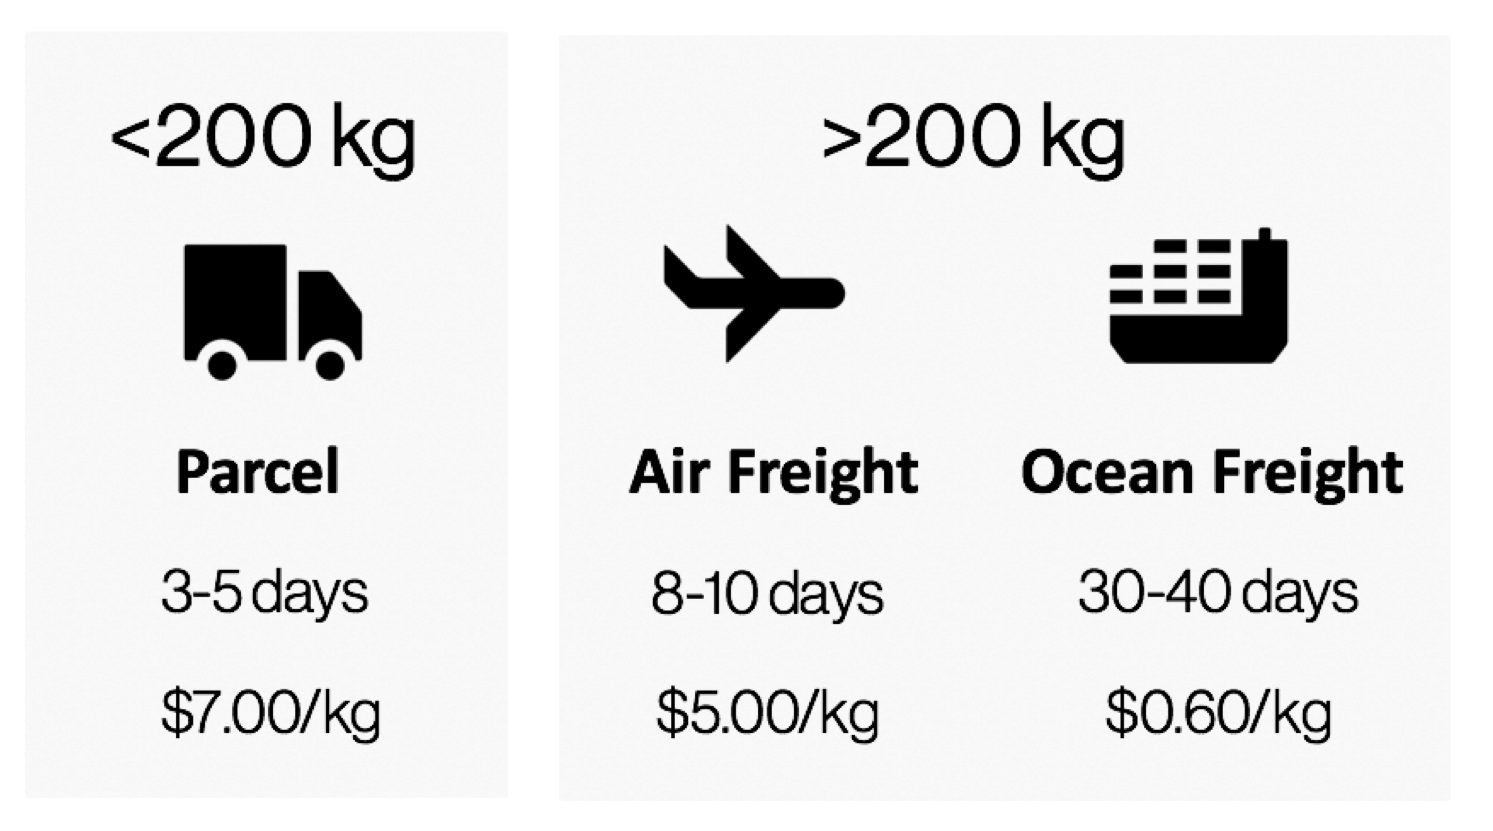
A good place to begin is with the weight of the shipment. These are some of the rules I always stick to:
- For ocean shipments, always use a freight forwarder
- For air shipments, use a freight forwarder if your cargo weighs more than 200 kg
- If your cargo is less than 200 kg, then you can go through your supplier, who will leverage DHL Air Express
- Freight forwarders are too expensive for shipments less than 200 kg
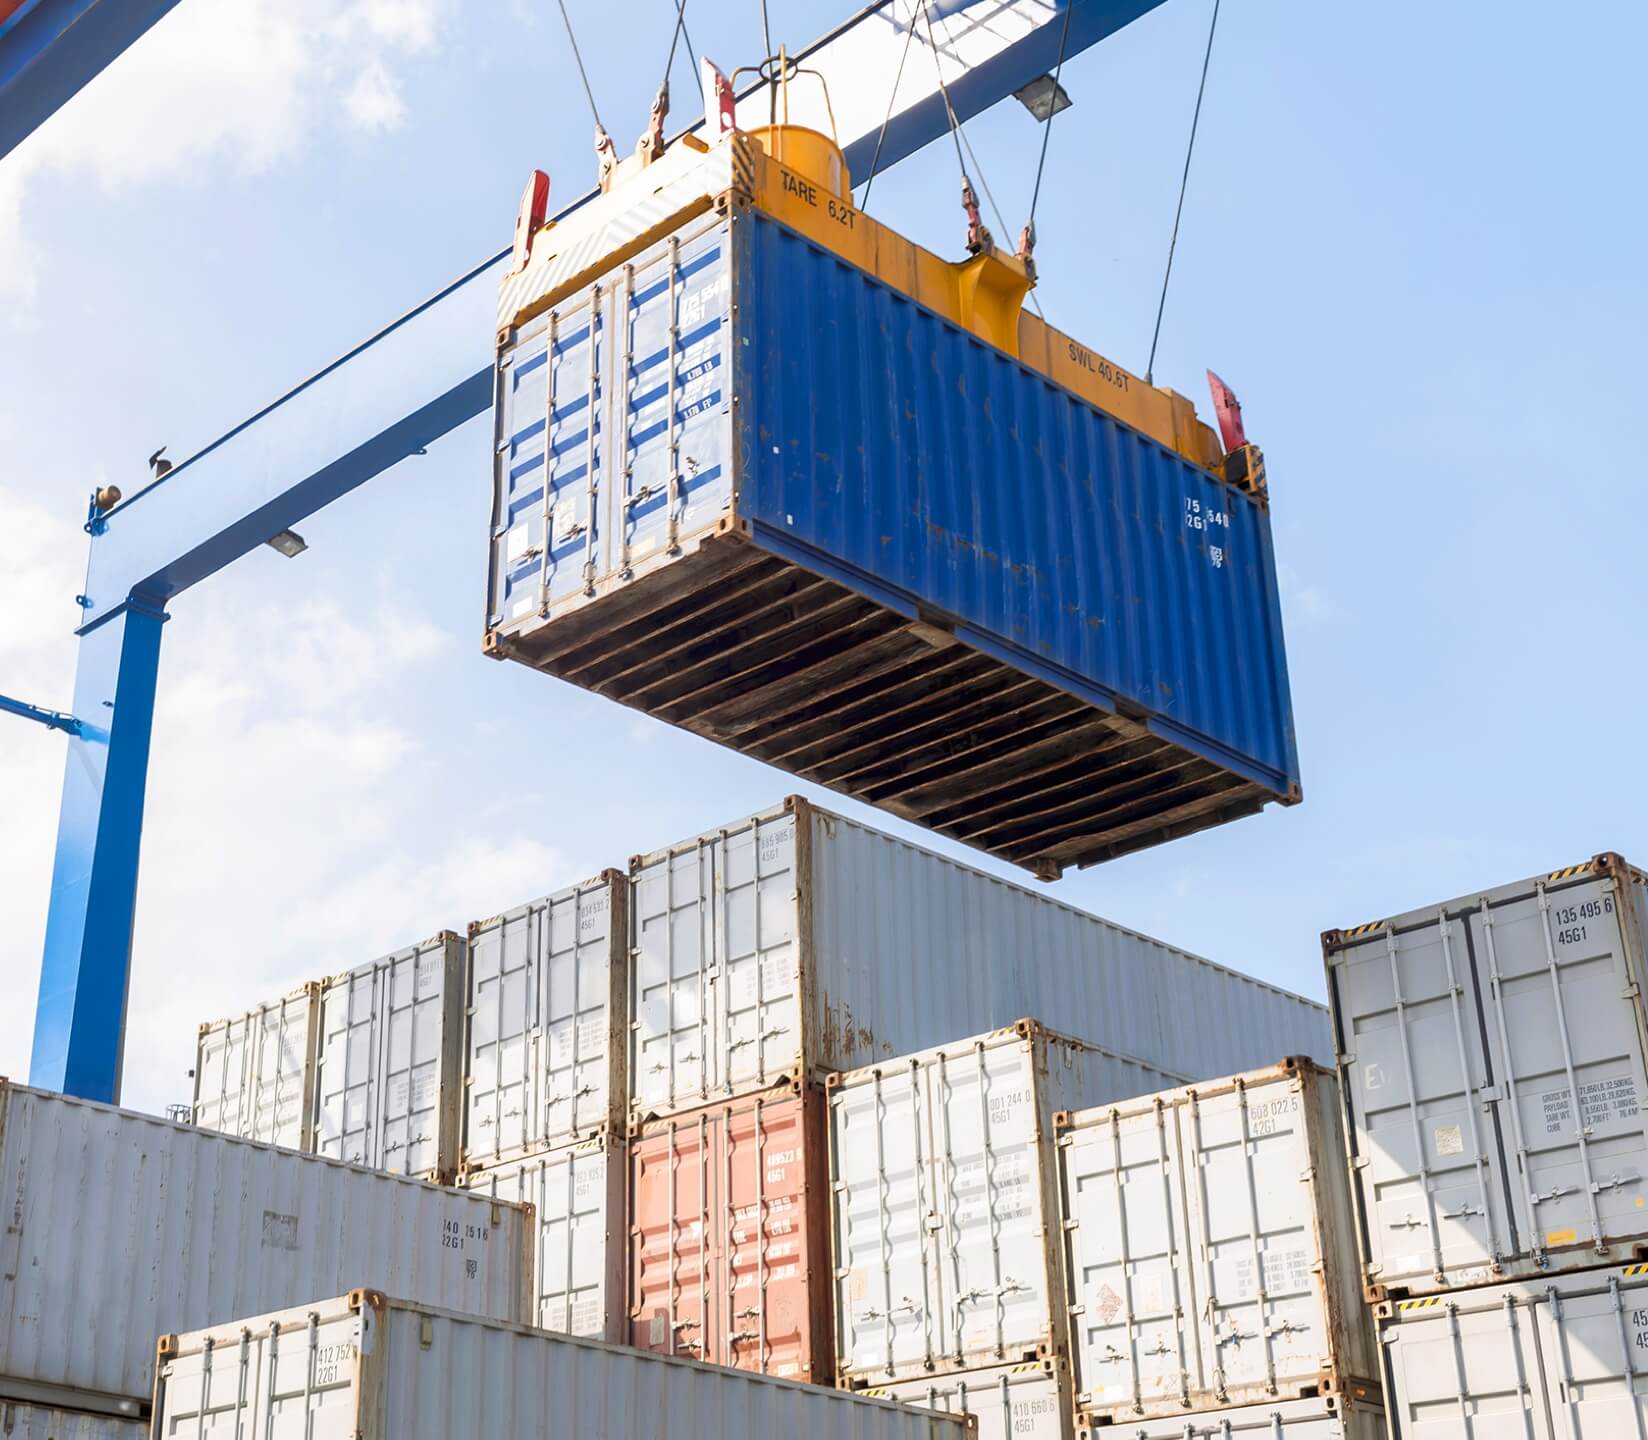
Shipping FCL vs. LCL
The most typical ocean shipment is an LCL (Less Than Container Load) shipment. You’re going to be in an LCL shipment if your shipment is less than 18 cbm (cubic meters). Think about it as the space your product takes up as opposed to the weight.
If you’re in this category, it means your product will be in a container with other shipper’s products. That container will be shipped to the United States and then offloaded at a container freight station before the cargo is prepped and sent to Amazon fulfillment centers.
This is where a freight forwarder comes in handy!
If your shipment is over 18 cbm, that’s when I’d be working with your freight forwarder to see if FCL (Full Container Load) makes sense. Typically FCL ships direct to an Amazon warehouse without unloading the container.
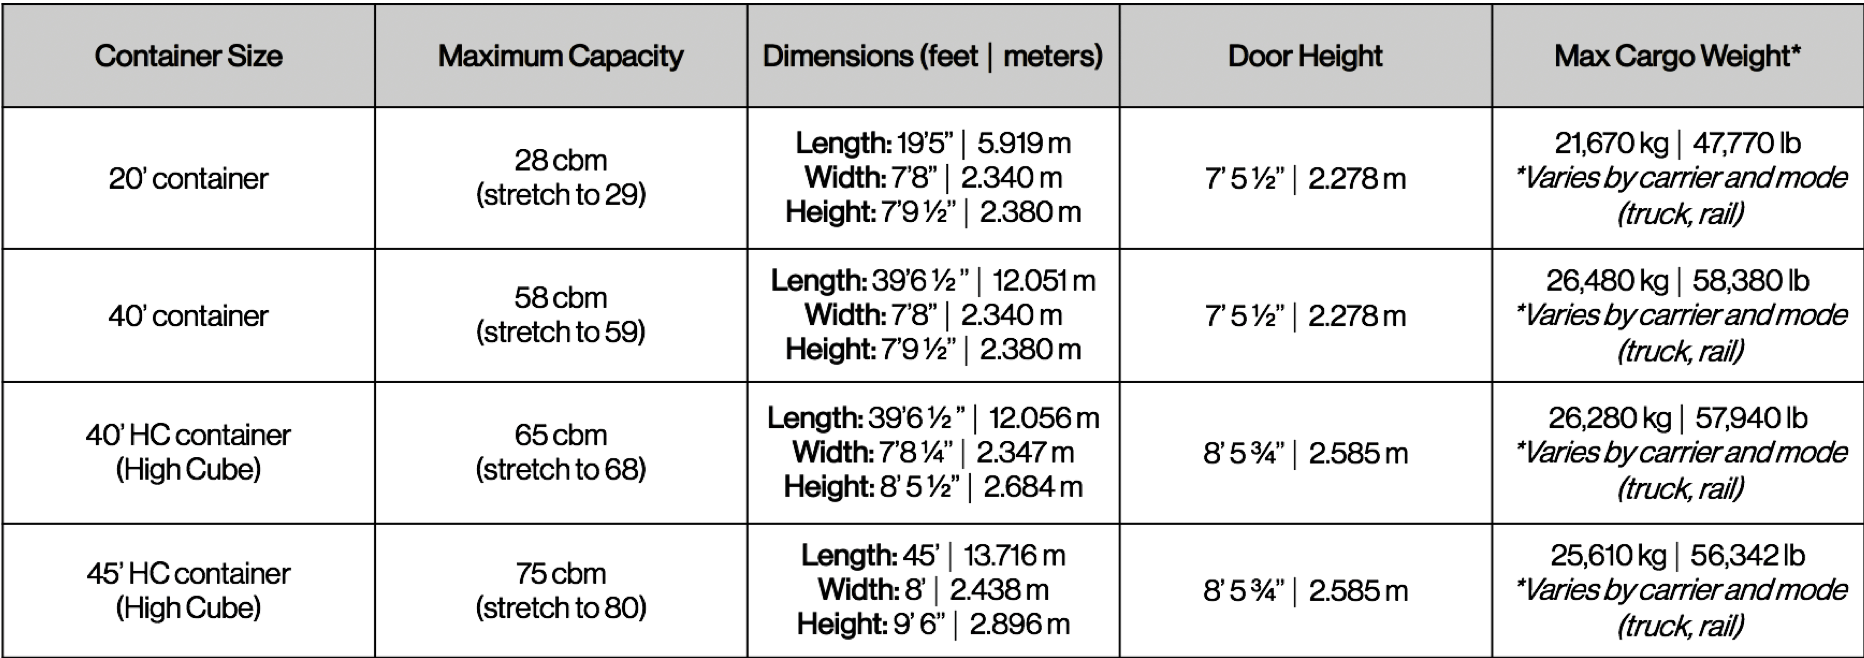
Container Sizes
If you were wondering how much you would need for FCL, here’s a list of the container sizes available:
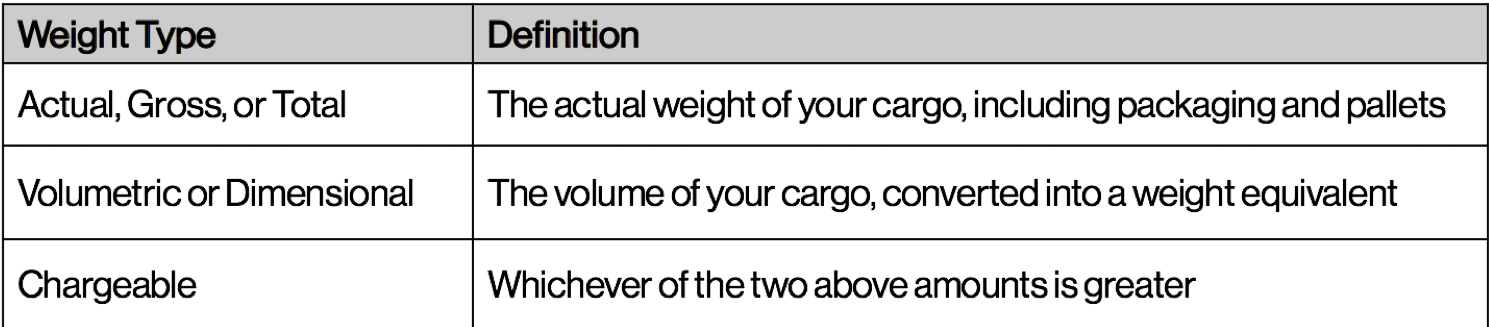
Shipping via Air
Another consideration is to ship via air, which is usually a much faster and simpler process. But, it can be expensive. The chargeable weight is the weight which airlines will use when determining the cost of a shipment, and the carrier will charge you for whatever is greatest: gross weight or volumetric weight.
Inspections
To ensure quality, always have your shipment inspected overseas by an independent third party, even if you have shipped with your supplier multiple times.
Recommended solutions:
💡PRO TIP: try to negotiate (ahead of time) with your supplier for them to pay for the second inspection if the first inspection fails.
Creating an Amazon Shipment Plan
When you are shipping goods to Amazon, you must create a shipping plan in the Seller Central platform in order to get the correct addresses and information and ensure Amazon knows about your inventory and there are no setbacks in getting the inventory into the Amazons warehouse.
Shipment plans do not expire so it helps to set them up well in advance. Let’s walk through setting one up!
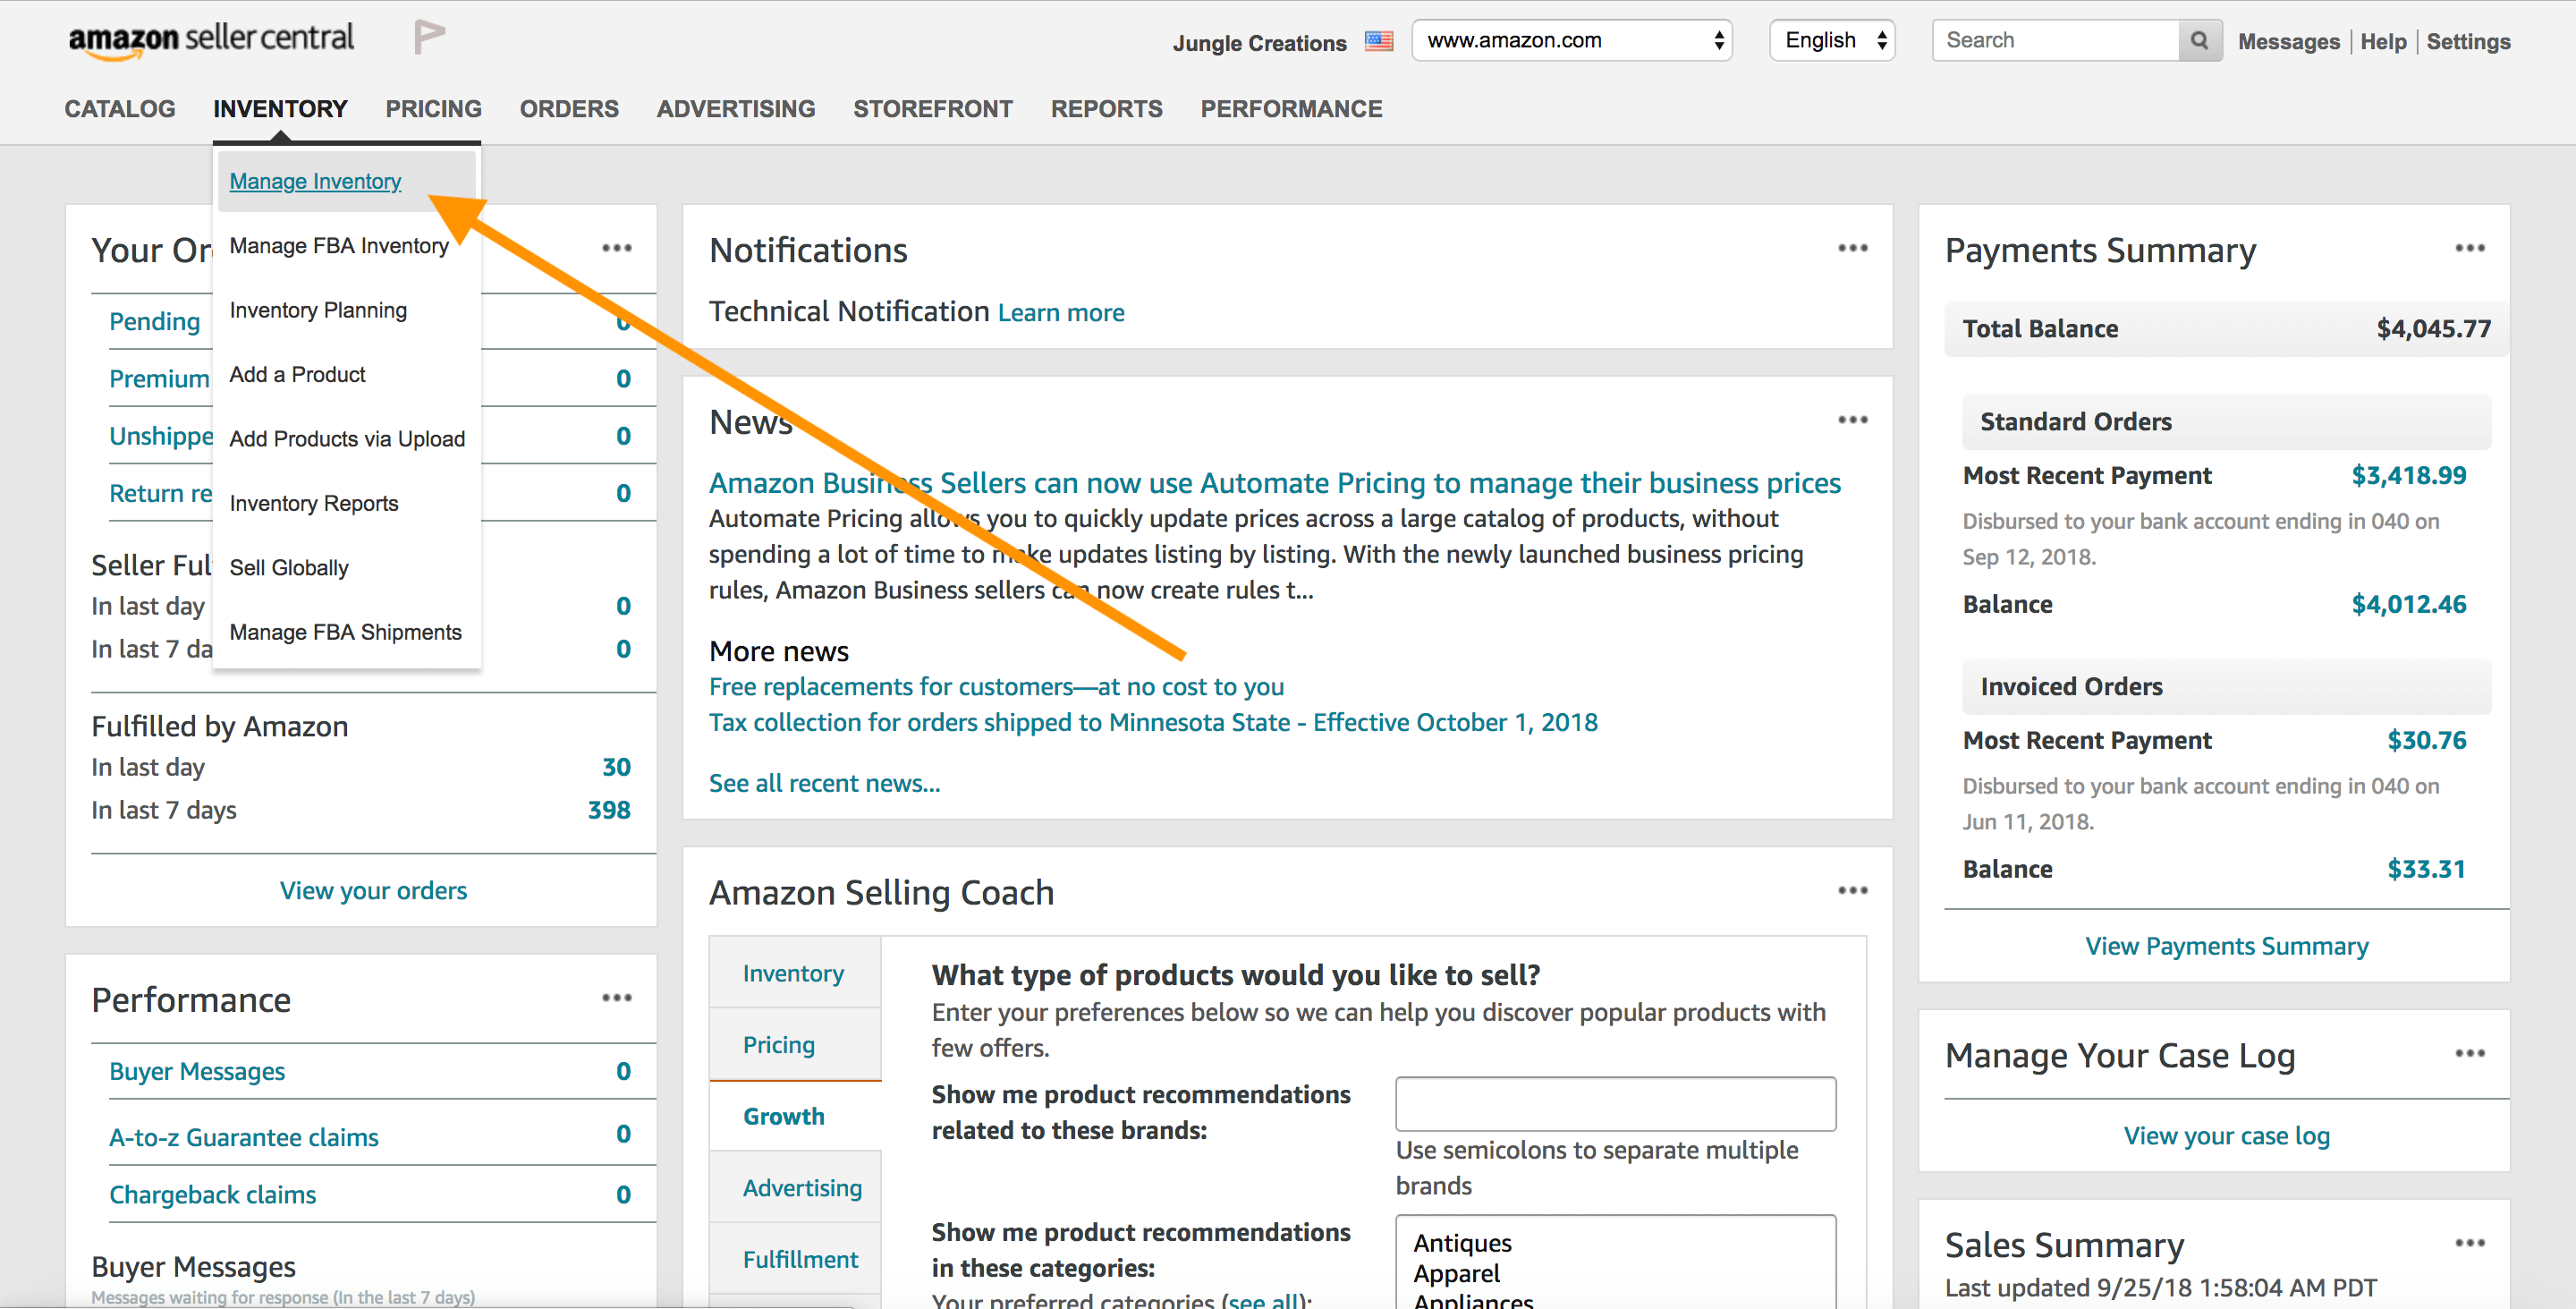
First, from your home screen, you’ll want to select “Manage Inventory” from the “Inventory” tab.
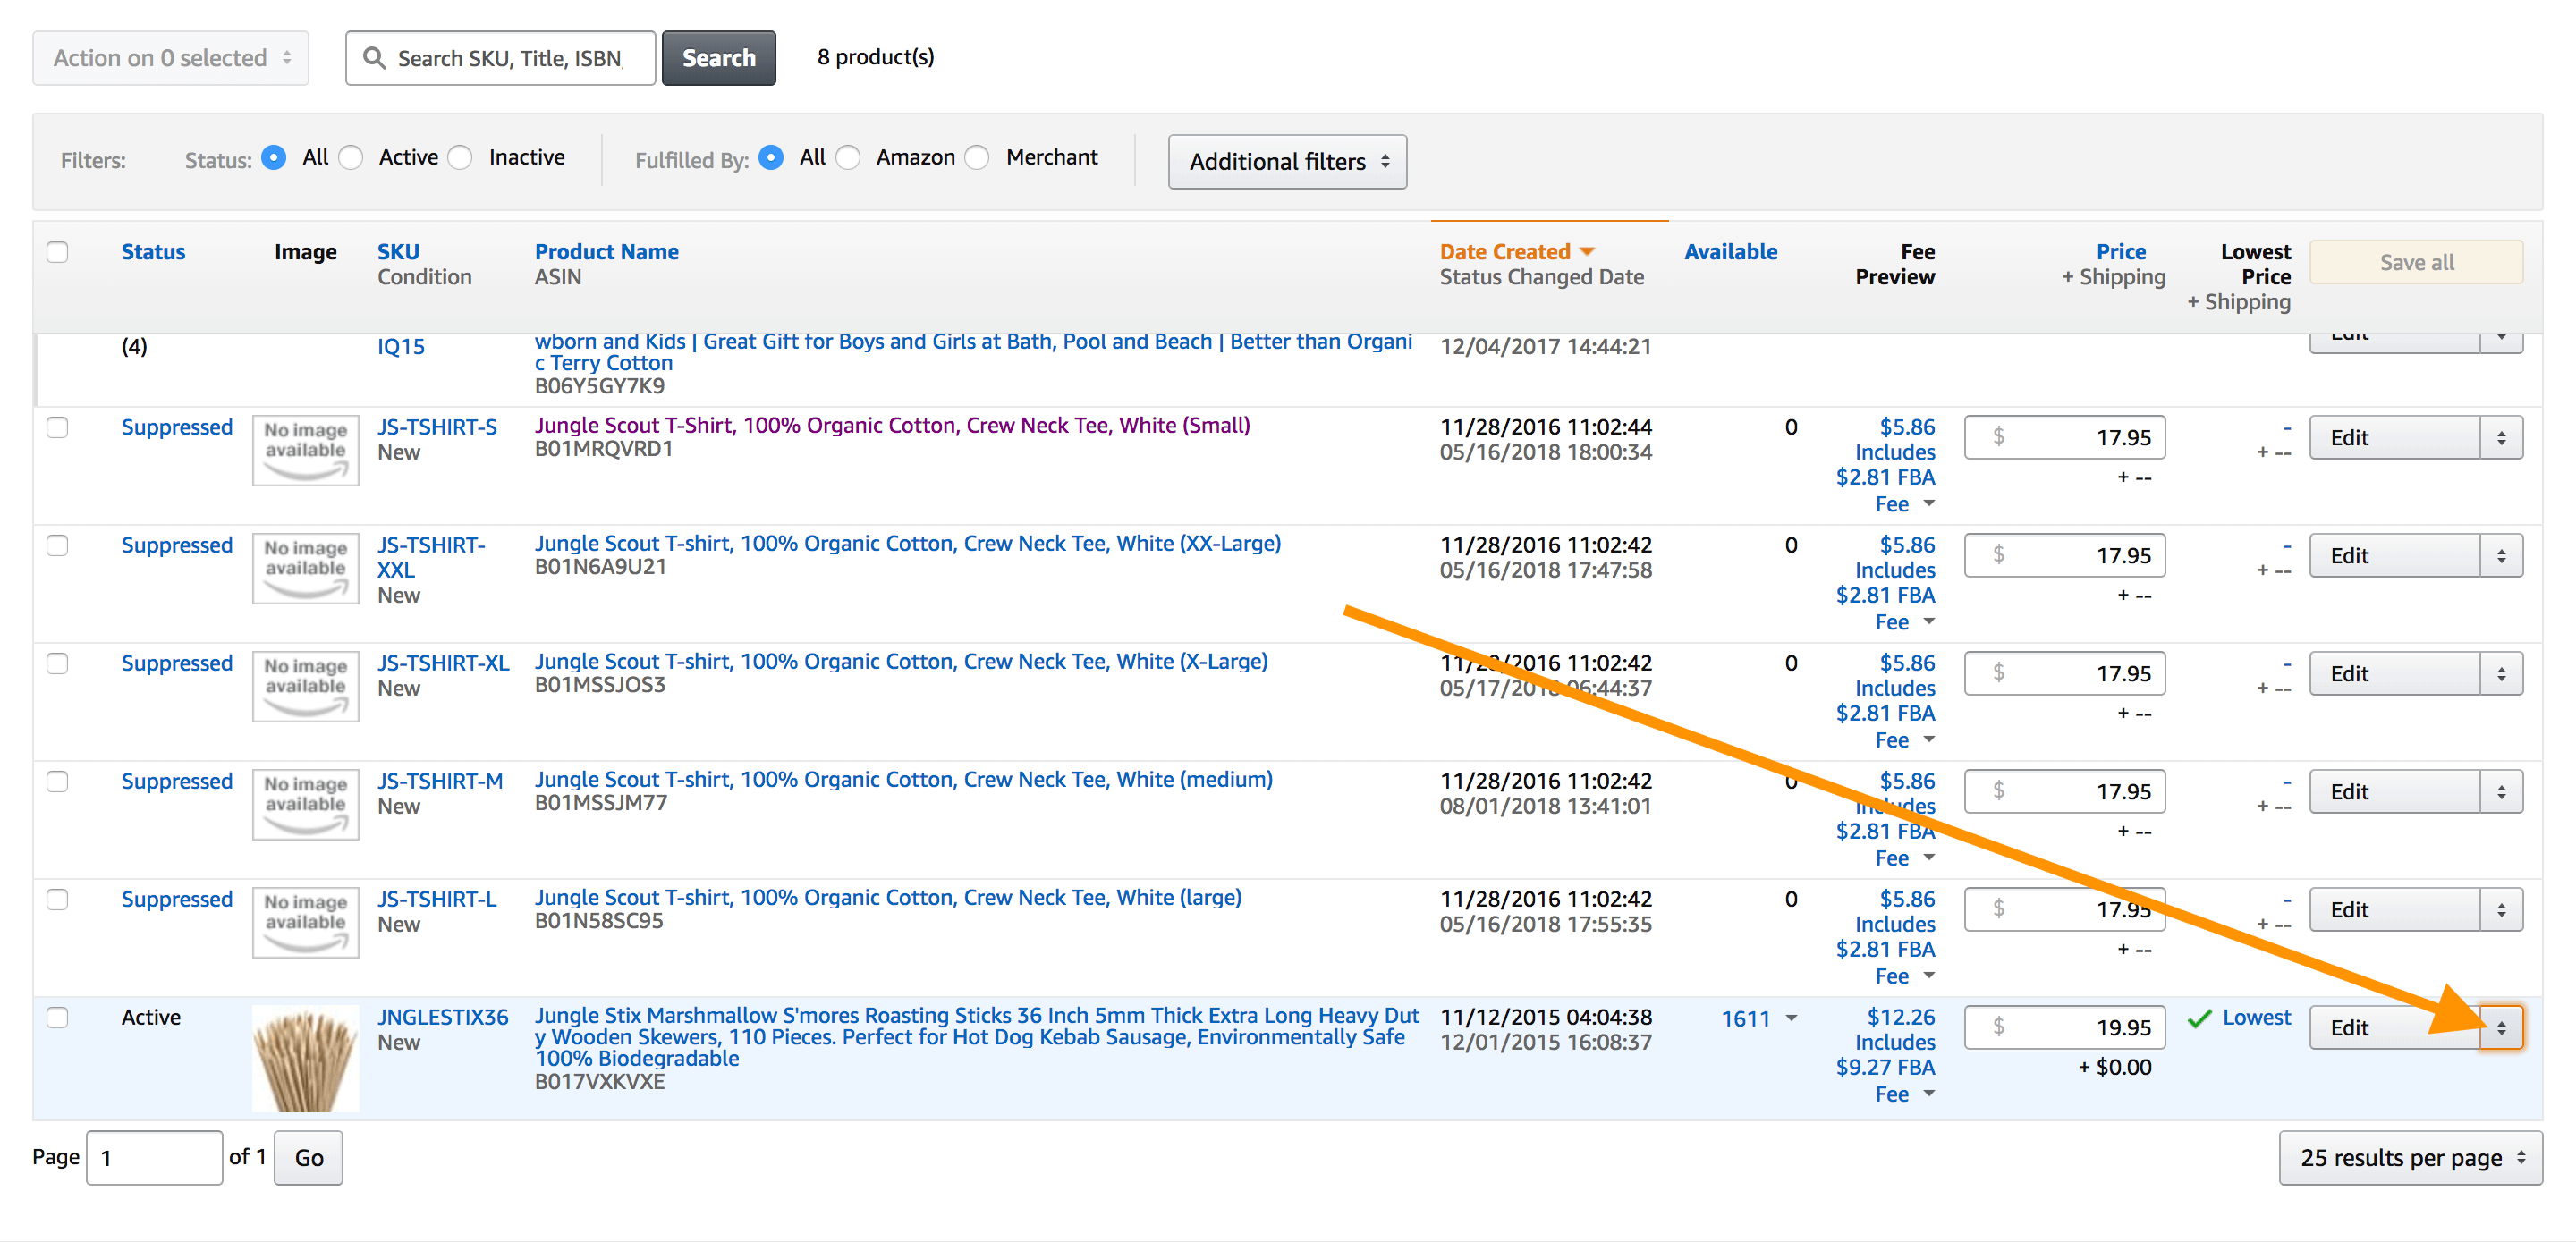
This brings us to all current product listings (next week we cover how to create the perfect product listing). From here we’ll navigate to the “Edit” button.
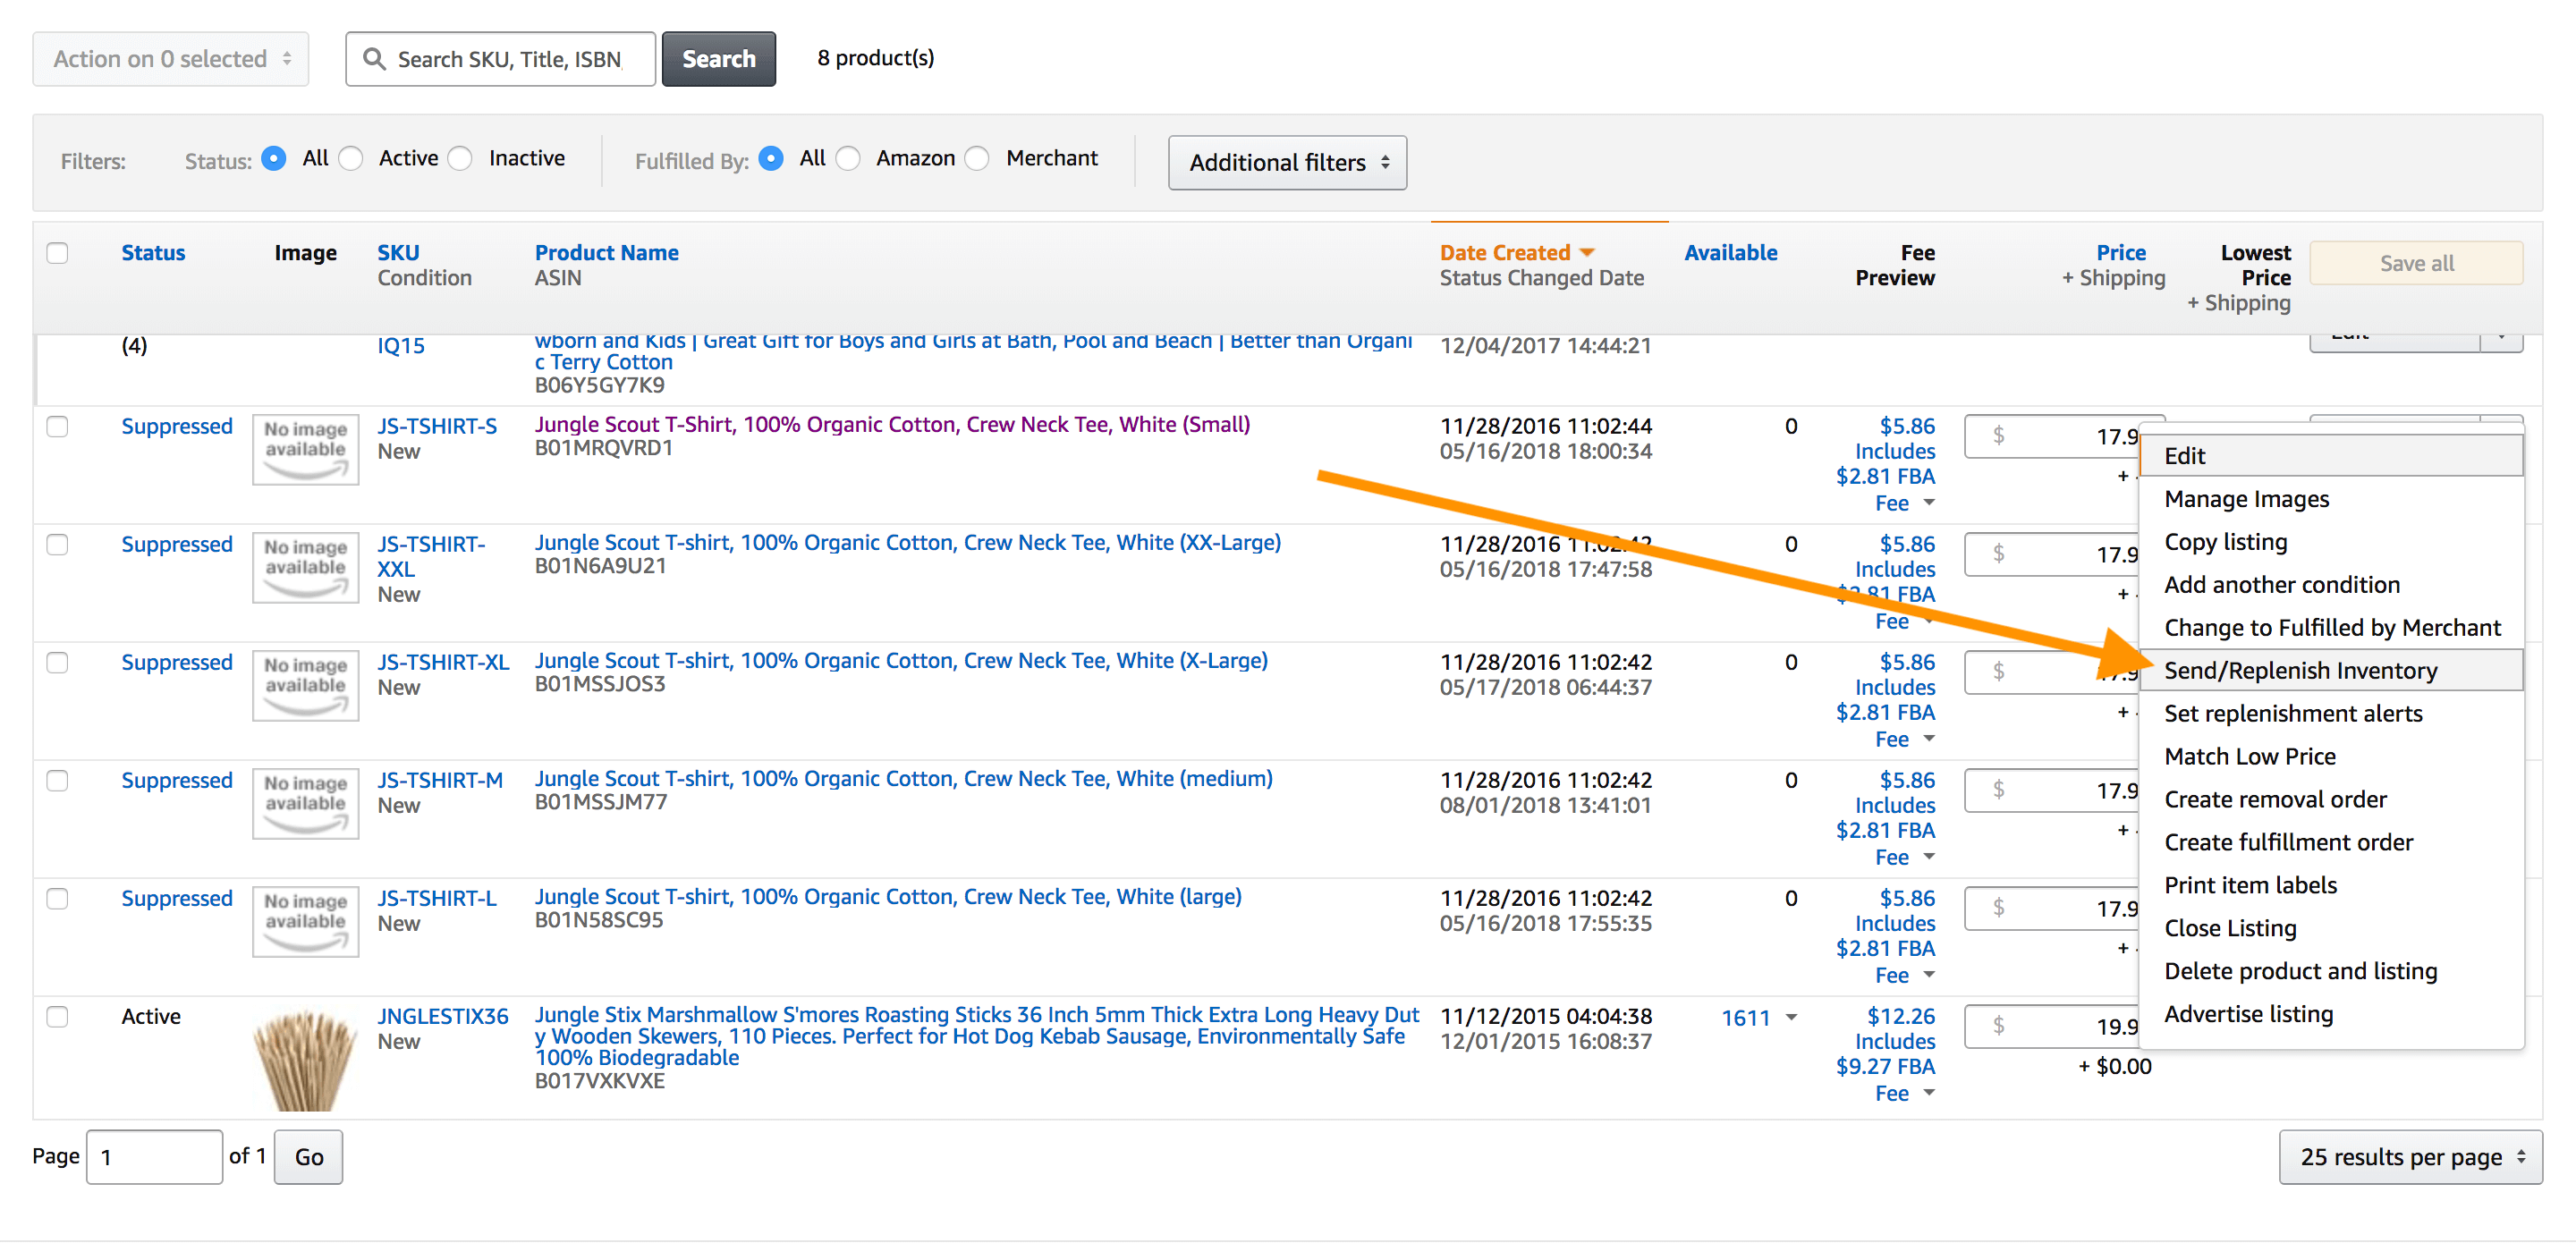
Next, we select “Send/Replenish inventory”
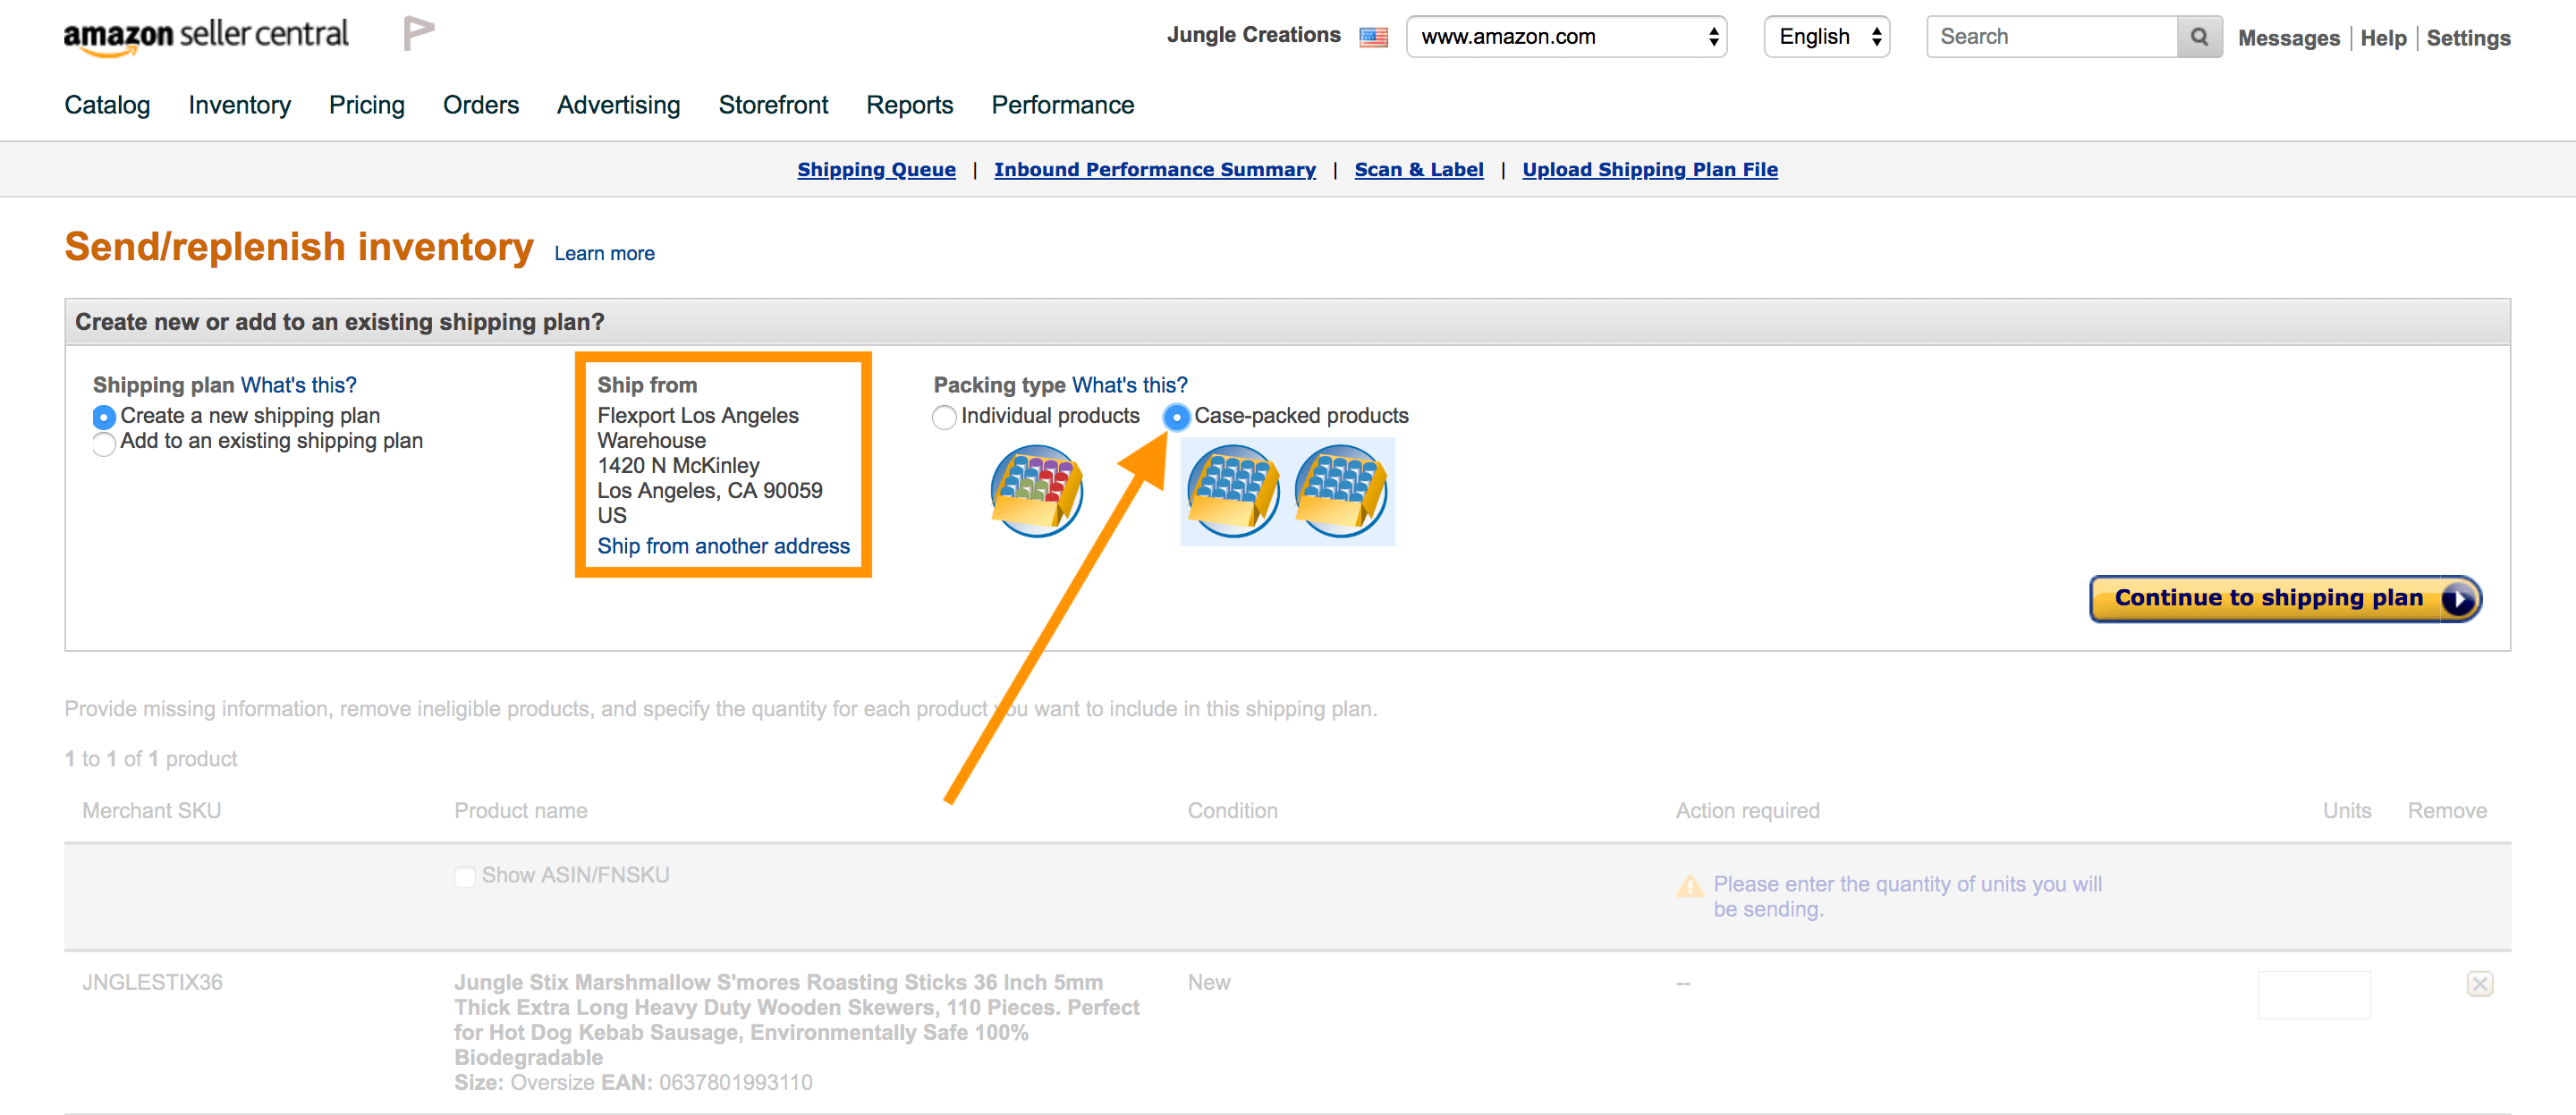
In the following screen, we need to give Amazon some more information:
- Select “Create a new shipping plan”
- Enter the ship from address. It’s important to note that the “Ship from” address is the location from which your shipment will be picked up for final delivery to an Amazon fulfillment center.
- The location of the Ship From warehouse often determines the location of the Amazon fulfillment center you’re assigned
- Do not use the supplier’s address. Use the final destination your product will land at before going to Amazon – like the offloading warehouse at the port of entry.
- Select “Case-packed products”. Be sure to put all SKUs into one shipment plan.
- Shipment plans do not need to be broken down by SKU; if you break them down by SKU, Amazon may split your shipment into more fulfillment centers than necessary
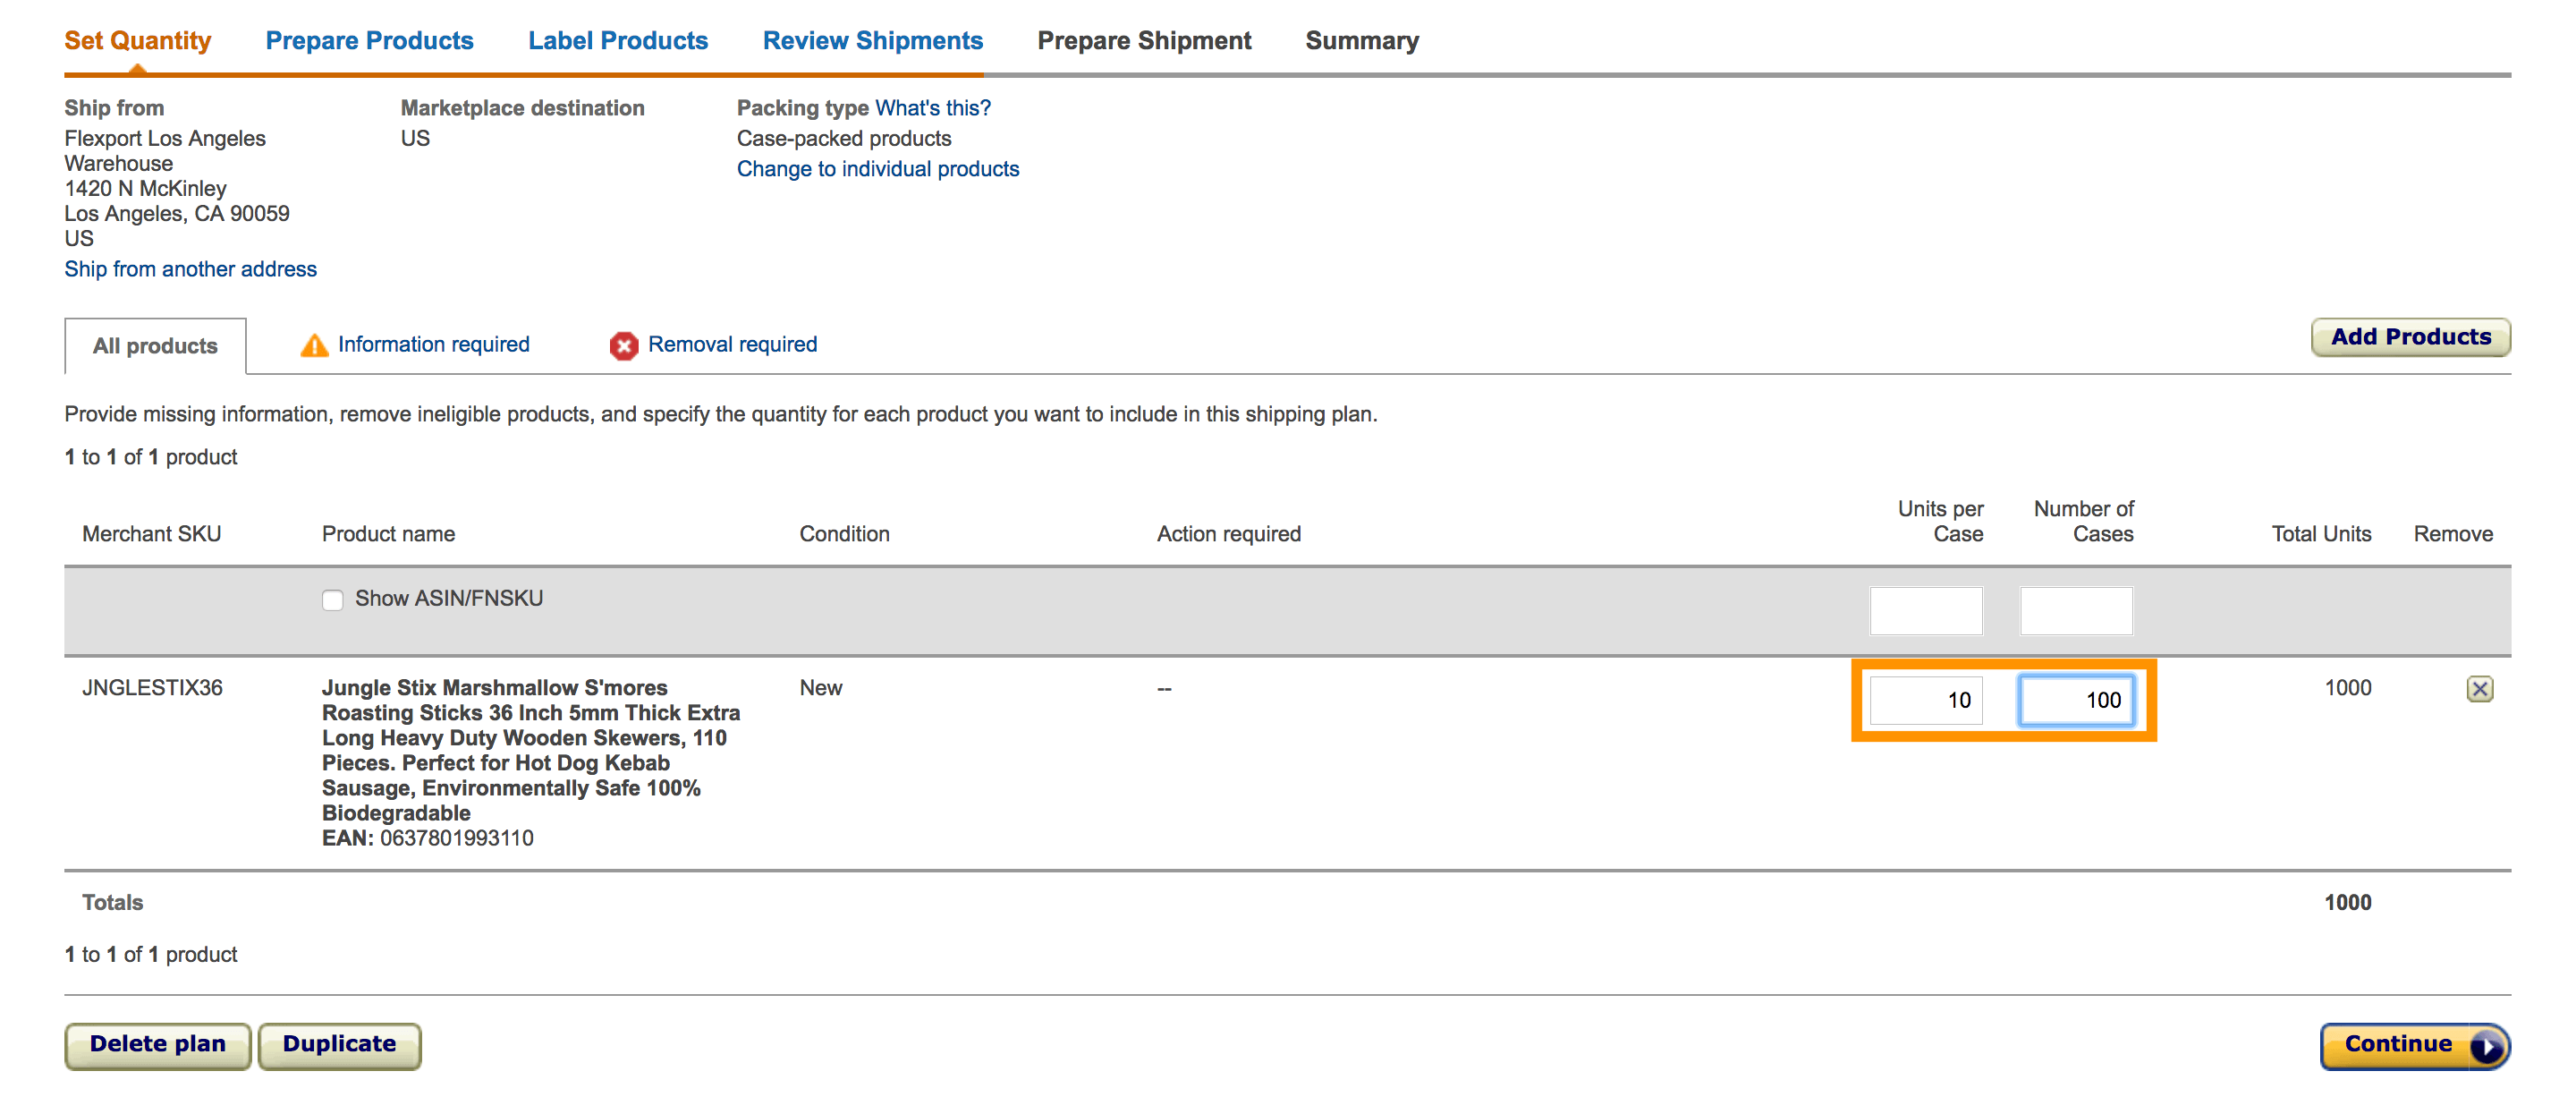
Next, we input the units per case and the number of cases. This information should be readily available from your supplier.
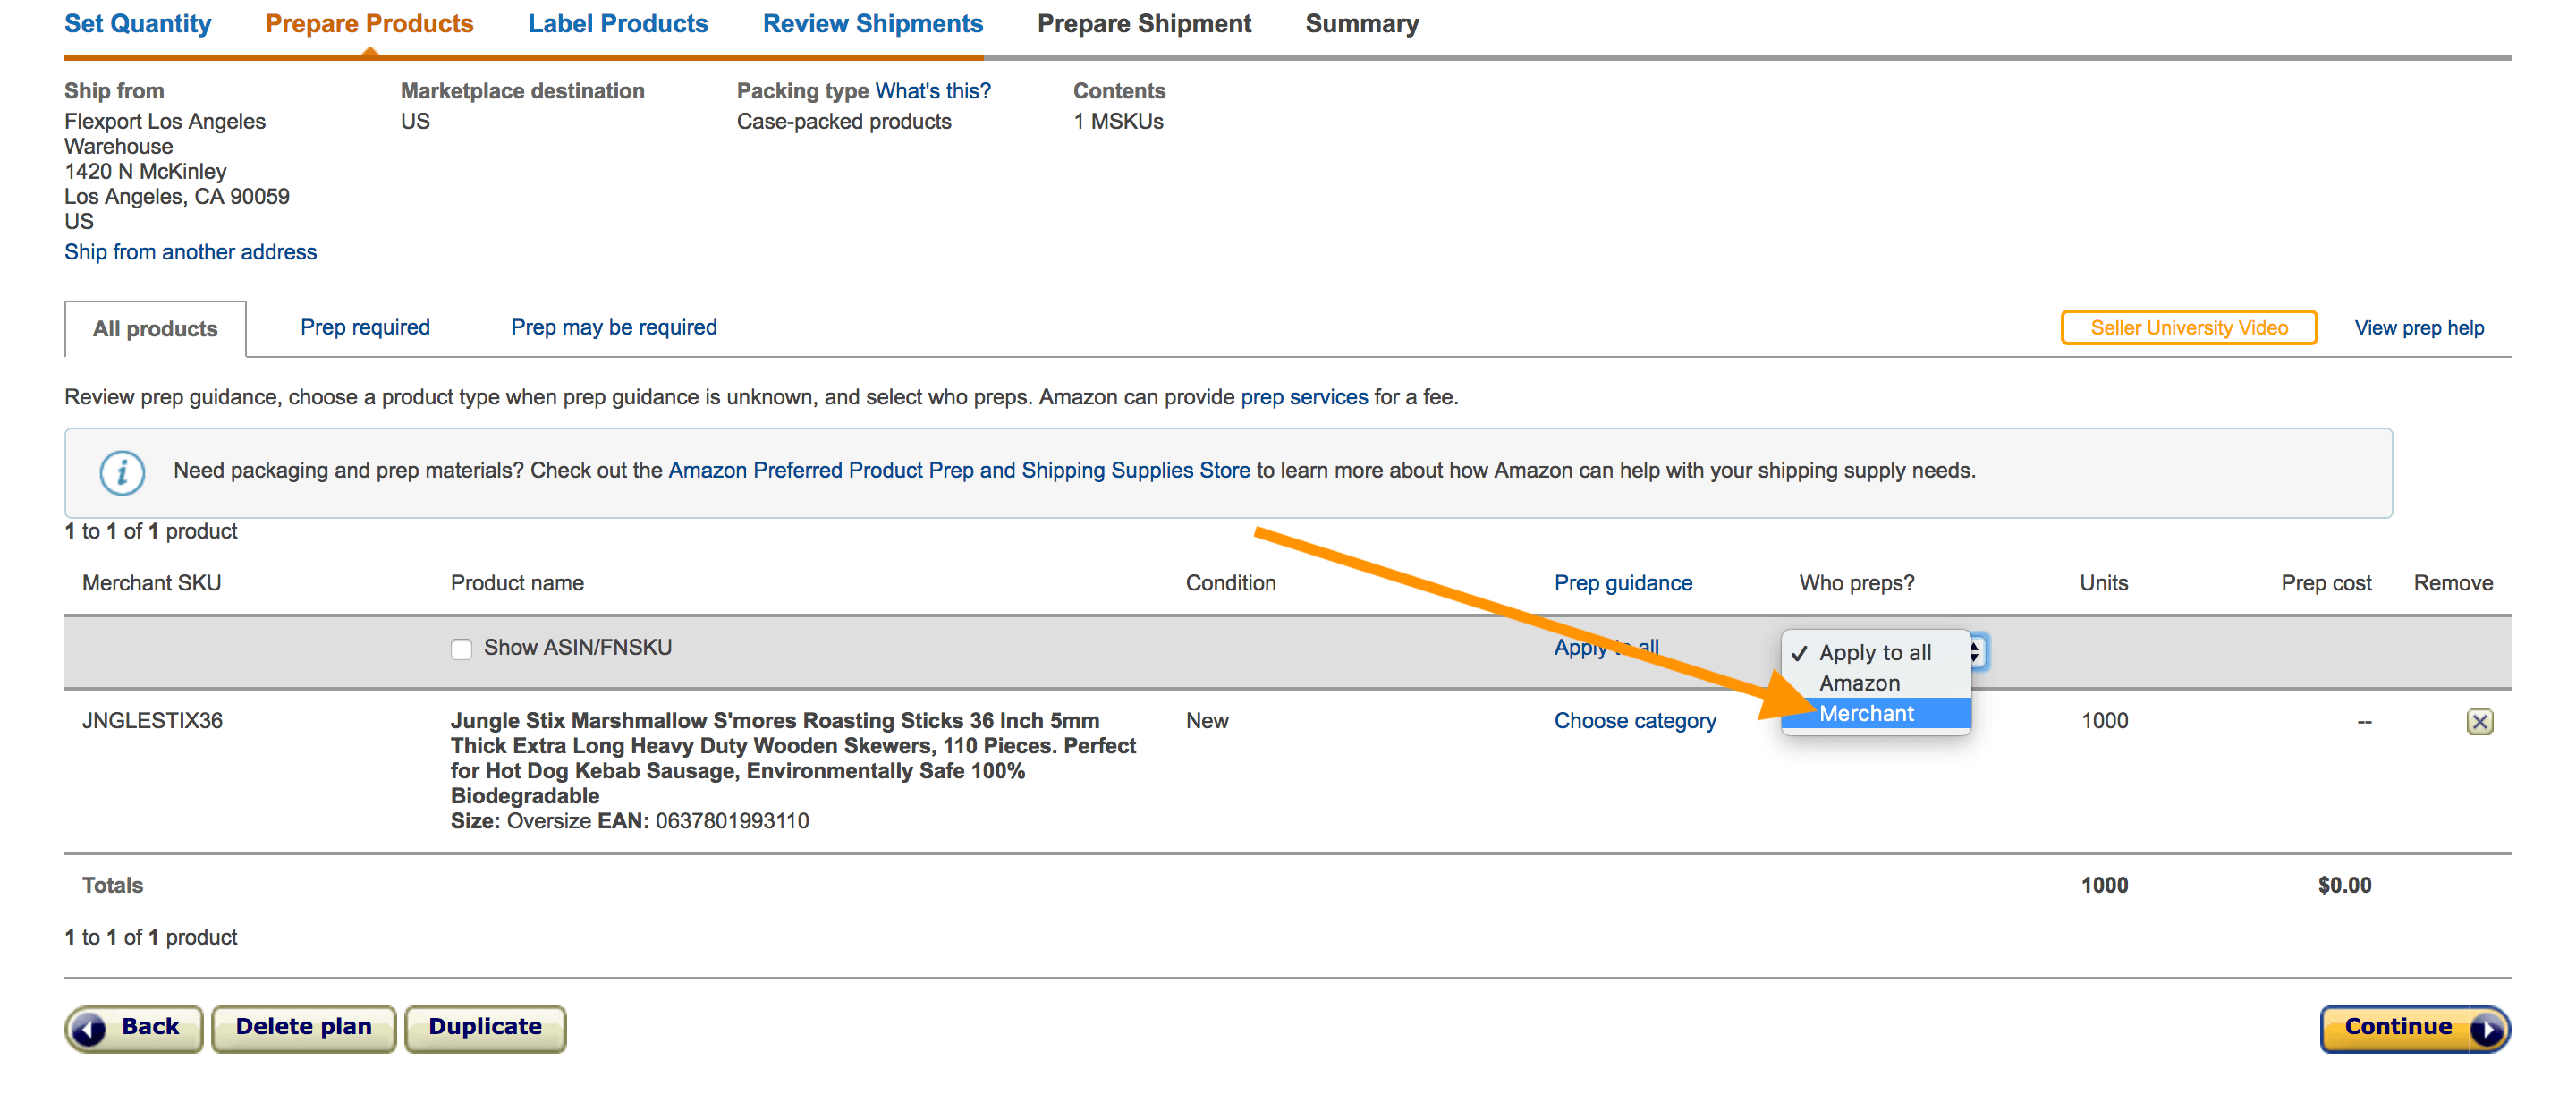
Next, Amazon wants to know if they will be doing the packaging prep work (bubble wrapping, bagging, etc.) or if it will come ready for customers. I would highly advise you always have your supplier do all the packaging prep work as it is always the more affordable route. If you’re curious to know what Amazon charges then you can check it out their pricing here.
Let’s select “Merchant,” since we are having our supplier do the prep work.
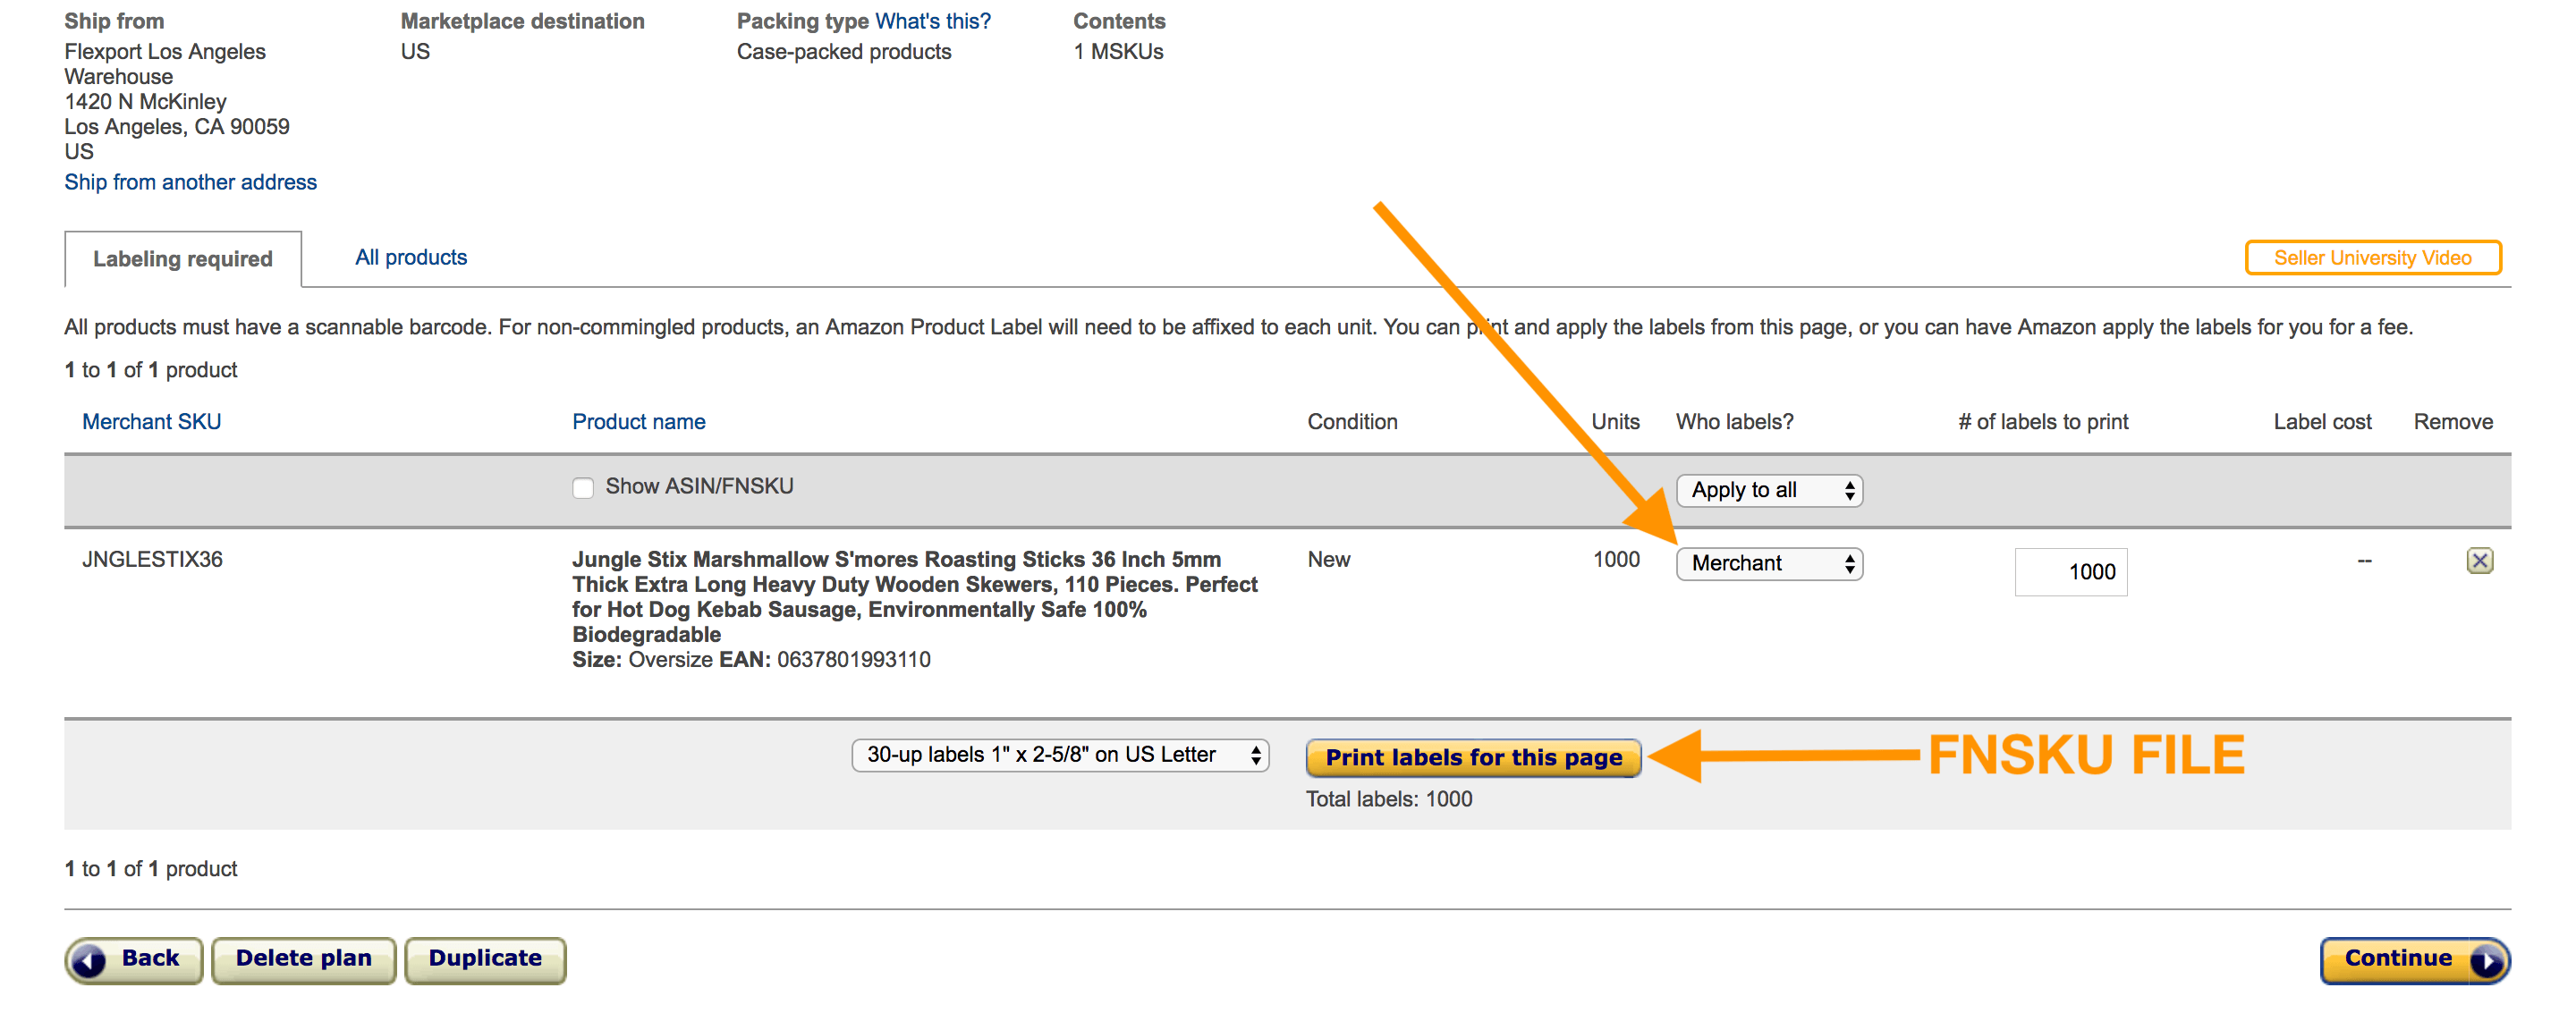
Now, Amazon is asking if they will be applying the FNSKU (an Amazon-specific barcode/identifier, we cover this in last weeks episode) labels on our product (at a fee). Once again, we want the supplier to handle this for us.
However, before we advance from this screen we want to make sure that we select the “Print labels for this page” button in order to get a PDF file of our FNSKU. This is the file we would provide our manufacturer so they can add the FNSKU/barcode to our packaging.
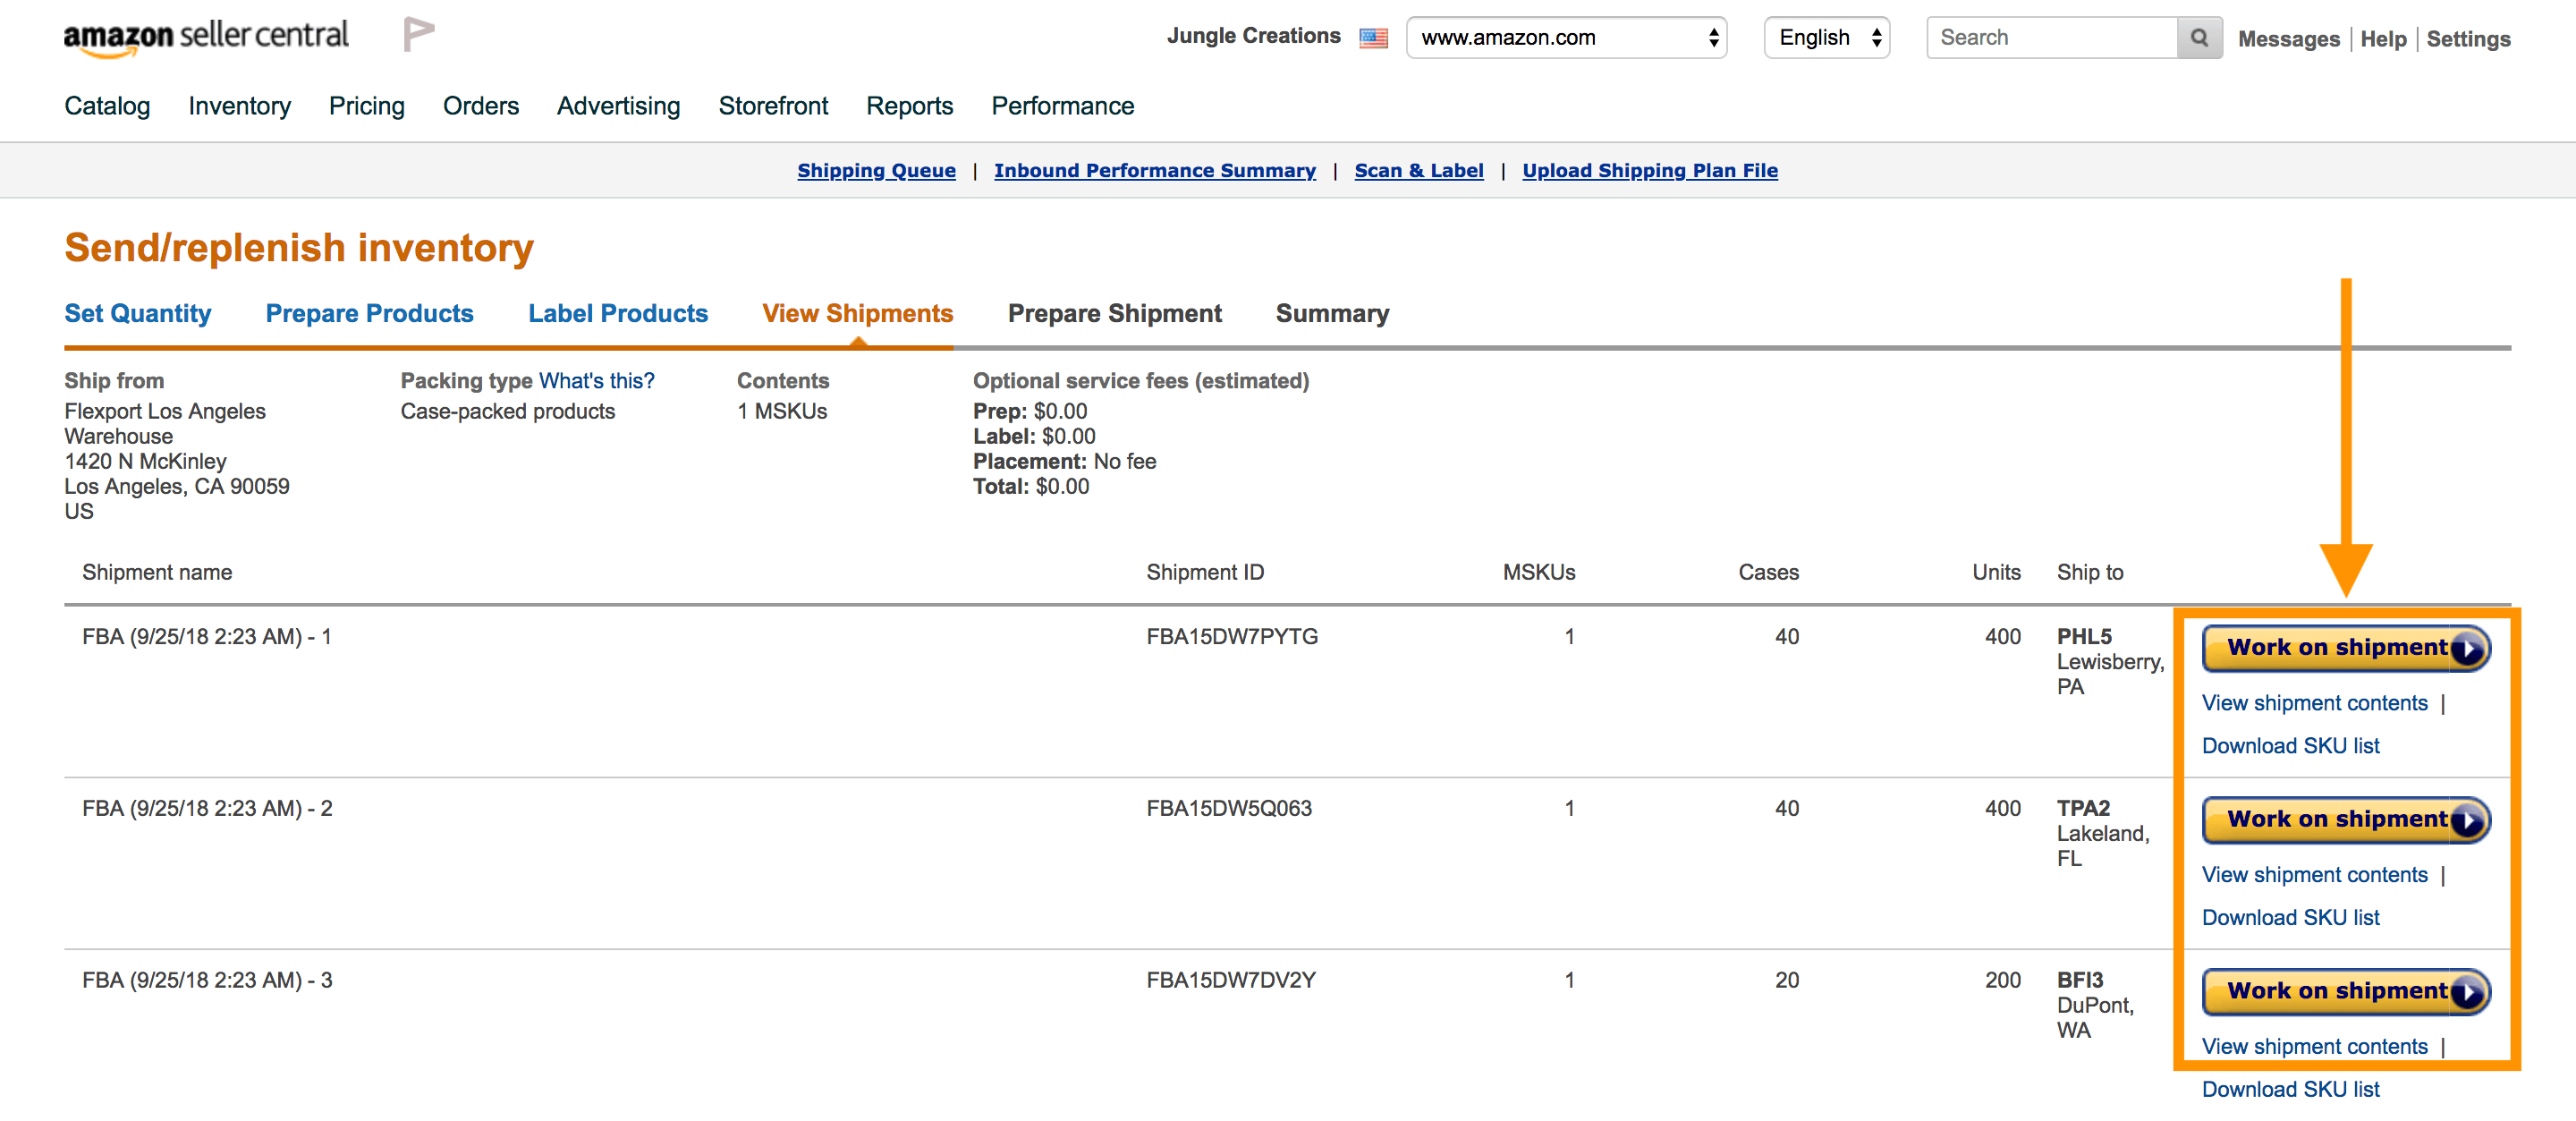
Amazon will automatically designate the fulfillment centers they want our product shipped to. As you can see below, my 100 case shipment has been split up into 3 locations: Pennsylvania, Florida, and Washington (unfortunately we don’t have a say in how this is divided up).
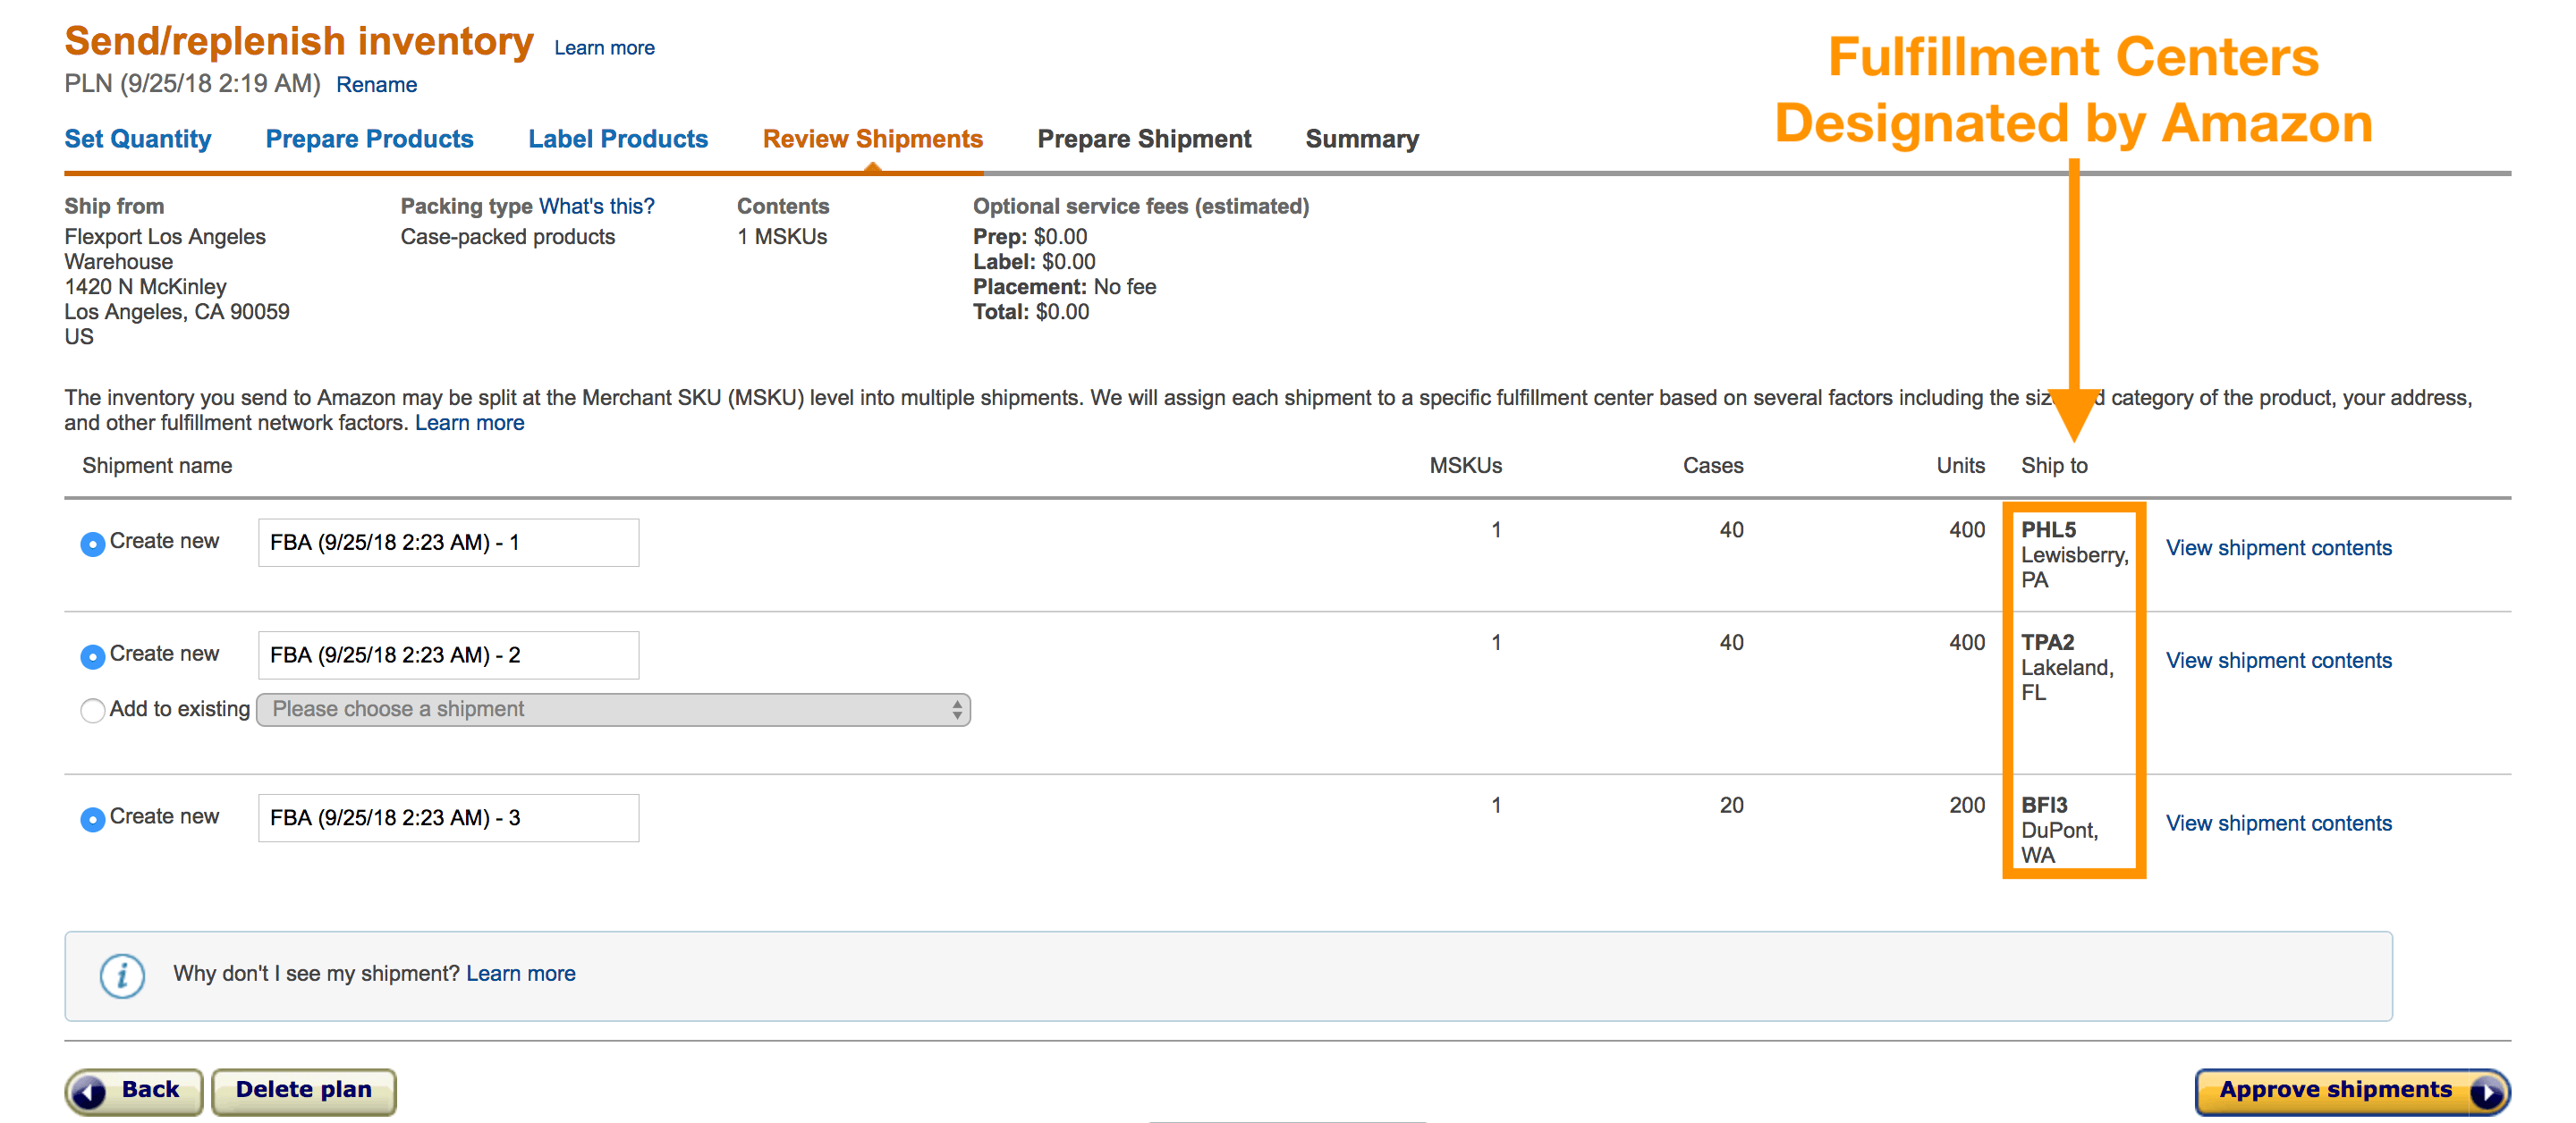
Once, I’ve approved the shipments, then I can begin to work on each shipment plan independently.
Lastly, we are taken to the Center Replenish Inventory page. This is how to get our goods from the freight forwarder’s distribution center to Amazon’s distribution center. You’ll notice here there are two main shipping methods: “Small parcel delivery (SPD)” and “Less than truckload (LTL).”
If it’s less than 30 cartons, you’re going to use SPD. If it’s greater than 30 cartons, then you can use LTL.
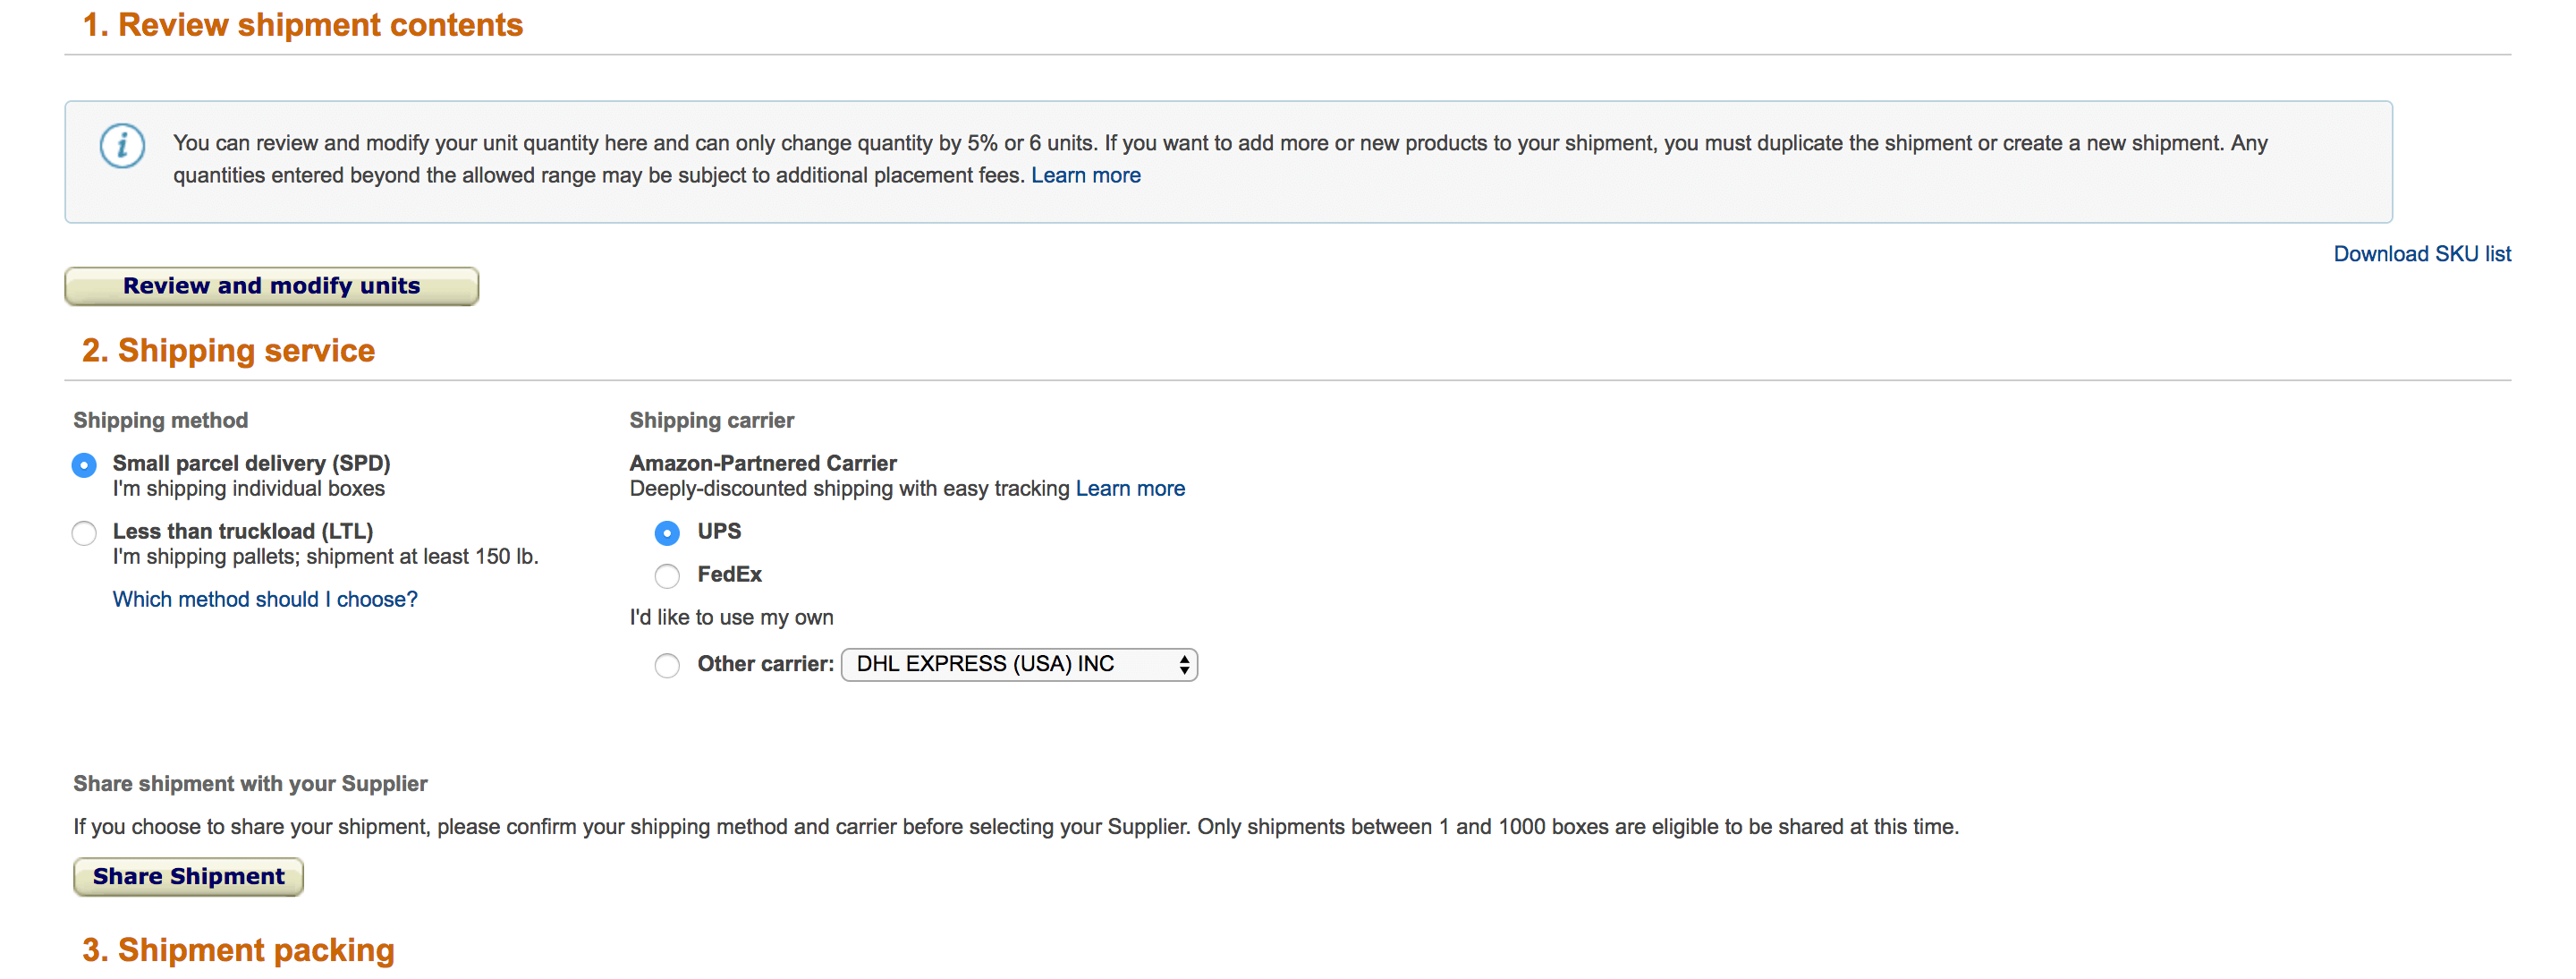
Selecting the Final Delivery Method
UPS:
- Select “Small Parcel Delivery (SPD)” and “UPS”
- Complete the “Shipment Packing” section by entering the units per box, the number of boxes, and the box weight
The estimated shipping cost will be in the “Shipping Charges” section. Then, you provide Amazon FBA carton labels to your freight forwarder.
Amazon LTL:
- Select “Less than truckload (LTL)” and “Amazon-Partnered Carrier”
- Complete the “Shipment Packing” section by entering the units per box and the number of boxes
- Input the following as estimate information:
- Dimensions: Use 48” x 40” x 62” (maximum height per Amazon requirements
- Weight: Divide the cargo weight by number of pallets
- Approximate pallet count: Divide the shipment’s volume (cbm) by 1.5
- Complete the “Shipping Charges” section and click “Calculate”
| Shipment Size | Delivery Method | Transit Time | Palletization | Things to Consider |
| SPD (Small Parcel Delivery) ≤ 30 cartons |
FedEx | Next business day to local area |
Not required | 200 carton limit per shipment ID Only UPS is available in Canada |
| LTL (Less than Truckload) > 30 cartons |
Amazon LTL | 2- 3 weeks from when goods are available for pick-up |
Flexport will palletize per Amazon’s specifications | 26 pallet limit Not available in Canada |
| FCL (Full Container Load) At least one container |
FCL Direct Delivery | Within 7 business days from when goods are available for pick-up | See “Setting up Flexport FCL” | All products must be assigned the same fulfillment center |
Your freight forwarder may be able to provide trucking services that are faster, although more expensive.
Packaging Your Goods
- Make sure your goods are wrapped or sturdily contained
- Wrapped in some sort of plastic or casing, so they aren’t covered in carton cardboard dust by the time they reach your customer
- Ensure the wrapped units are positioned in the master carton to minimize empty space
- Stuff padding in the cartons to fill up any space to prevent the units from bumping into each other and shifting in the carton
- Seal the cartons well so units will not shift out
- Make sure your master carton is structurally sound to support any extra weight and to protect it against mishandling
- Fill up any empty space in the master carton – you want the packaging, not your goods, to absorb any shock your shipment encounter
Palletizing
- If your cargo is fragile (think glass or electronics), palletize at origin to keep your cargo more secure
- If your cargo is not fragile, palletize cargo stateside, because pallets are heavy and will add a significant amount to your freight costs
Labeling
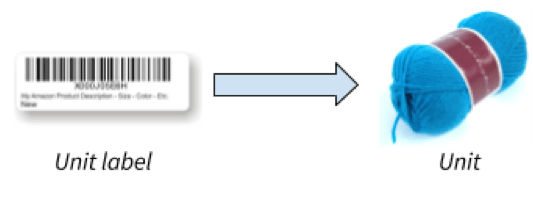
Ask your supplier to apply the unit labels (FNSKU) at their factory:
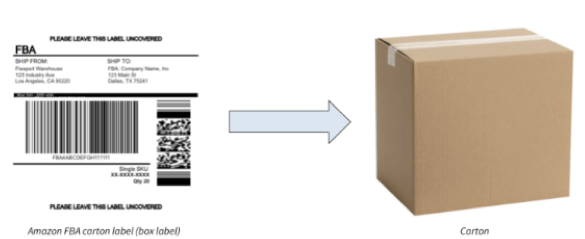
You generate the Amazon FBA carton labels in Amazon Seller Central:
If you’re using UPS or FedEx, each carton should also have a UPS/FedEx label, which is generated in Amazon Seller Central.
If you’re using Amazon’s LTL trucking service, pallet labels will be applied at the destination warehouse.
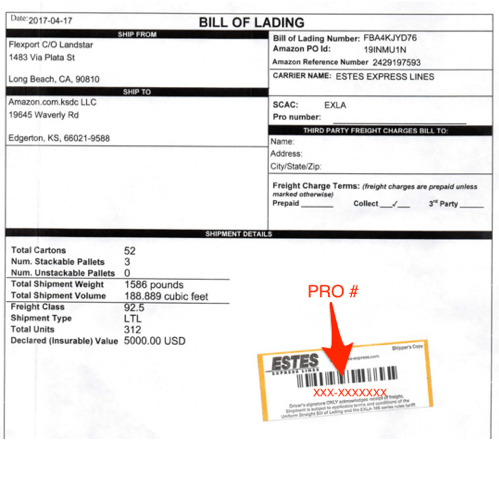
Tracking Your Shipment
- If you’re shipping to Amazon with UPS, you can track your shipment on Amazon Seller Central
- If you’re shipping to Amazon with Amazon LTL, you can track your shipment on the carrier’s website using the PRO# on the trucking bill of lading (B/L)
How Long Does It Take to Ship from China?
Incoterms
- You and your supplier set incoterms
- 11 incoterms, but the most common are FOB and EXW
- FOB (Free on Board) – The supplier is responsible for getting your goods from the factory to the port. This cost is added to manufacturing cost.
- EXW (Ex Works) – The freight forwarder is responsible for getting your goods from the factory to the port.
Cargo Insurance
- Always buy freight insurance because:
- 50% of freight claims are denied by carriers
- Your cargo will pass through many hands and places before it gets to you, increasing the chances of damage
- If damage or loss occurs, carriers will do their best to limit their liability or avoid it altogether, even if they are at fault
- Cargo insurance will cover your shipment from pickup to delivery, across multiple carriers and modes, and it covers the value of your goods as well as what you have paid for freight and other costs associated with the cargo
Shipment Documents
-
Telex release – an email sent from the point of origin to the destination port that allows the carrier at destination to release your cargo without presentation of the original bill of lading
- Eliminates the need for an original bill of lading to be presented at the destination for the release of the goods
-
Bill of lading – the ticket that outlines the journey of your cargo from origin to its destination
- The carrier issues a set of three original bills of lading, one of which must be endorsed by the consignee and physically mailed to the receiver of the goods so they can obtain the cargo at destination
-
Commercial Invoice:
- Needed to clear shipment through U.S. Customs
- Needs to contain:
- Country of origin/manufacture
- Full name and address of Importer of Record
- Full name and address of supplier/manufacturer
- Complete description of merchandise in English
- Quantity of units for each product
- Unit value of each product, including currency declaration
- Total extended value, including currency declaration
-
Packing List:
- Information must match what is listed on the commercial invoice
Getting Through Customs
- Give your freight forwarder the commercial invoice, packing list, and/or product information
- Be as accurate and detailed as possible so your customs broker can correctly classify your goods to help avoid holds at Customs
- Customs select shipments at random to undergo Customs exams, but you can minimize your risk by making sure that your paperwork matches up perfectly with your shipment
Peak Season
- Expect high, volatile rates, rolled cargo (cargo is moved to a later shipment due to a lack of space on the scheduled carrier), trucking delays, and other interruptions
- Plan ahead
- Book carriers early and expect to need more time to load/unload at origin and destination because of congested ports and warehouses
- Book shipments 7-10 days before they are ready at your supplier
- Prepare for extra fees as a result of congestion
- Trucking wait fees
- Chassis shortages
- CFS (container freight station) fee
- Pickup and Delivery fees
Shipping, in a Nutshell
Here’s an easy to follow step-by-step rundown of how this process should go for you, the seller:
- Find a freight forwarder and get set up with them ready for your first shipment
- Create a shipping plan in Seller Central on Amazon
- Notify your freight forwarder of the approximate date the goods will be ready and get a quote
- The freight forwarder then communicates with a representative at your factory to get the goods on the vessel
- It takes a few weeks for the shipment to arrive via ocean freight
- Then your freight forwarder will unload the container and palletize your products for Amazon
- A truck will pick up your pallets and take them to the Amazon distribution center
So realistically, you will pay your freight forwarder to handle all of the difficult parts for you. The key is to ensure you have a good relationship with them, communicate frequently, and be flexible in case they need any information from your or your supplier.
EXCLUSIVE Jungle Scout Discount from Flexport
If you’re in the market for a freight forwarder I would highly recommend you give Flexport a shot. I have been using them for some time now and I must say they make this whole process of getting my goods to Amazon a sinch. PLUS, we have negotiated a special rate for our Million Dollar Case Study viewers. Check them out:
Get $300 off your first Flexport shipment!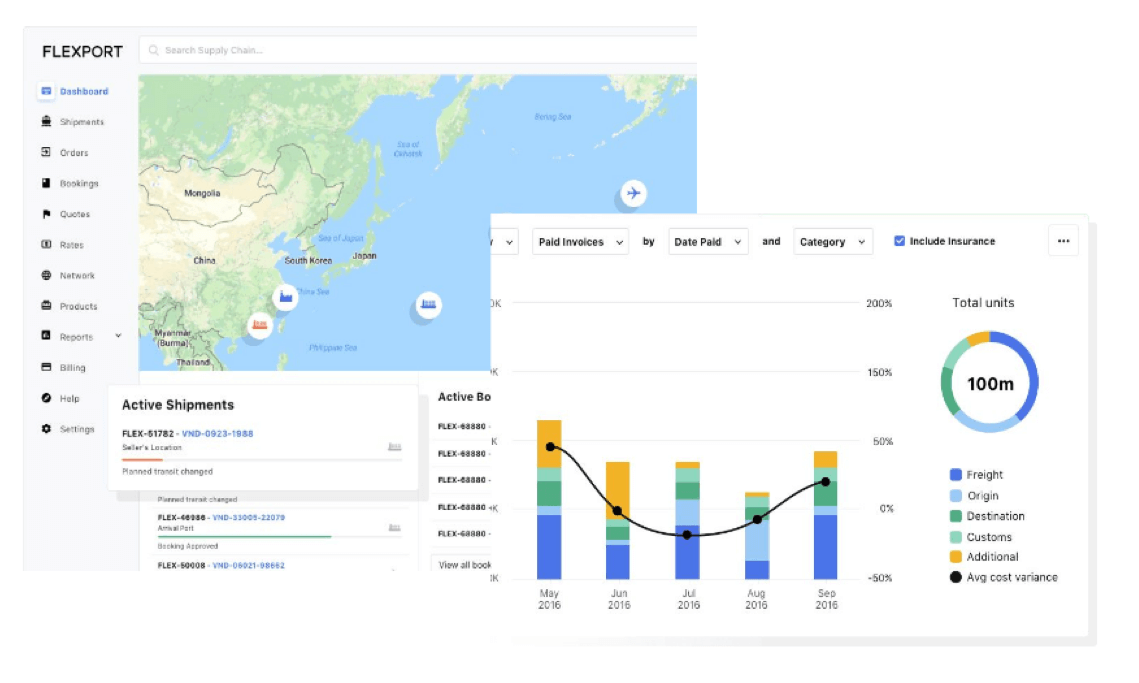
Start doing some research of your own! Every week, we’ll be giving you your Action Items and Weekly Workbook and exclusive hacks to make the most of your MDCS journey.
Get your FREE MDCS Workbook HERE!
After you’ve completed the Action Items found in the Workbook, post your progress in the Million Dollar Case Study Facebook Group! You don’t have to reveal all of your best ideas – just let us know you’re working on them! You can also post them to Instagram with the hashtags #mdcschallenge or #freedombuilders.
Here’s what you could be eligible to win at the end of the MDCS! We’ll be drawing for names and the more photos you post and share as the weeks go on, the more chances you get.

We donate 100% of our product proceeds to Pencils of Promise.
They build schools in developing countries to help children get access to the education they need for a strong foundation.
We love doing the Million Dollar Case Study. It’s a team-wide effort and we value every opportunity it gives us to connect with sellers like you.